

MPU_FIVE
-
Posts
728 -
Joined
-
Last visited
-
Days Won
4
Content Type
Profiles
Forums
Gallery
Downloads
Articles
Posts posted by MPU_FIVE
-
-
2 hours ago, woodsy said:
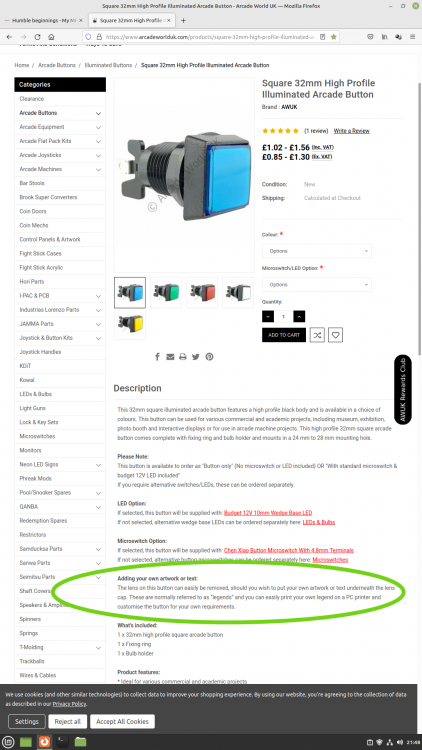
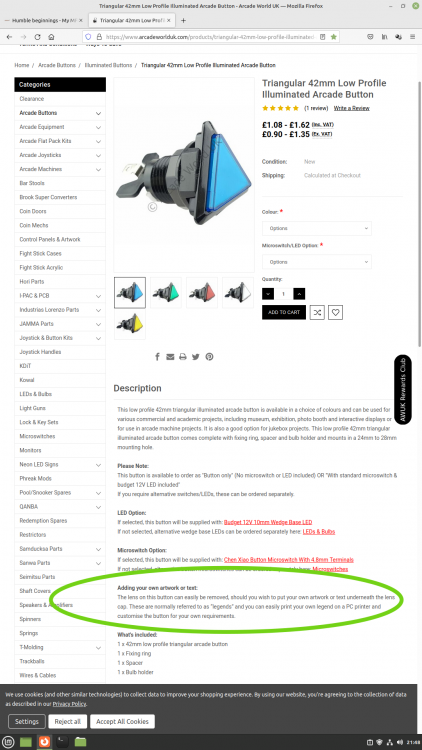
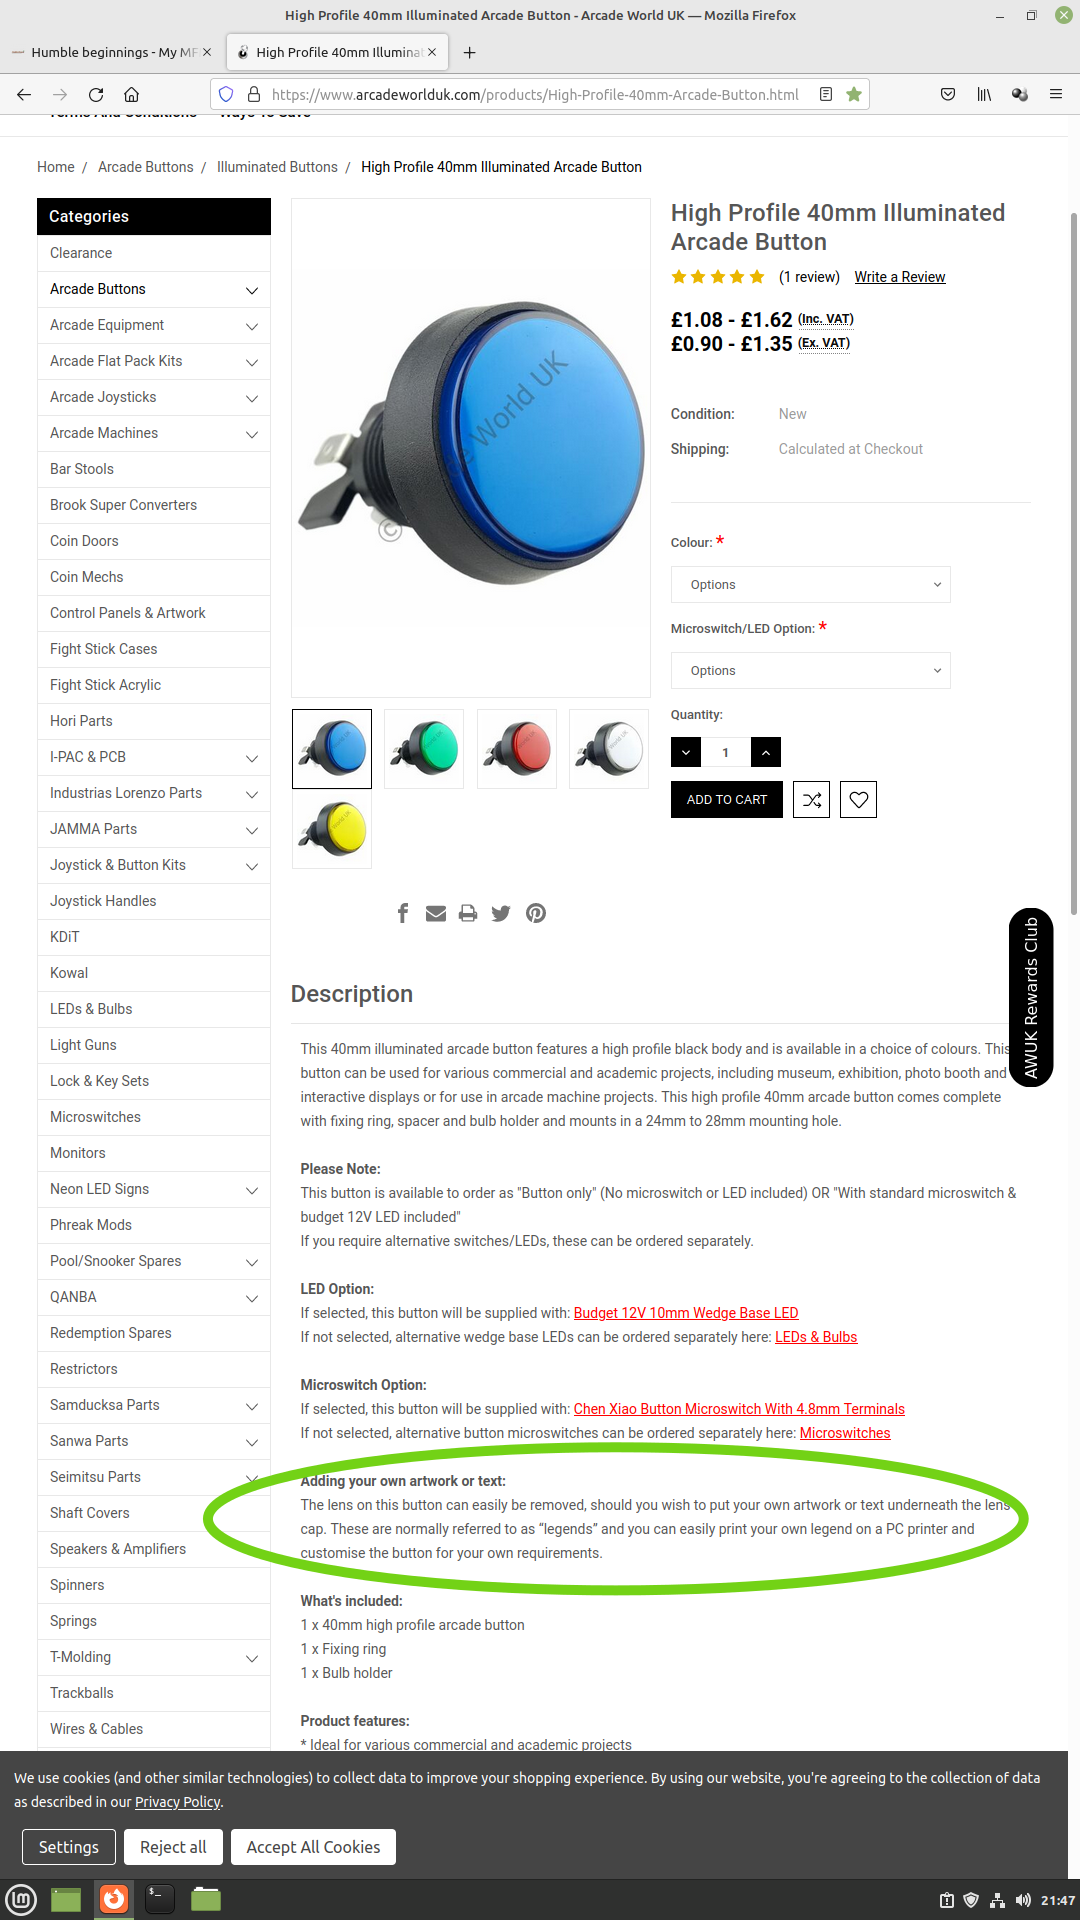
can i ask, is each button clear plastic with a colour insert behind it kinda like a quality street wrapper, because my dream is to put my own insert pic in them not the colours
if you get my meaning. thanks bud
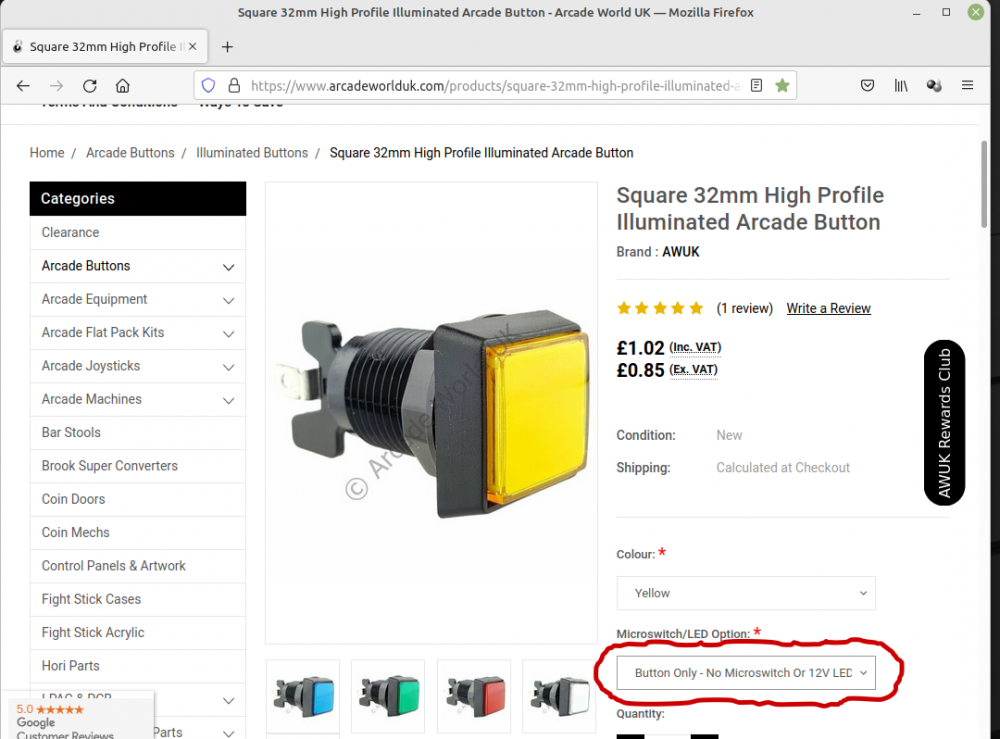
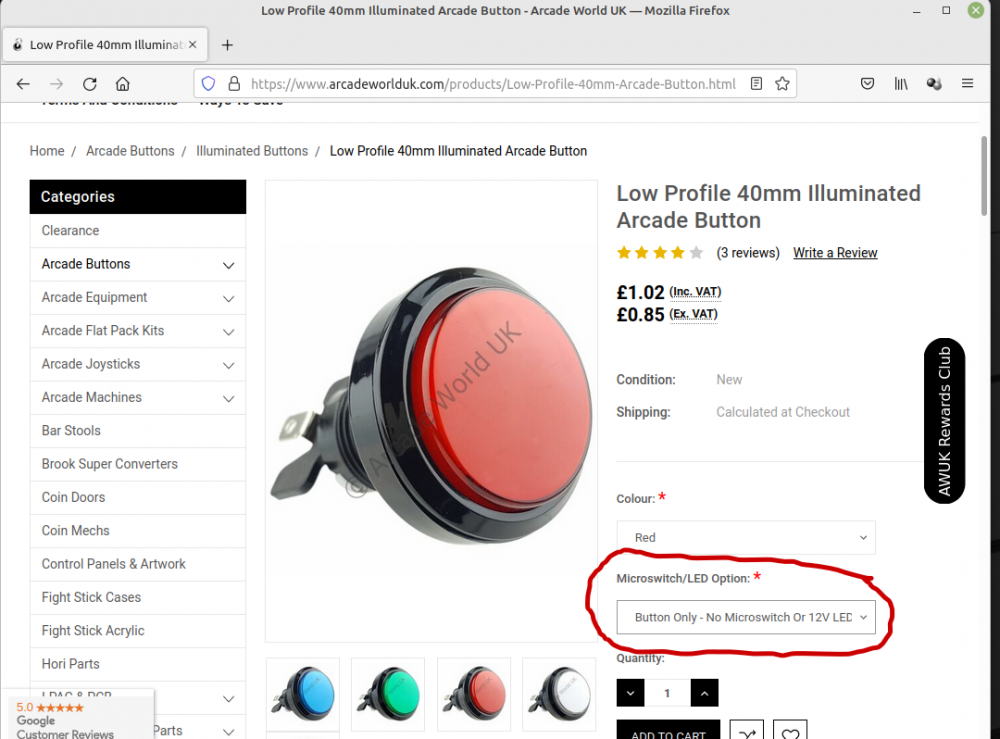
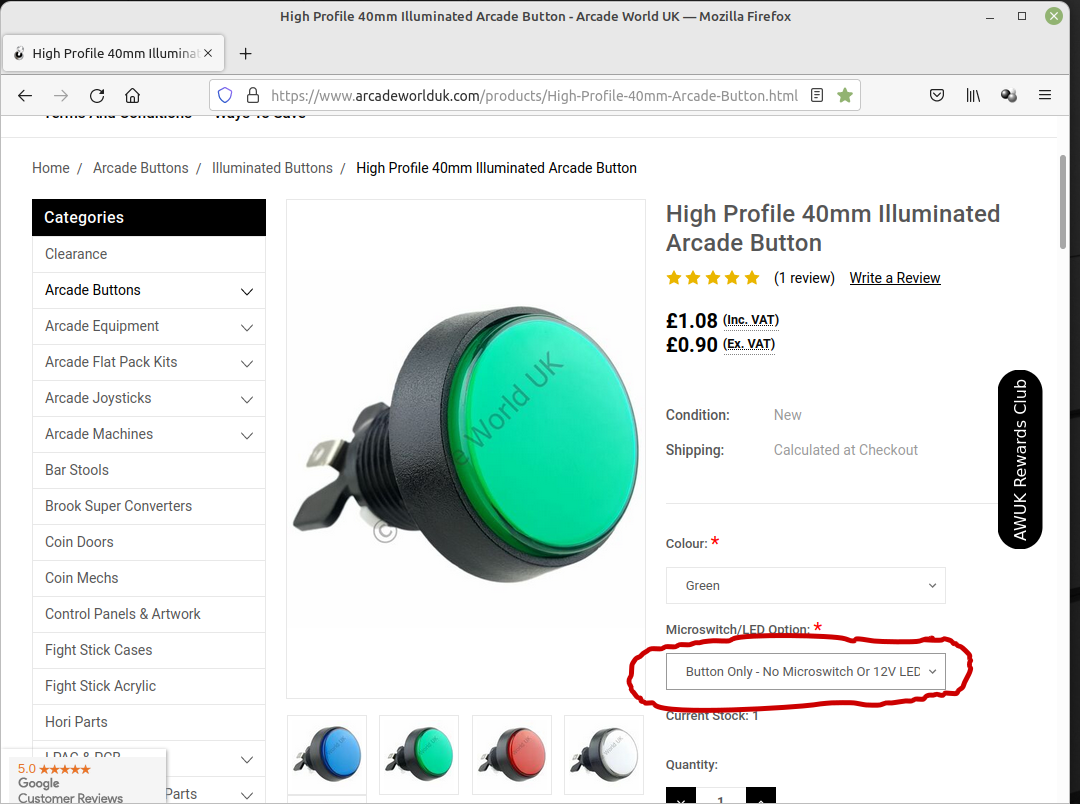
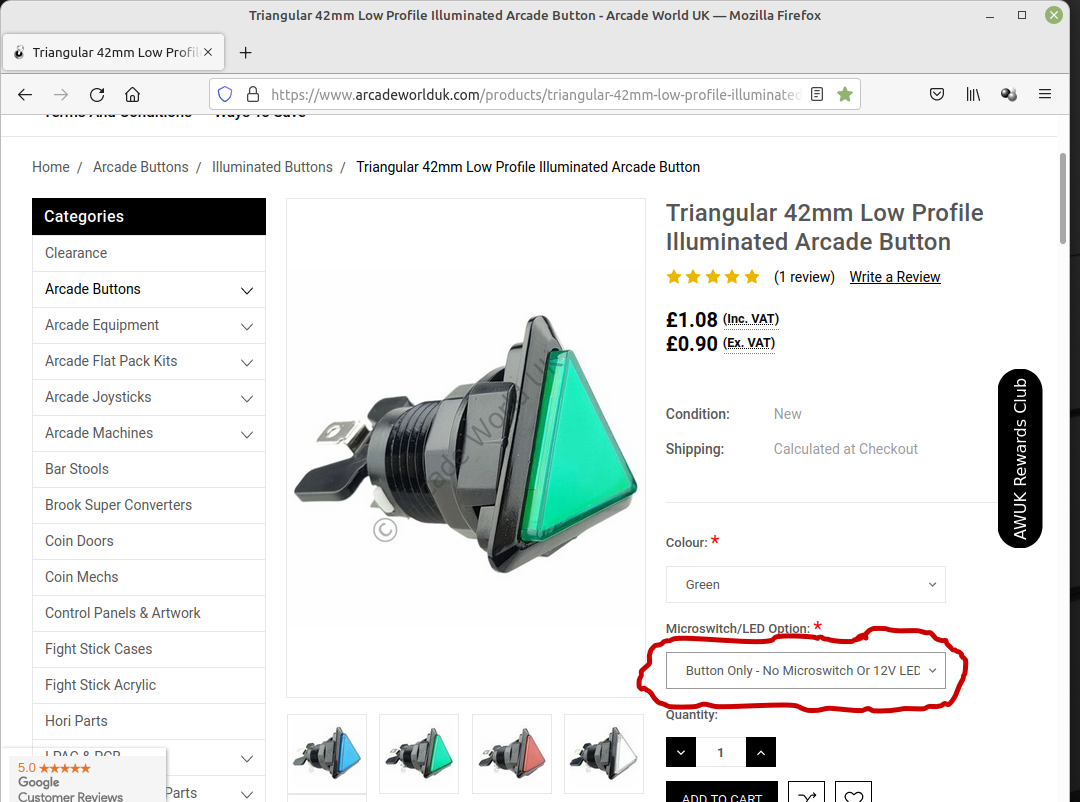
@woodsyThe plastic is coloured but the lens can be easily removed to place your own "legends" inside the buttons...
I screenied the round, square and triangle buttons from arcade world's website and highlighted where it says about it so you can see for yourself in these pics....
Hope that helps matey! :)

-
2 hours ago, davep180 said:
Yep. That's how it works. The each way shifter has probably been set up with letters set up using the button numbers, and you change letters according to lamp numbers. Locate the button number with the corresponding lamp number, and change them. Lamps will be changed in the ipac config section and the button number letters can be changed in the component list.
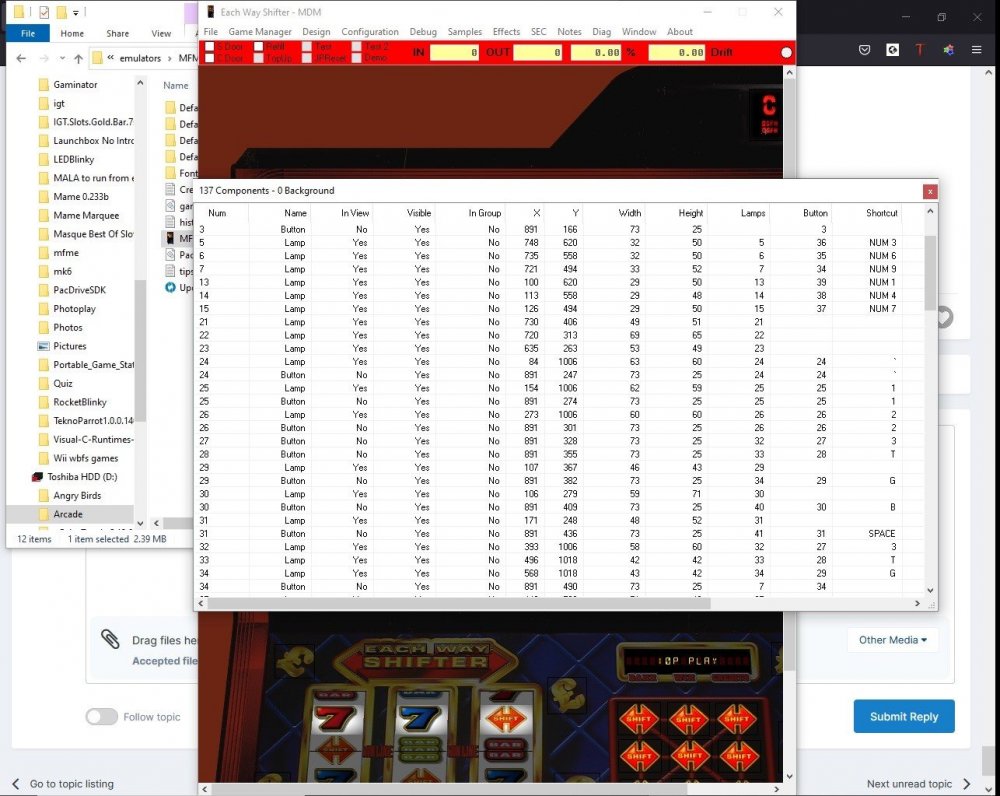
Here, letter G is both Button 29 and Lamp 34. In config, it will change the lamp part, but you'll have to find the button part in the component list, click properties and change that too.
Hope that makes sense.
Thank you for your brilliant tips... @davep180
I will give them a go when i've signed off here for the night...
Cheers! :)
-
I think the only thing that'll bug me about the keyboard in terms of appearance will be the fact that the triangle keys will not have smooth edges to them as they are low profile buttons with a spacer so have a "catchy edge" to them... I could of sunk them in to be low profile i suppose but the amount of space the key has to grip to the wooden panel is literally just the 3 corners of the triangle (with a large triangle hole beneath it) which i don't think i want to do... i could make (who am i kidding - get brother to make) a wooden "high profile" triangular surround for each button i guess - or maybe look into how much it would cost to get a 3D printing firm to fabricate me 4 triangle plastic button edges. hmmm
-
1 minute ago, davep180 said:
I hope you get it sorted. You'll find the machines are a lot of fun when you have your buttons up and running!
4 minutes ago, woodsy said:holy MOLEY. it looks good, but as dave knows i'm not that good at wiring and working out the techy stuff, but it looks awesome..
do you have to rearrange the lamp buttons for each layout or can you default one or more as in make button 1 the space bar by default and 1,2,3 cancel etc be auto assigned to same buttons on your keyboard/button thingy.. ?? i guess that would be helpful eh
As far as I understand it, you come up with a keyboard layout that you "set in stone" when you define the keys using the I-Pac2 software.
So as an example, going by my set up, the blue square key is always going to be button D
The layout for Jewel in the Crown i believe had K set for the blue button (for Knockouts), so you edit the layout and change from K to D and click apply to set it...
While in edit mode, you'd hover the mouse arrow over that blue "knockouts" button on the layout and it will show in a white box the lamp number associated with that button, you'd go into the Pacdrive settings of MFME for that layout (Jewel in the crown in this case ) and set the Pacdrive button 12 in my case to the lamp number that you just discovered... so lamp 18 in this case... see pic :)... (circled in green)
.thumb.png.3a2ae1d1ca7b7ce480c992cd3cba2885.png)
(2).thumb.png.b7dc9603f3111744e91282e31d20d399.png)
.thumb.png.bc0c3016a4eba6e8887a023c788c9573.png)
-
7 minutes ago, davep180 said:
In design/edit mode, there is a component list. Some of the older layouts use the button numbers for key assignment, rather than the lamp numbers. you can change them in properties from there.
Ahhh, cheers, I will try that, @davep180
")
Hopefully it will fix that layout as it's one of my favourite mid tech machines ole Each way shifter!
-
 1
1
-
-
MFME Keyboard.... the journey so far,
My brother sent a video of him painting the MFME Keyboard last night, I should be picking it up tomorrow and then the wiring can begin!
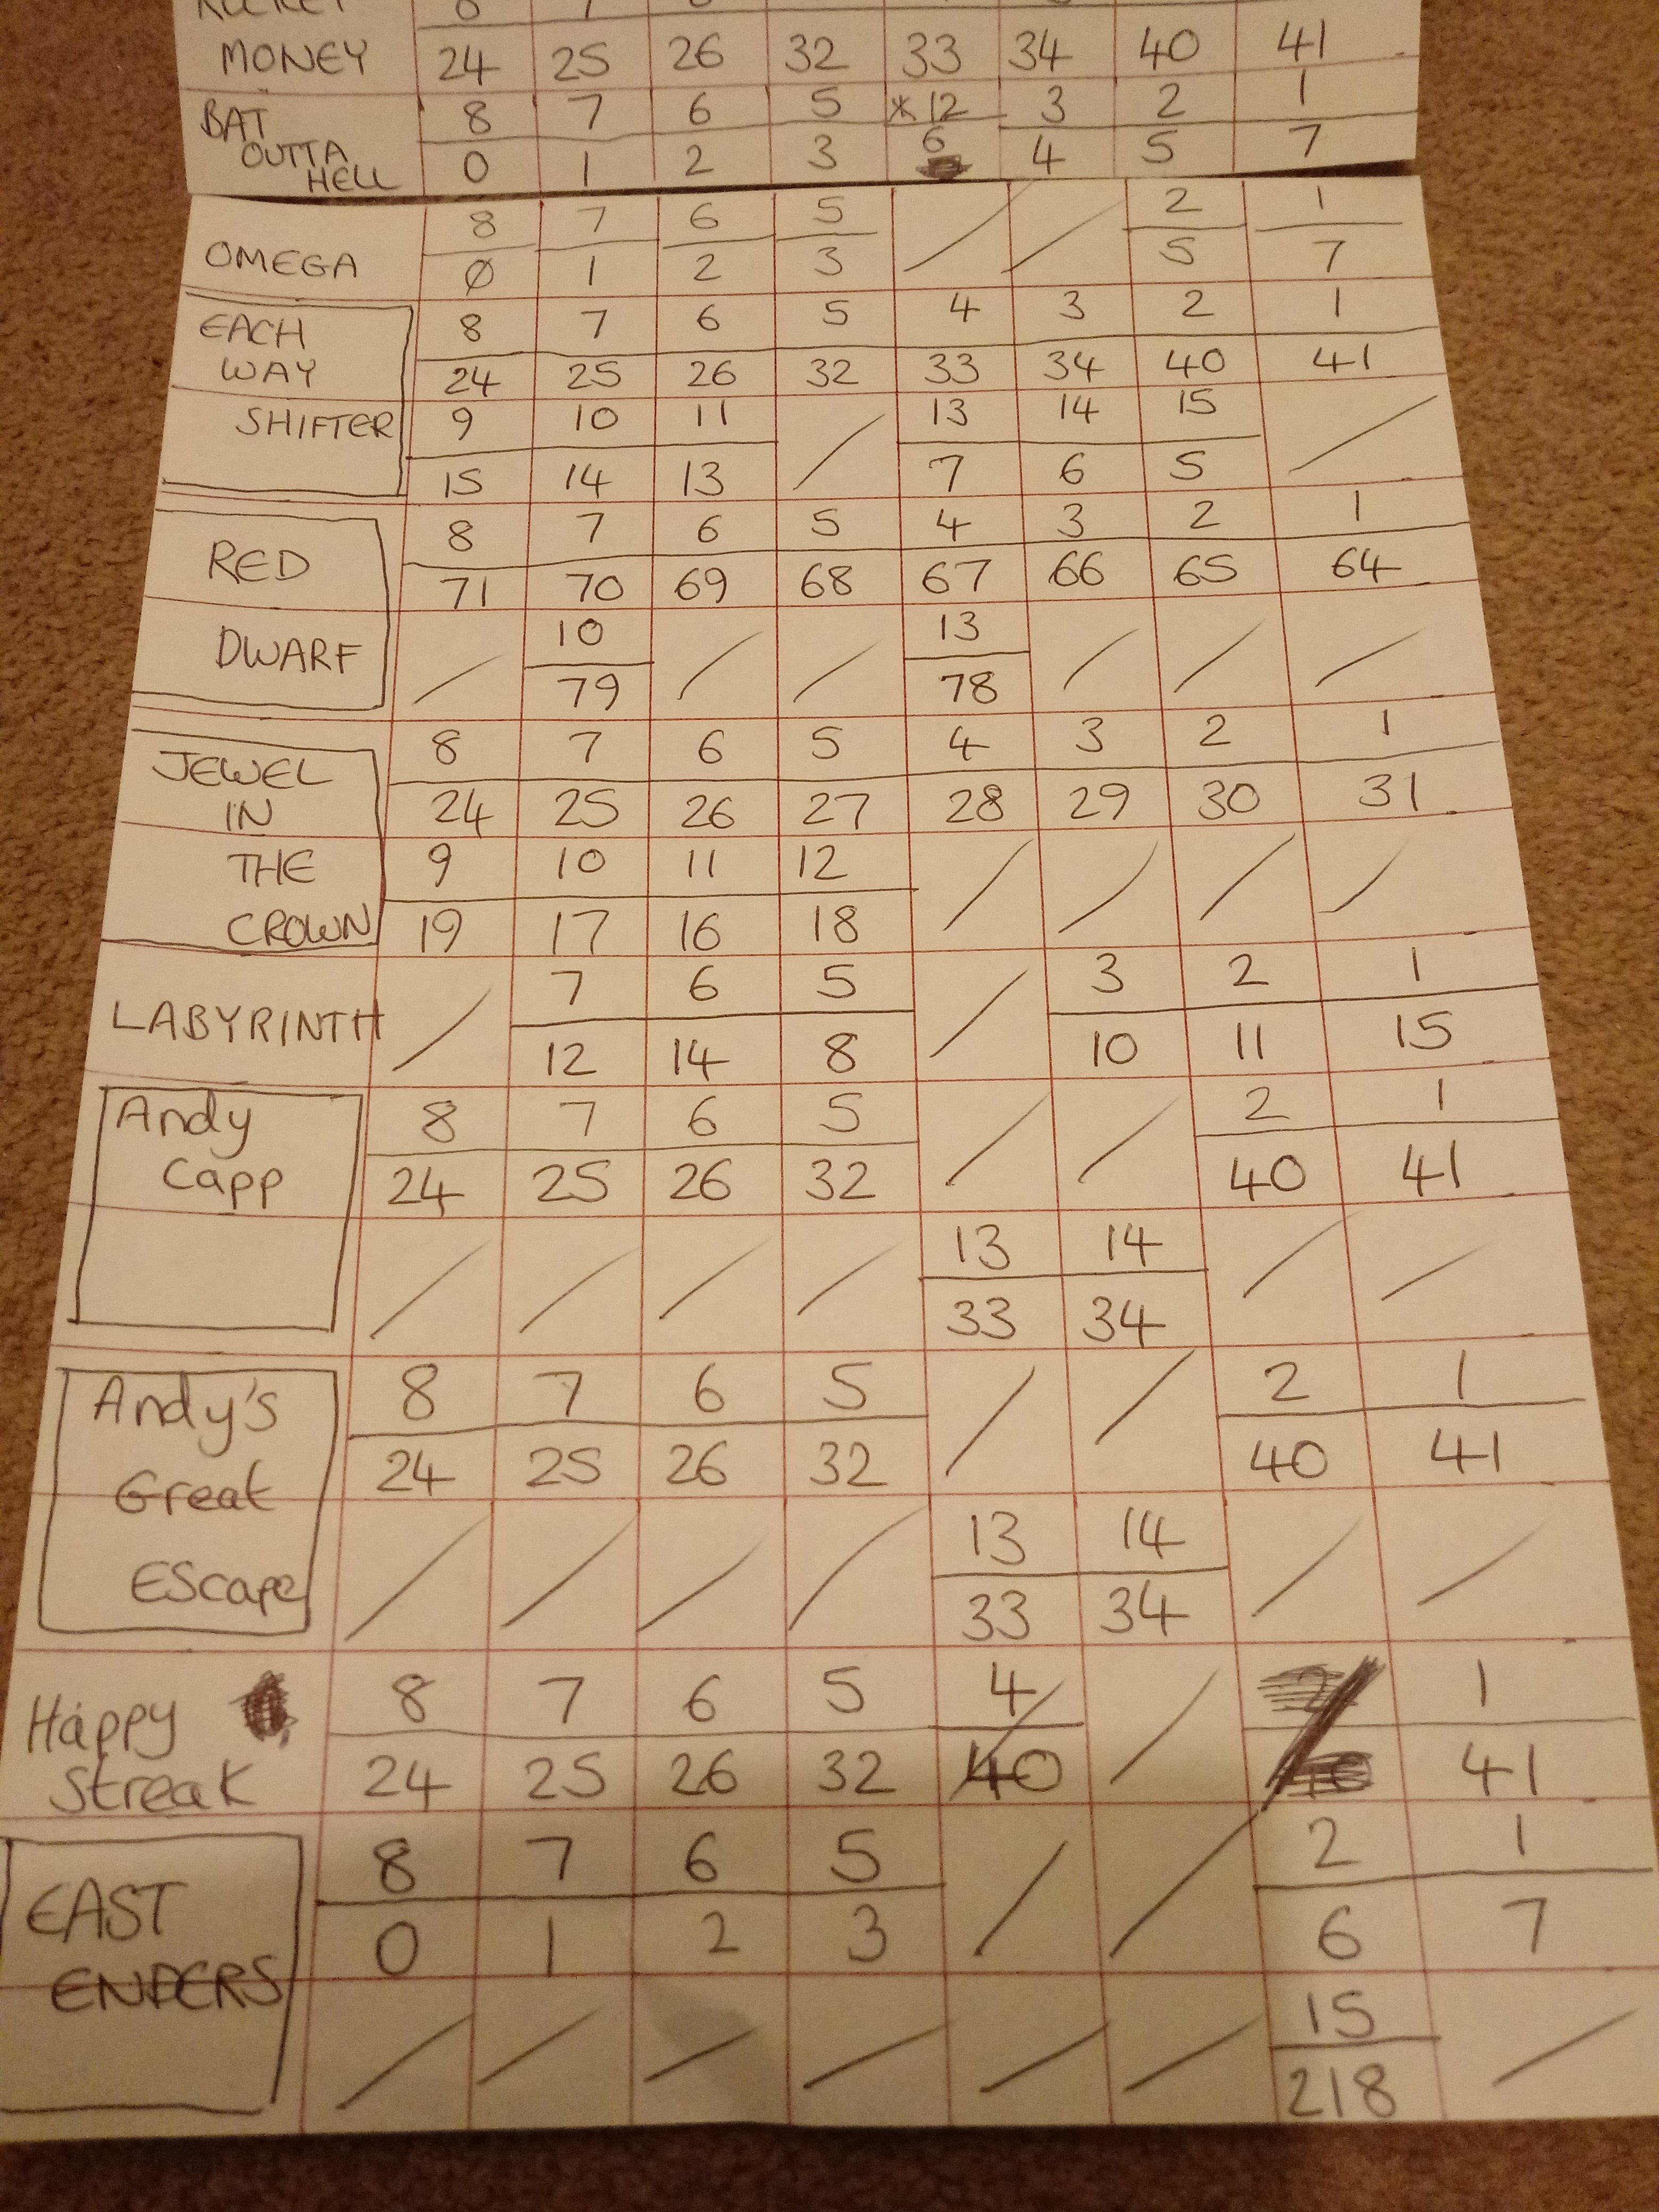
I have been converting a few layouts, ready to play when the keyboard is completed. There are some pictures of the I-Pac2 keyboard layout i have chosen, and a PacDrive lamp layout i have on screen to refer to when changing the keys.
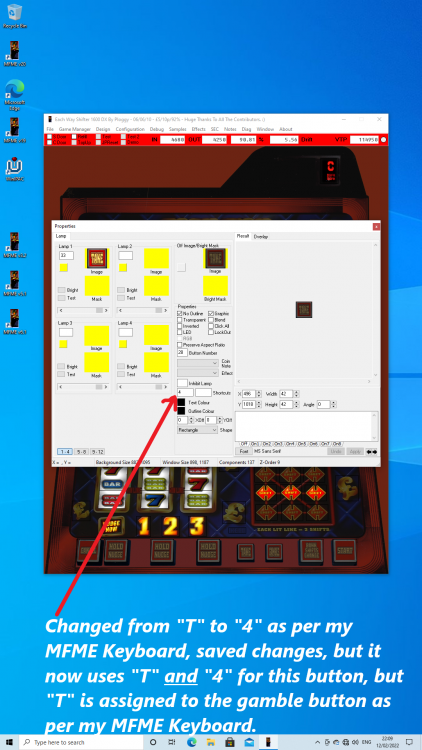
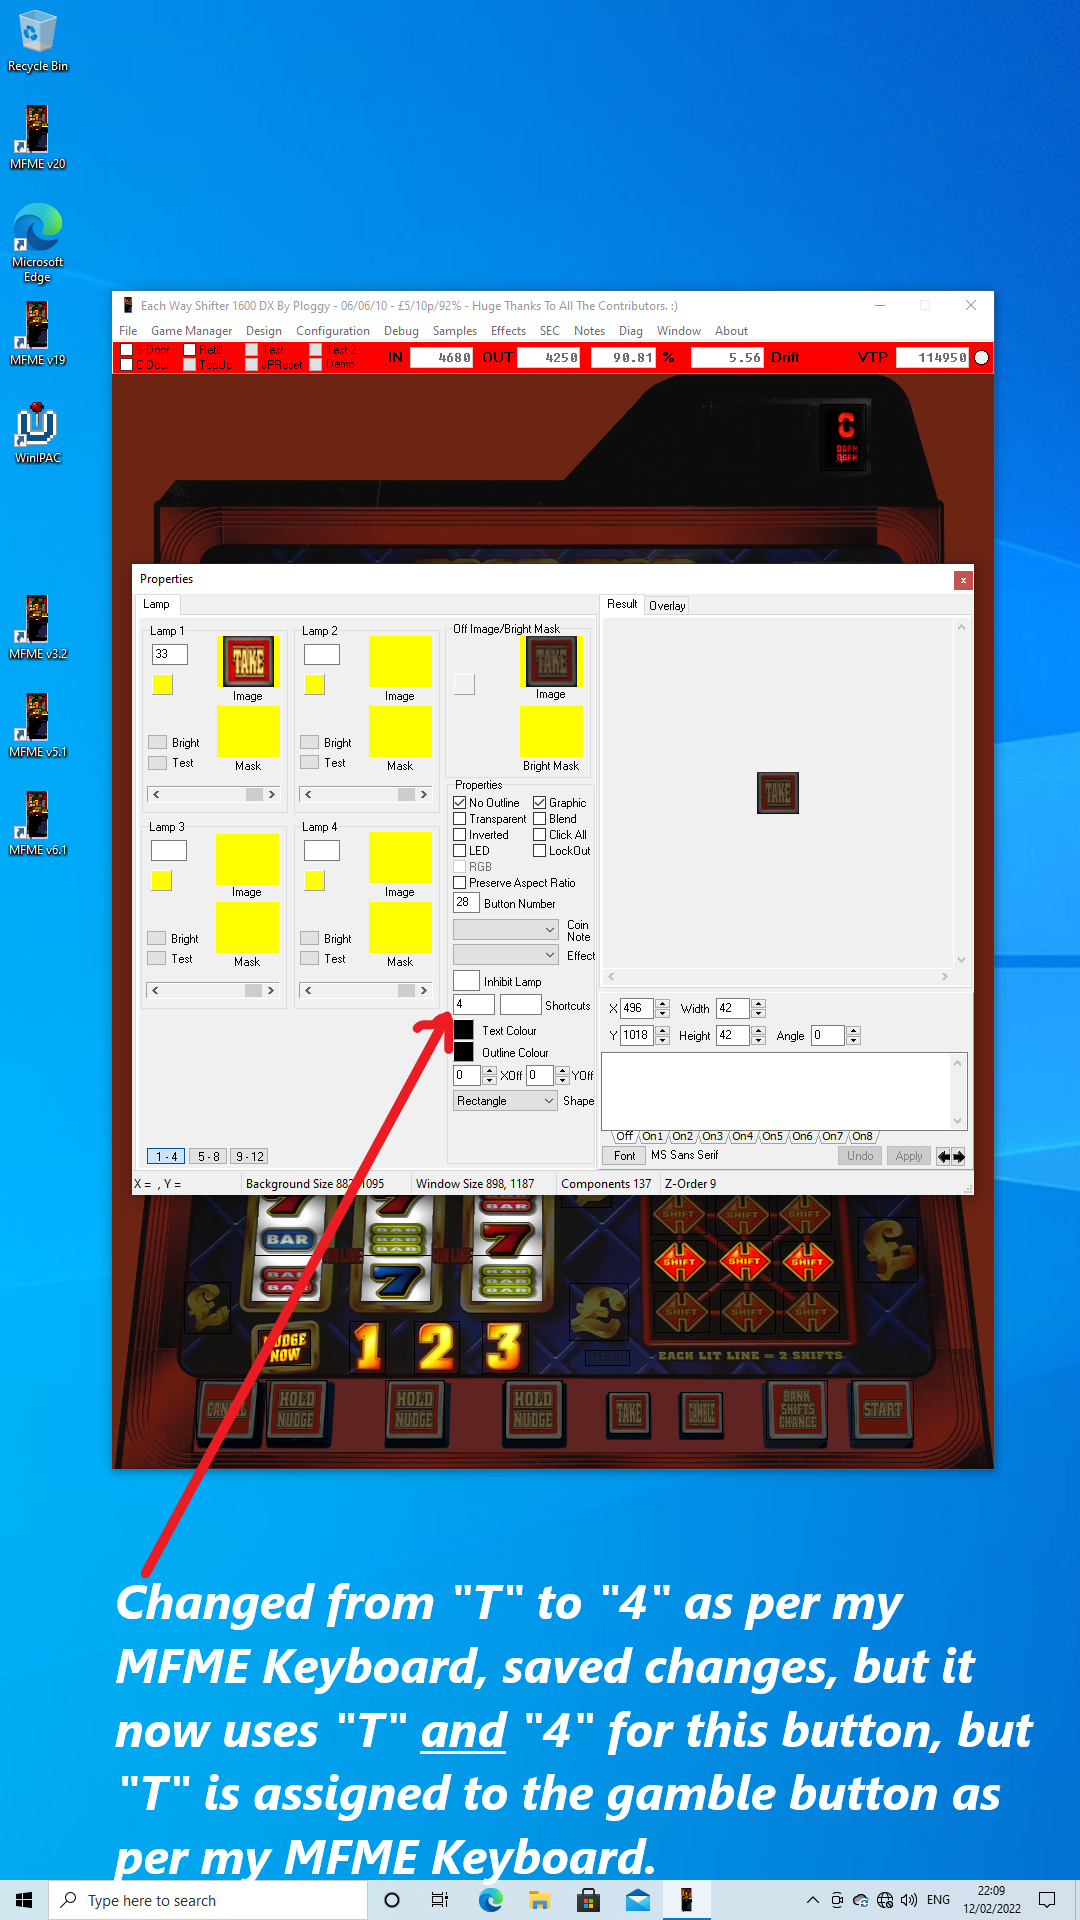
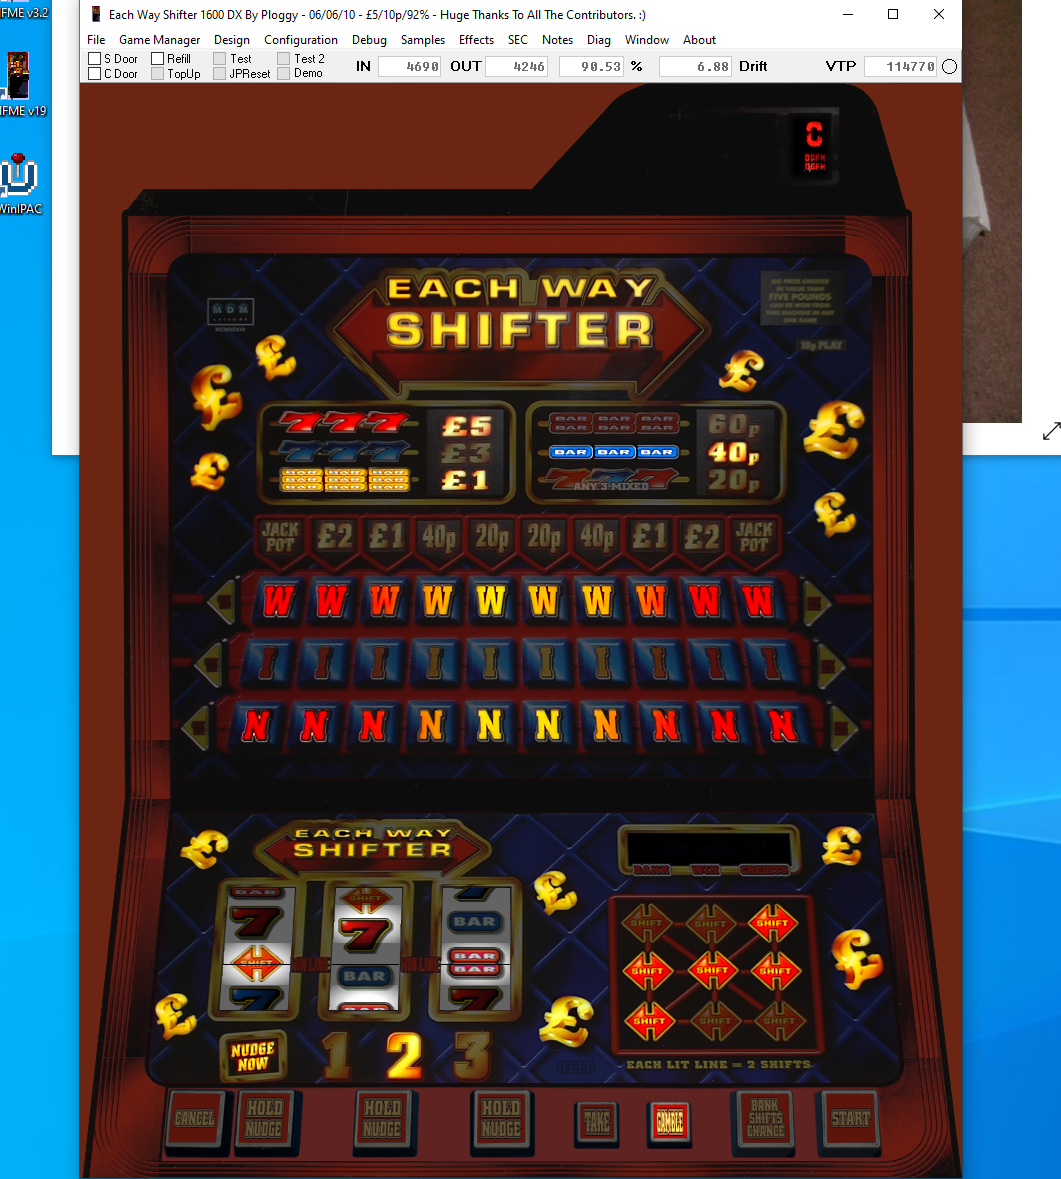
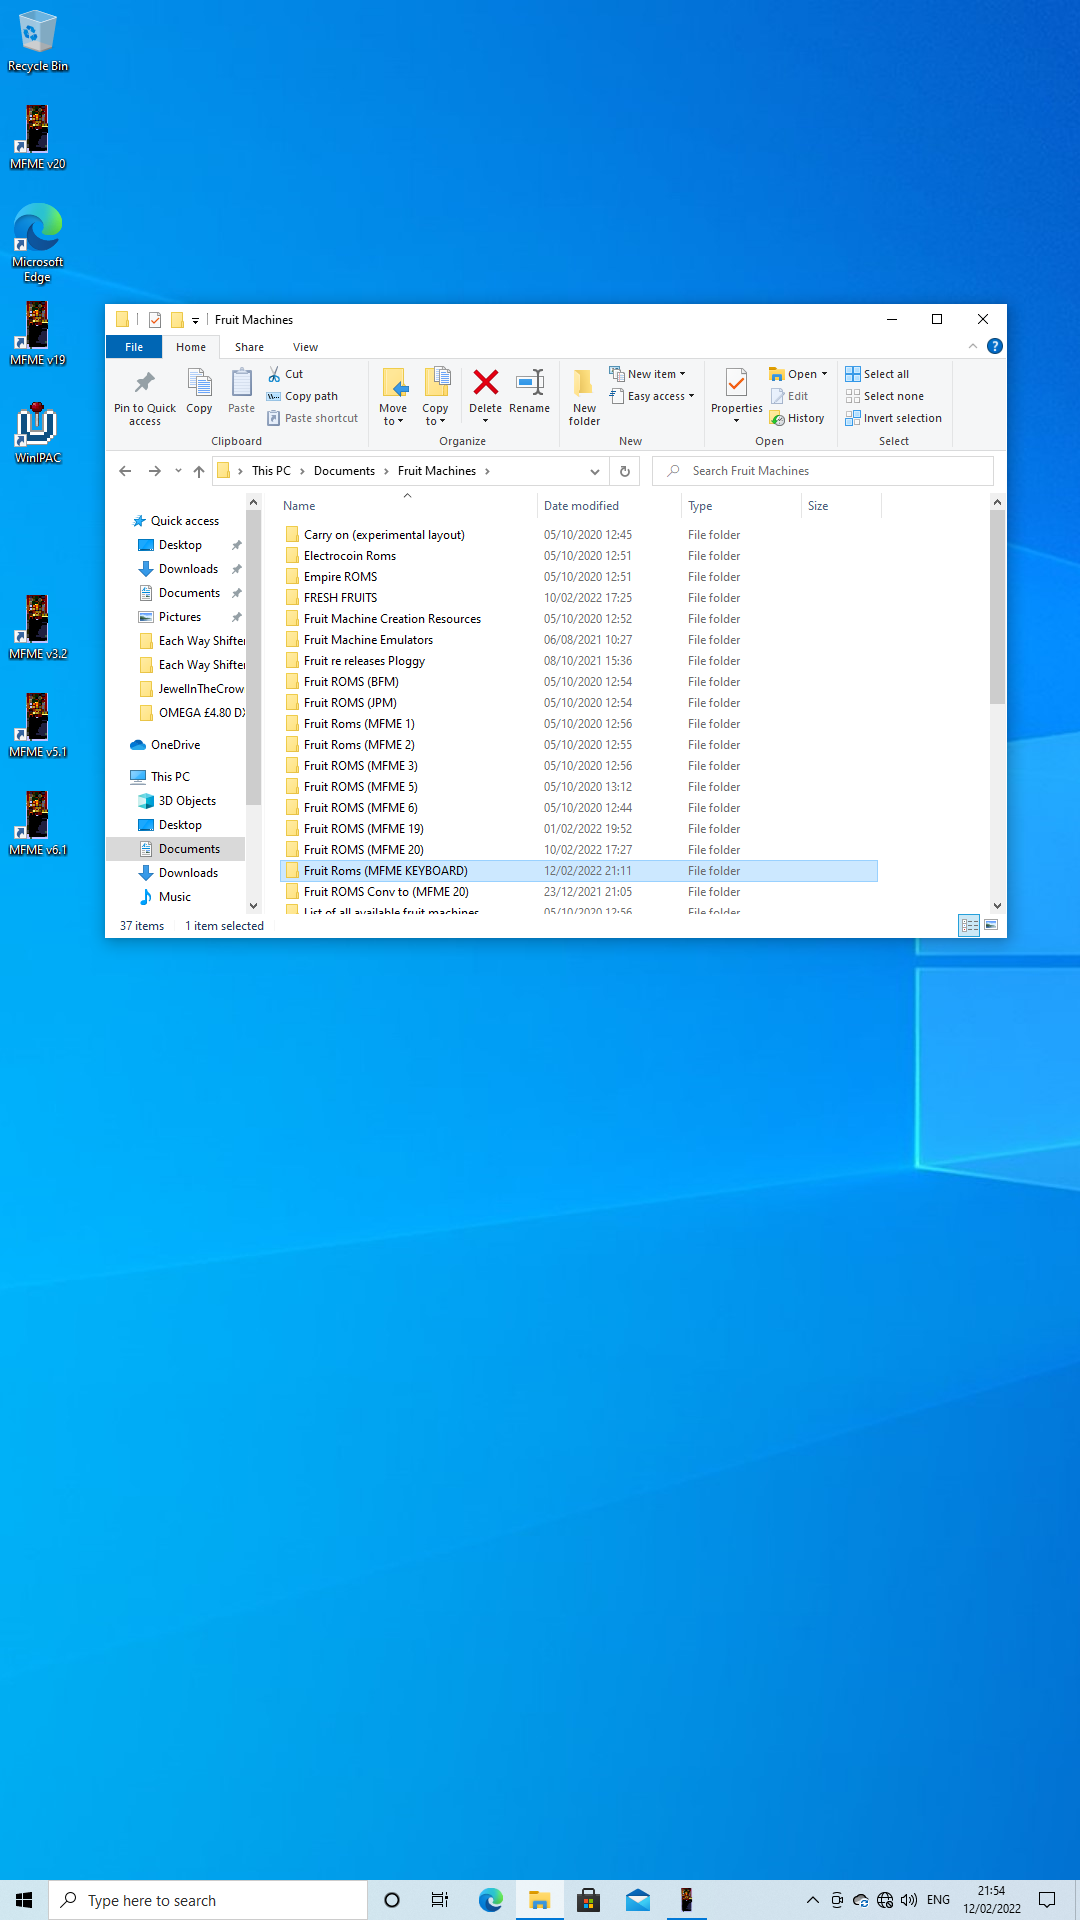
I was a bit (confused dot com) on one or two layouts that i was configuring, as although they let me change the key for a button, they also retained the key they were originally set to, for example, Each way shifter by Ploggy, I changed the "TAKE" button from "T" to "4" as per my MFME Keyboard, saved changes, but it now uses "T" and "4" for this button, but "T" is assigned to the gamble button as per my MFME keyboard, so when i press the "GAMBLE" button (assigned to "T") it collects instead because it thinks i've pressed the "TAKE" button... I did wonder if it may be because i have the same machine in another folder on my computer (but then ALL should suffer like this because they ALL already exist in another folder) - probably due to the way i keep things, as in a picture below there is a screenshot of my folders - over the years as each emulator came out i would have layouts for that specific version of the emulator in it.
Fruit Roms (MFME 1),
Fruit Roms (MFME 2),
Fruit Roms (MFME 3),
Fruit Roms (MFME S4 & MPU5), - the leaked one that caused chaos in FME land (aka 9.4, 9.9 and 10.1a)
Fruit Roms (MFME 5),
Fruit Roms (MFME 6),
Fruit Roms (MFME 19),
Fruit Roms (MFME 20),
and a new folder i have made specifically for layouts converted to the forthcoming MFME Keyboard -
Fruit Roms (MFME Keyboard)
Although really perhaps i should keep it simple and just go through all i already have and change the keys on them without creating new copies for the MFME Keyboard... - crumbs reading that back i've confused myself! oh well - onward we go -
I also include a short video of how i change a key on a layout, and how i find the lamp number which corresponds to that key, for anyone that does't know... I hope at least that won't confuse anyone! I kept that short and sweet - although filmed on my camera as i can't screen record as Windows 10 doesn't think my computer is up to spec to do it on the game bar... (I have a DELL XPS 420 from 2007) - i really must do some overtime at work and save up for a new one...
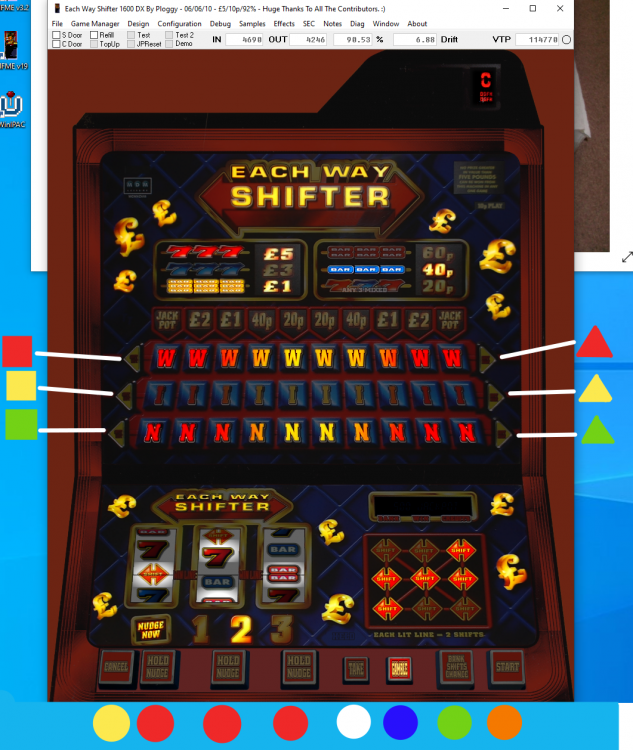
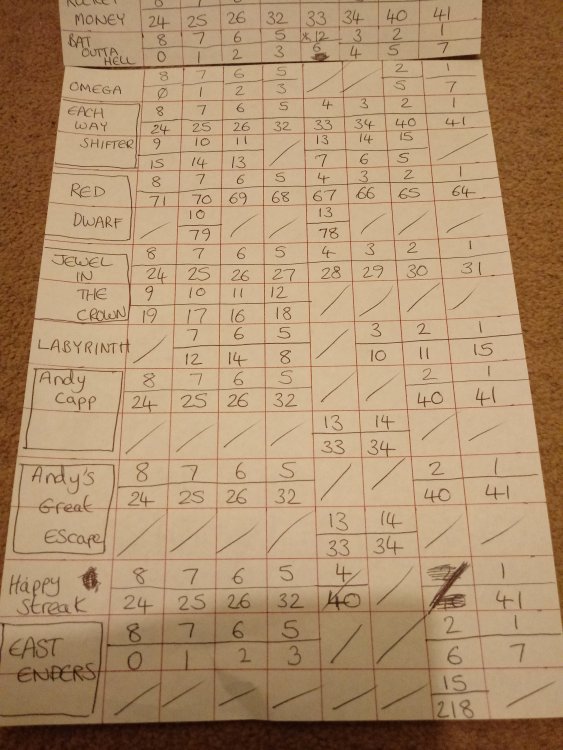
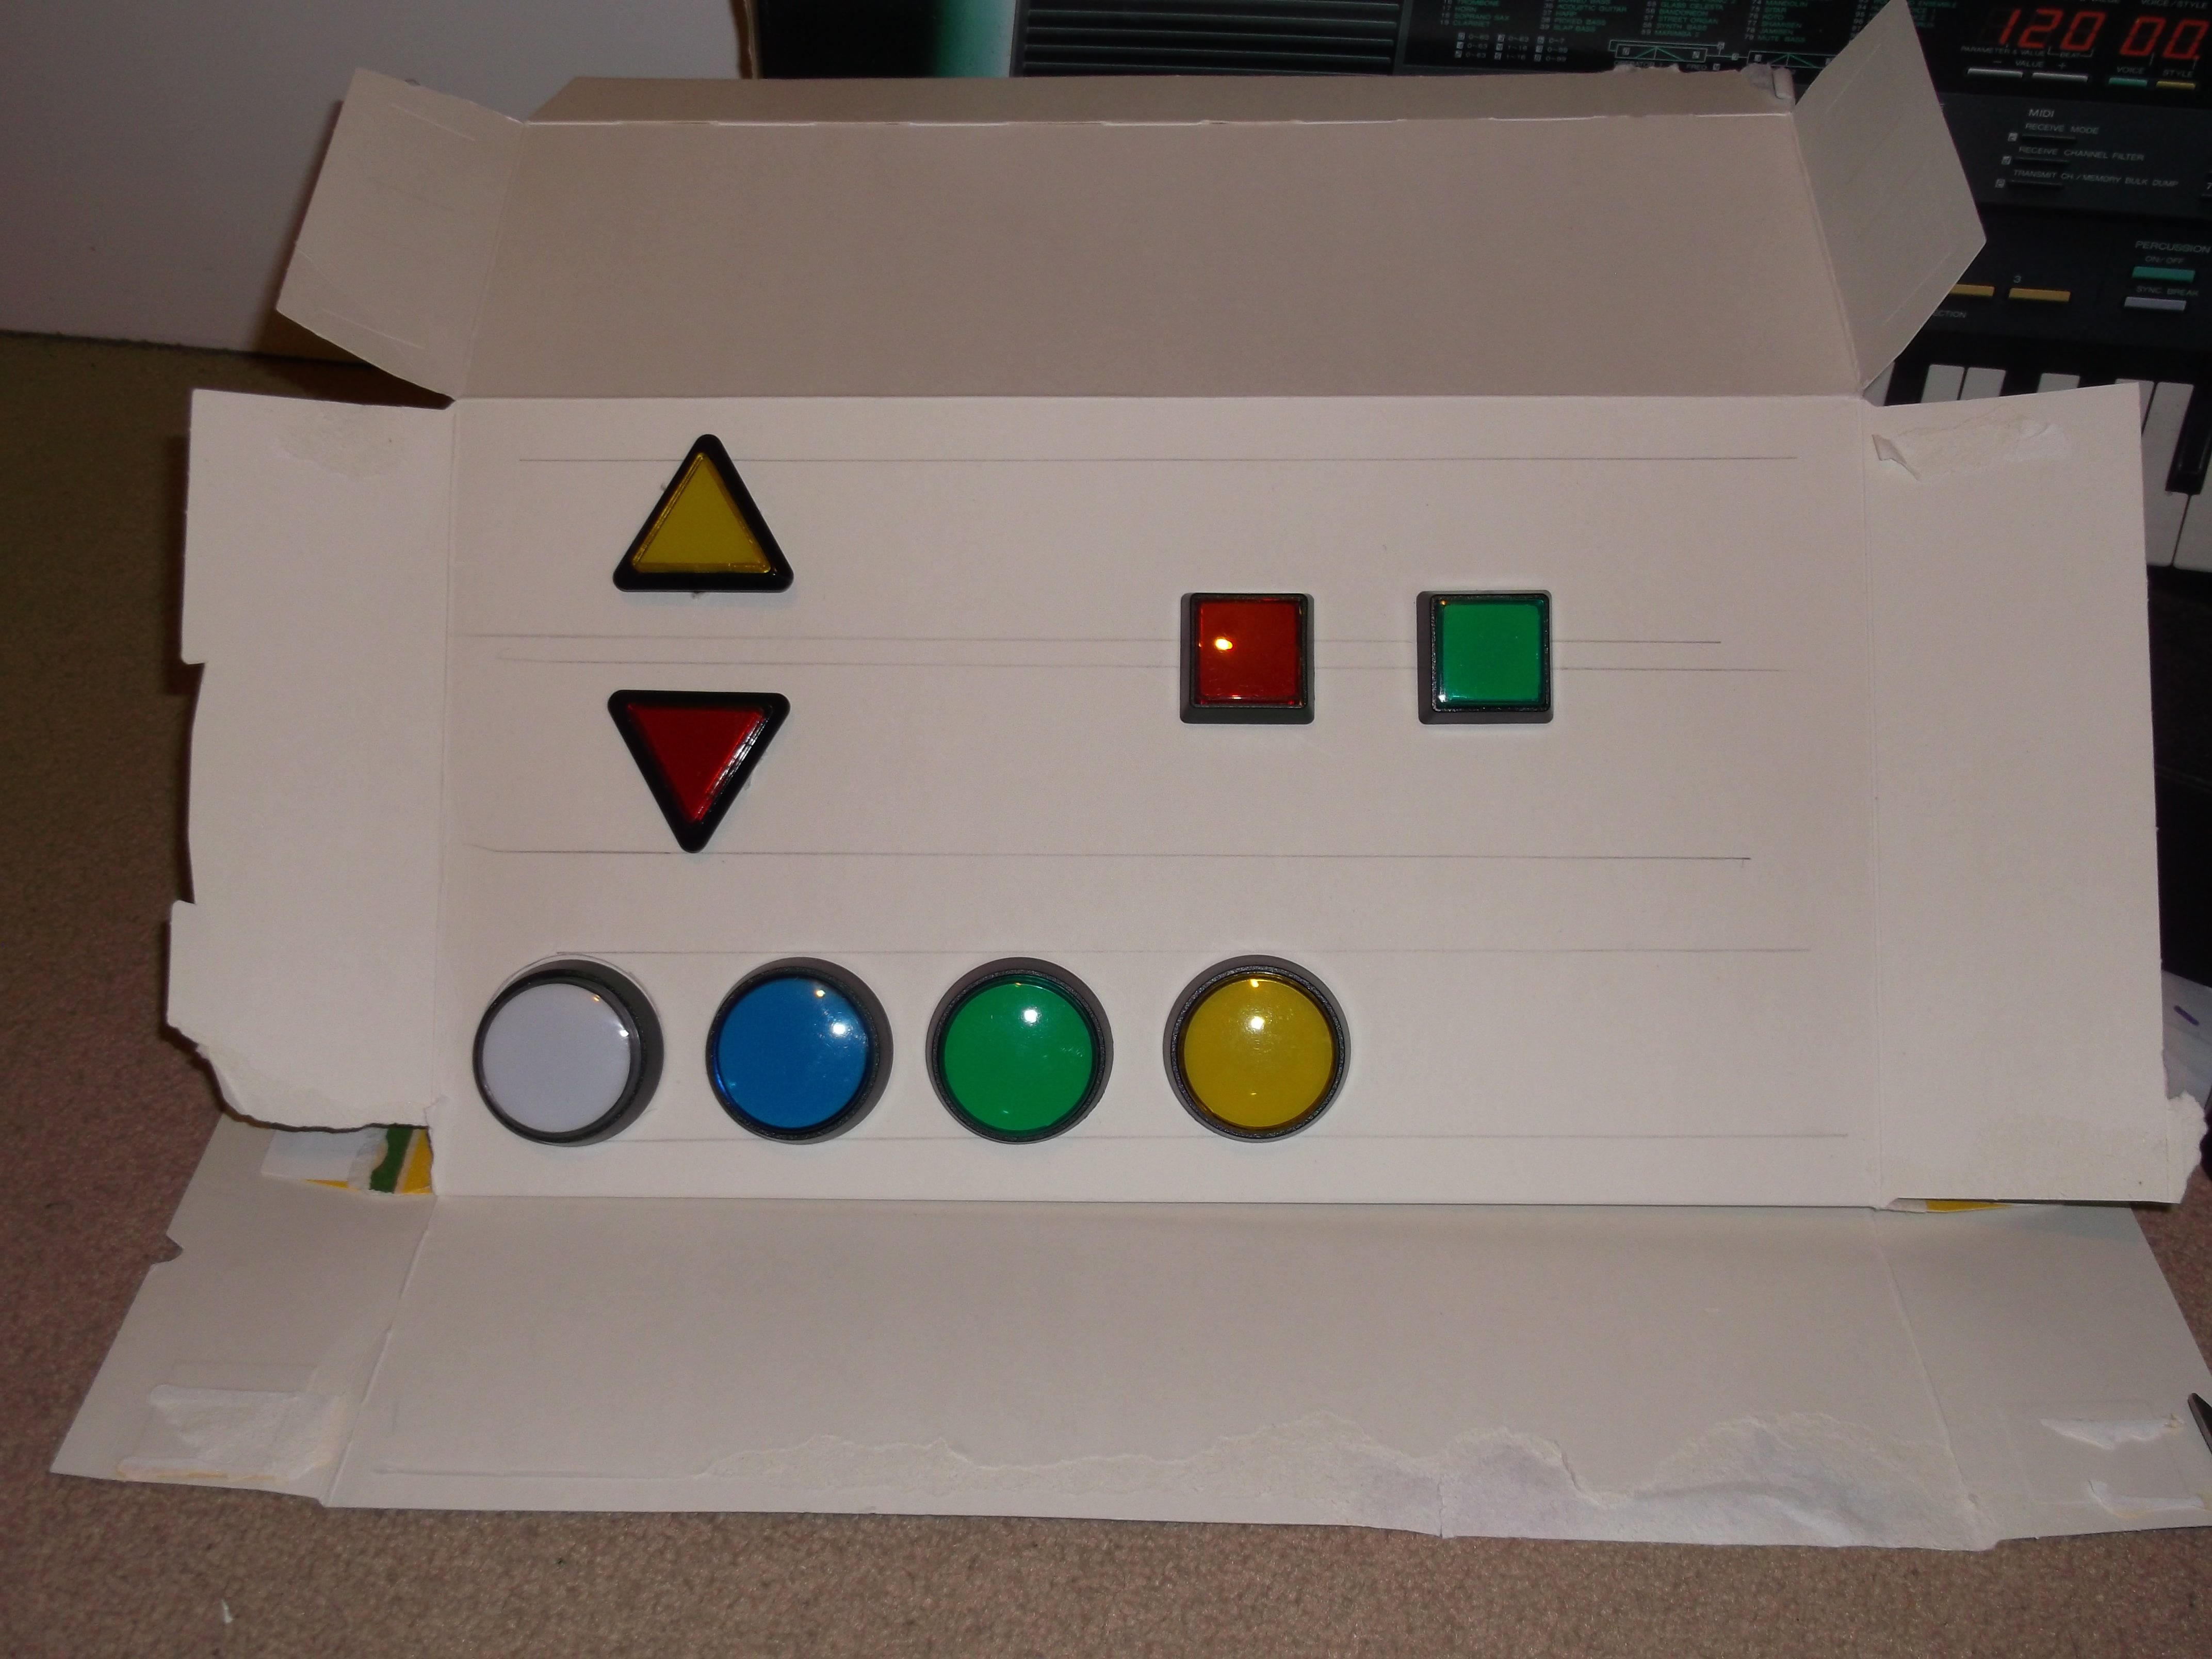
One way i have of making use of the buttons more intuative can be seen on the Each way shifter layout, (where it has 6 direction keys - 3 to the left, 3 to the right to move the light to make the word "WIN" on the board.) My thinking was traffic lights...
RED for TOP
YELLOW for MIDDLE
GREEN for BOTTOM
...and then it's quite easy to use the square and triangle buttons related to said direction keys!
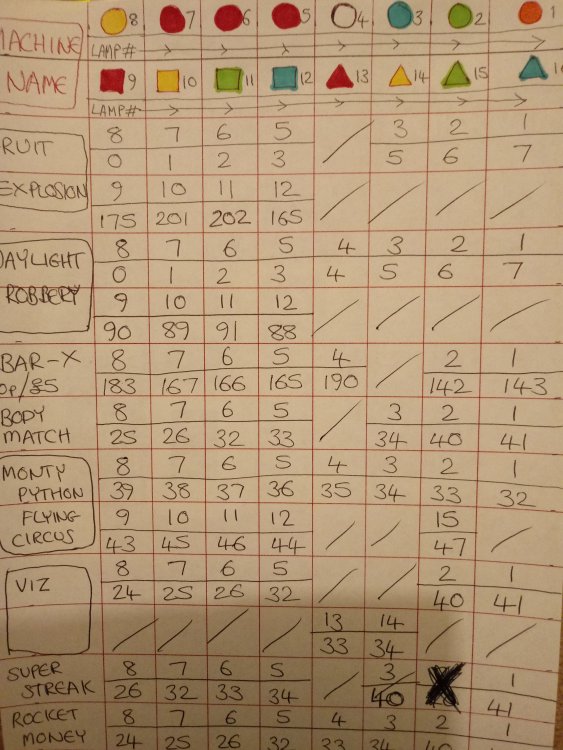
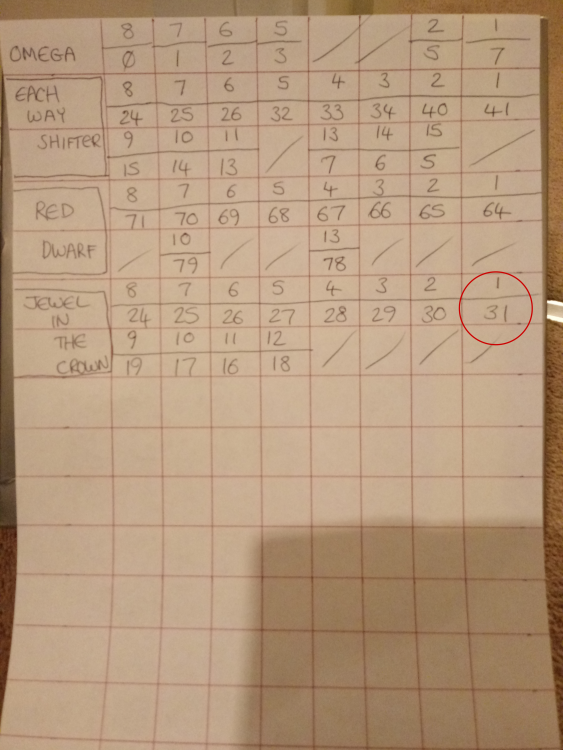
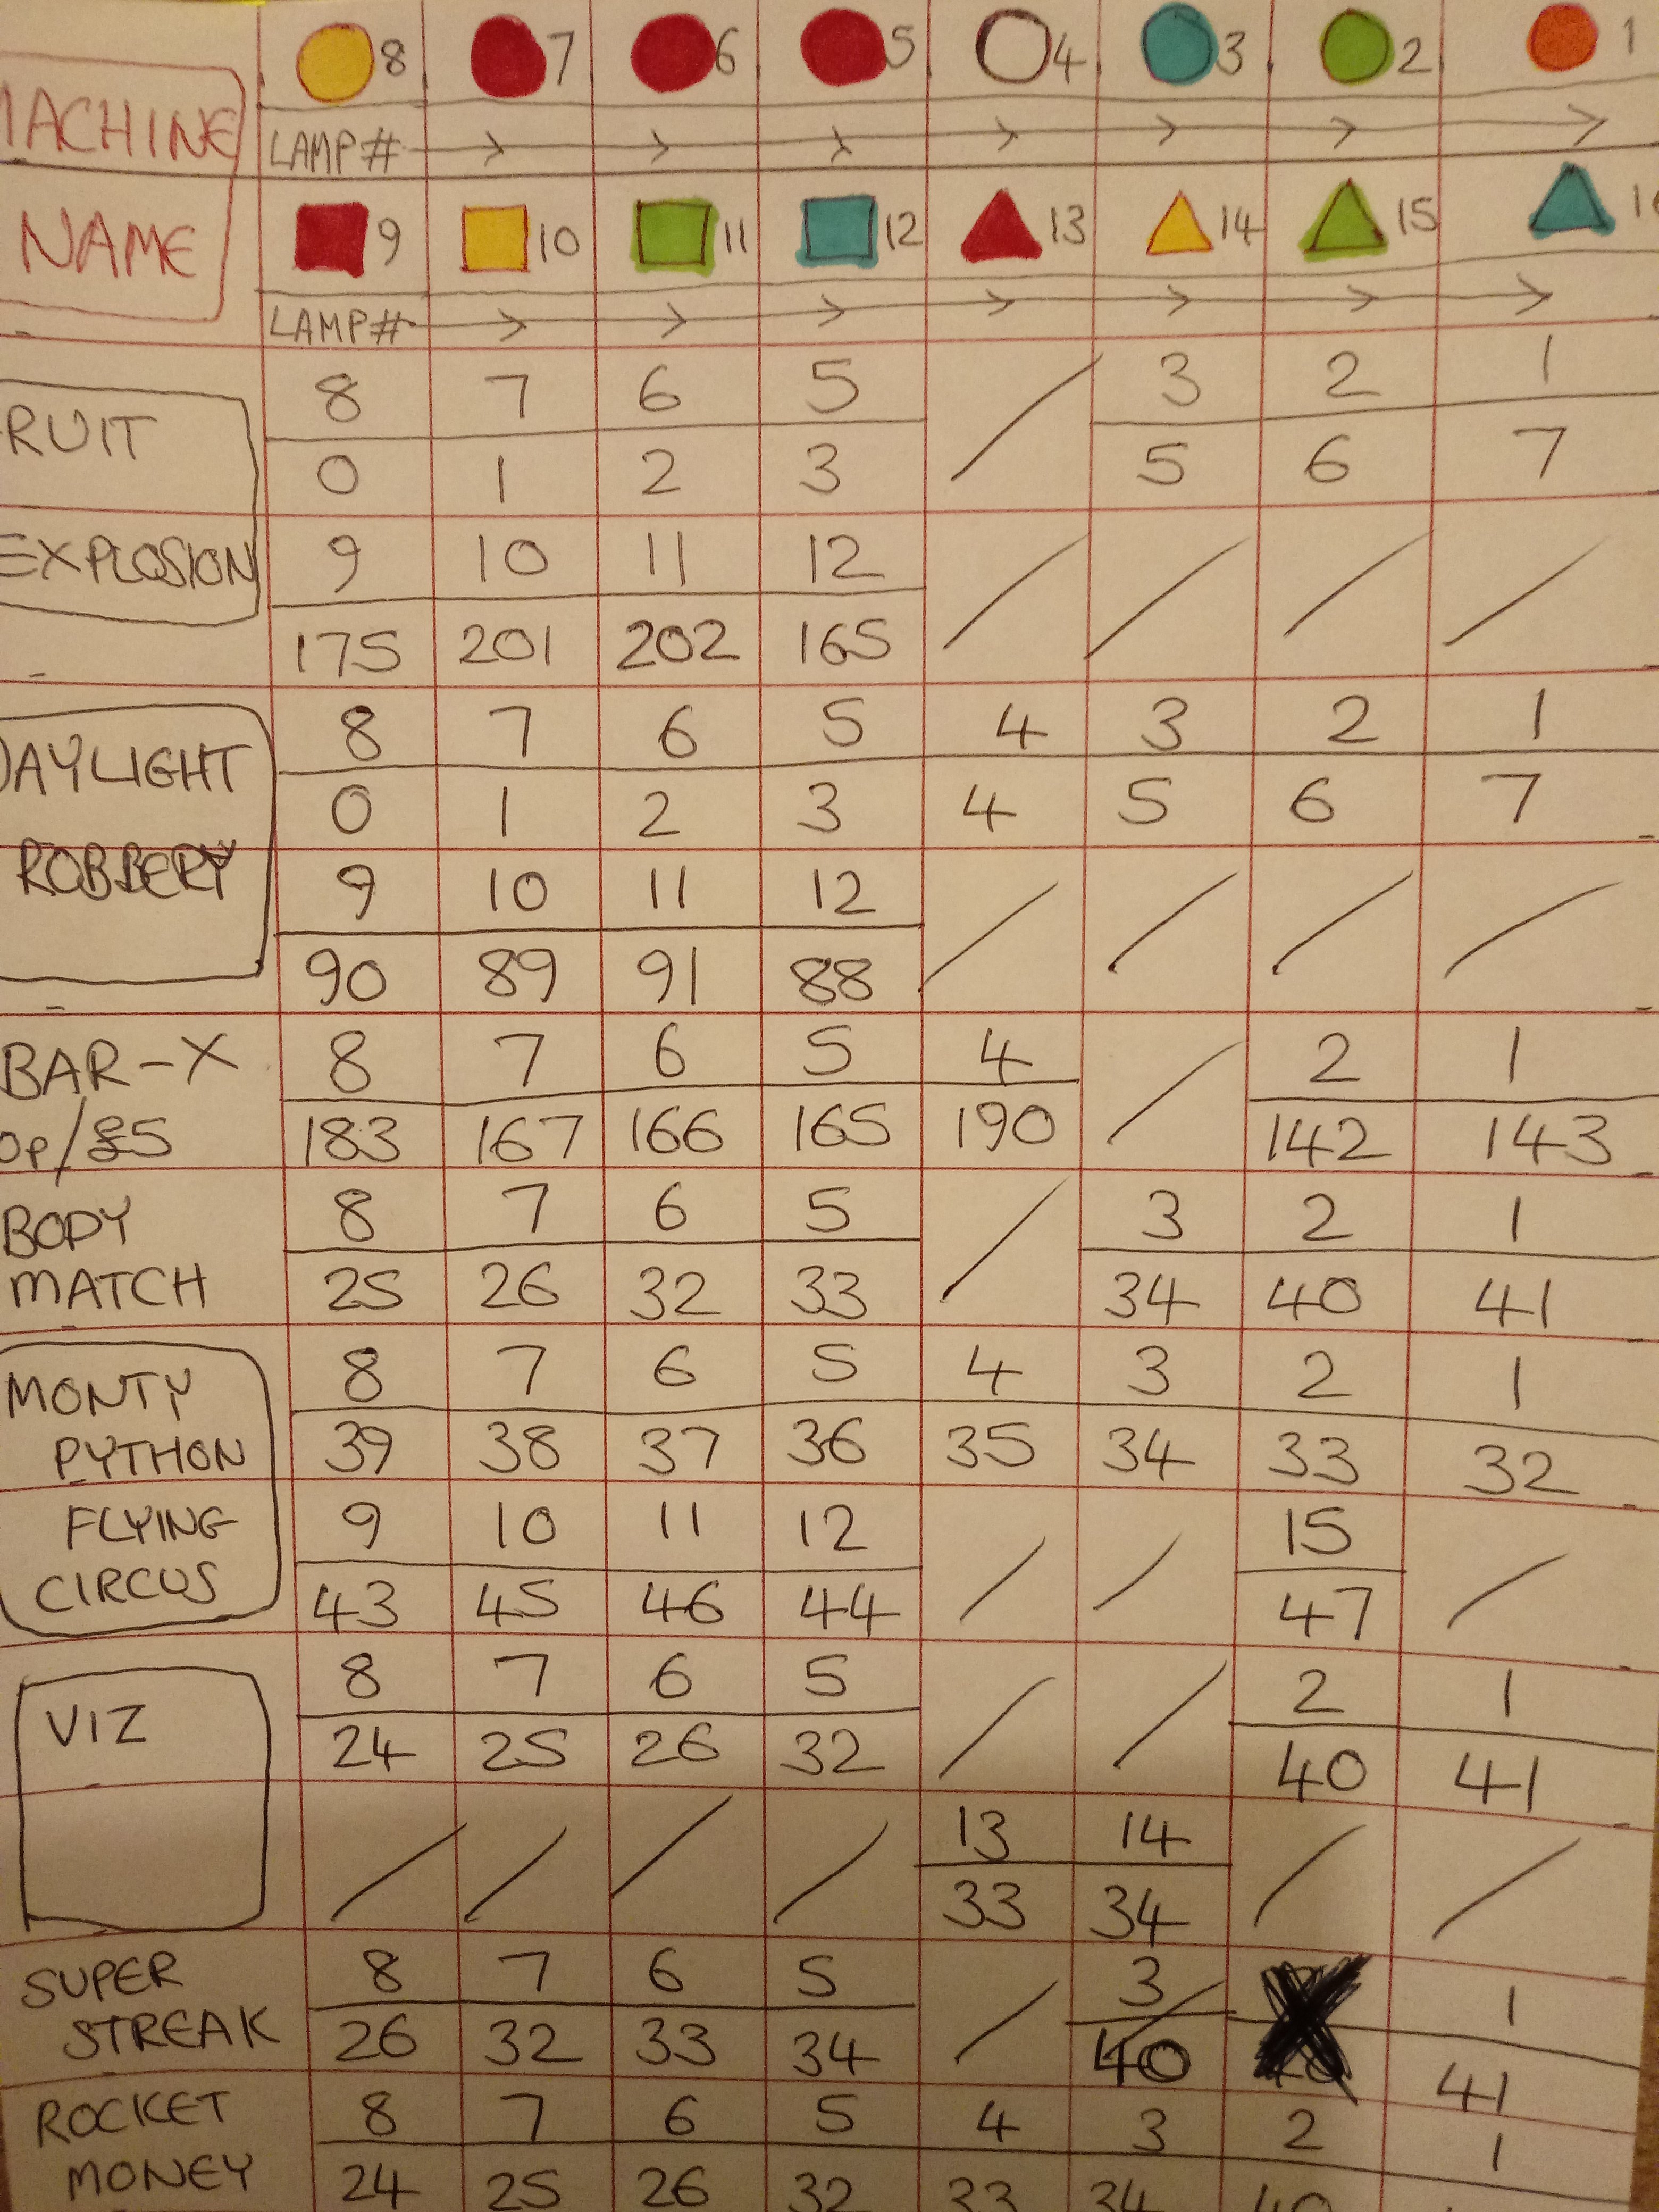
Also chucked into the pictures is a pic or two of a list i've written out with the lamp numbers for each key that will need to be entered into MFME for the Pacdrive for each individual layout... for instance on the pic titled "lamp numbers for pacdrive 3" in the red circle, for jewel in the crown, the lamp number 31 is to be associated with the Pacdrive button 1 (which is the START button on the layout)
On Andy Capp, I think i only needed to change 1 (if that) key as they were pretty much all set to the keys my Keyboard will be configured to... the H and L for Hi- Lo are mapped to my triangle Hi-Lo keys and is more intuative for hi-lo than if i used the blue and green round buttons on the bottom row... my preference anyway
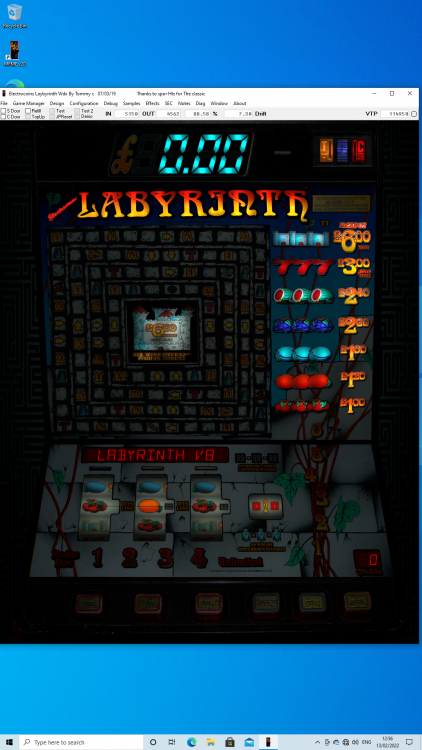
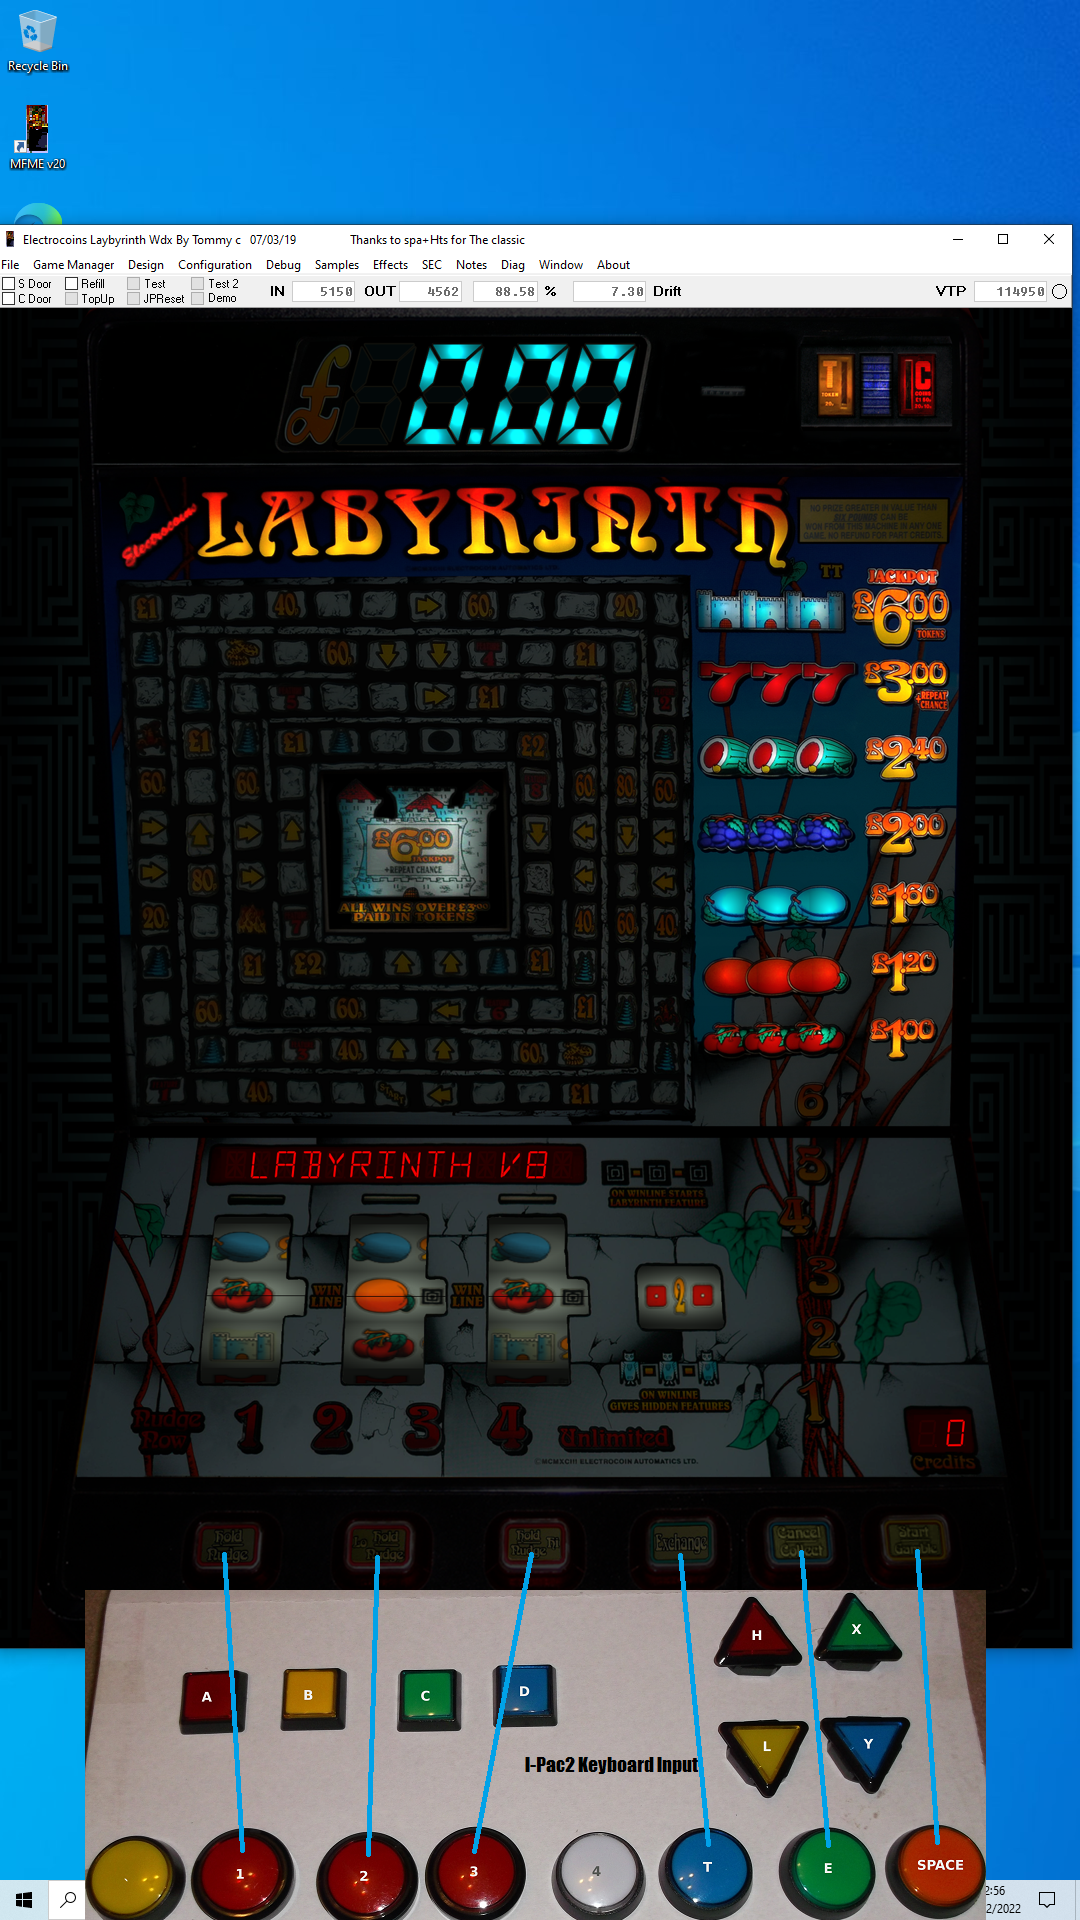
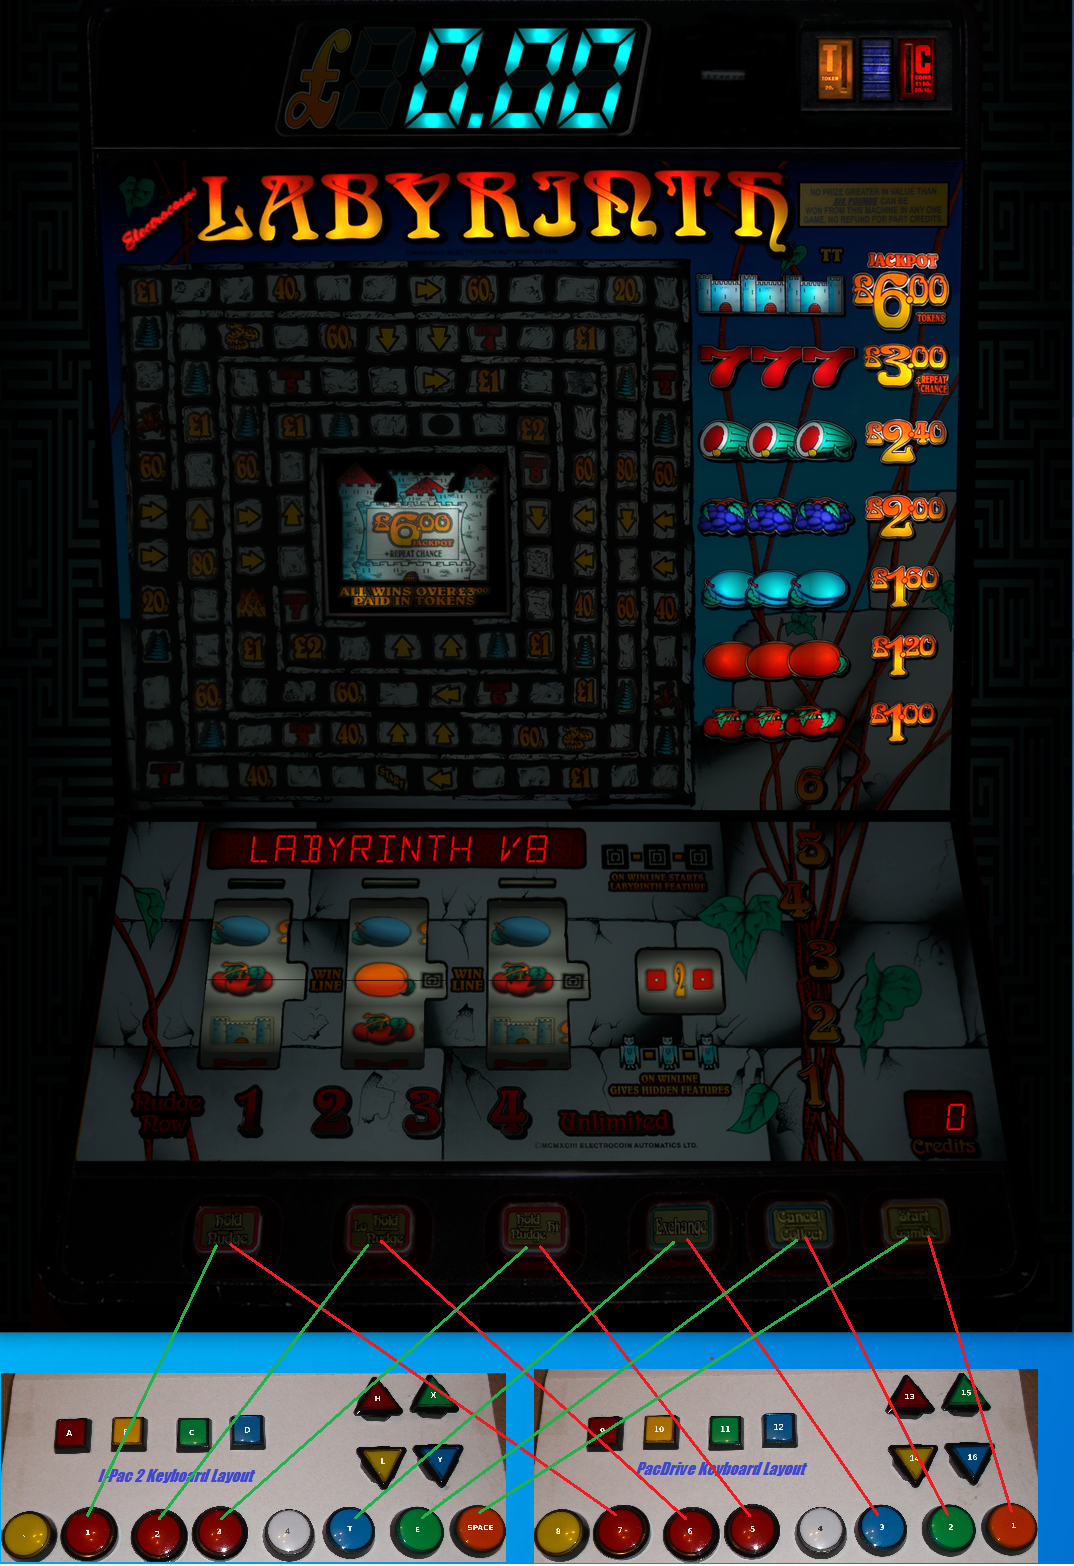
A pic of how i intend to map the buttons to Labyrinth should show what's going on a bit clearer than how my shoddy explainations have been going today anyway!
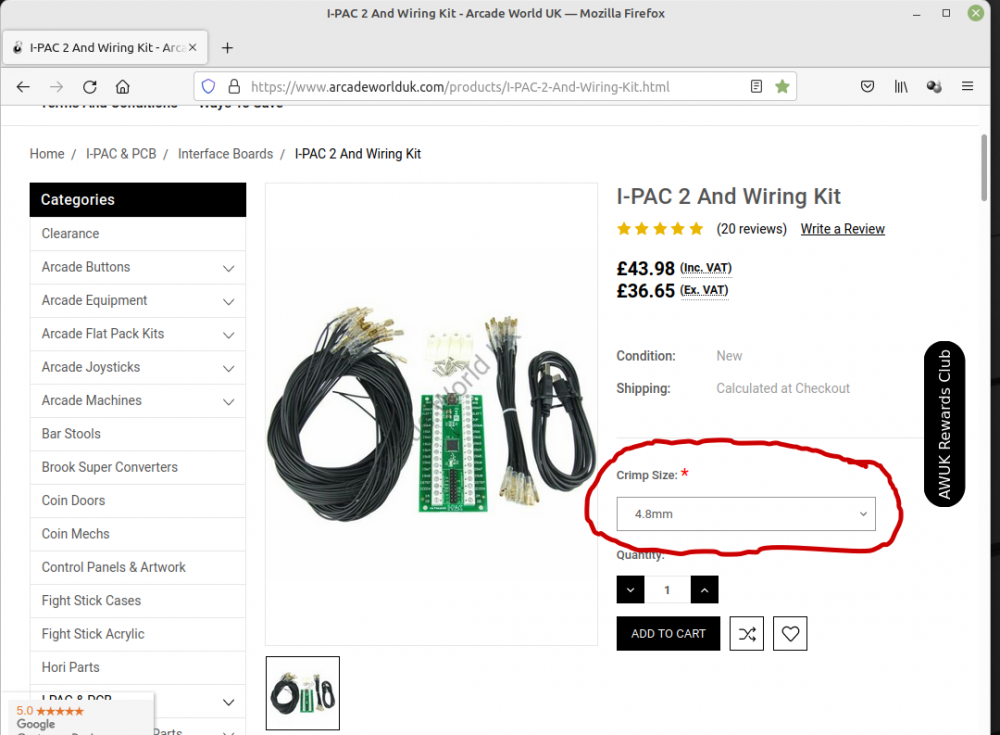
I've also ordered a crimp tool so i can put bootlace ferrules (inspired by @WibbleWobble's amazing I-Pac & PacDrive board on the cabinet he made) on the wire ends that will go into the PacDrive and I-Pac2 as i decided if i'm going to do this, i may as well do as best a job of it that i can!
I hope this all makes a bit of sense anyway... I think i need a coffee and a lay down now! ha ha!

Here's some pics that will hopefully do a better job of my ramblings!
next stop - wire city!!!
Cheers all...
Gary


.thumb.png.e0796992772d65d8953764fd1aa3cd55.png)
(2).thumb.png.abd40acded11115bc5734ea7b2f2ca87.png)
-
As @fits said above there is the legacy section that @Geddy has put together and he also posted a download of a complete MFME romset
https://www.desertislandfruits.com/forum/index.php?/files/category/37-legacy-layouts/
-
1
-
-
I tried again this morning and it worked....
Thank you for everything you do for the FME community matey.
-
2
-
-
1 hour ago, Geddy said:
Sorry you are having issues. Works okay for me and never had any issues with MEGA. Any other hosts worth a shot?
I would'nt know matey, I don't know much about any of these file sharing sites to be honest.
I may try again tomorrow...
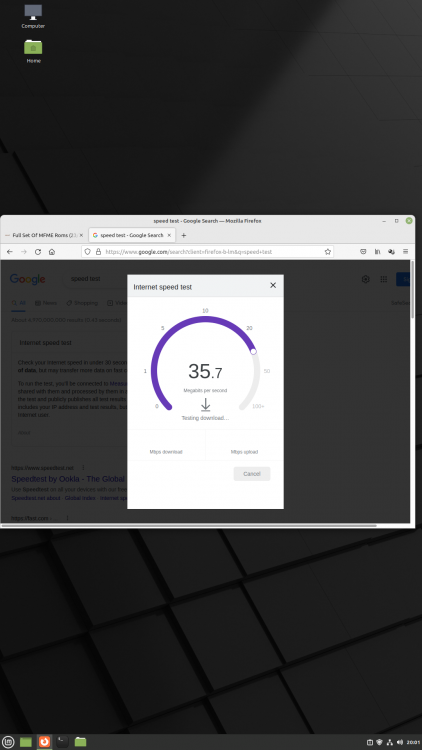
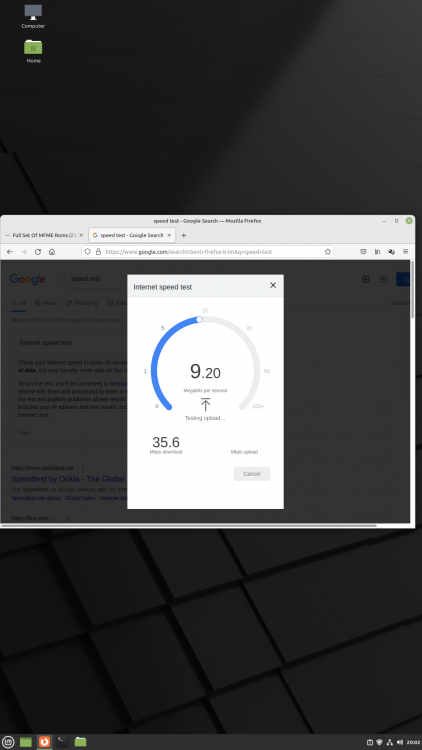
I'm guessing it times out... the download speed was varying between 1.6mb/sec and 2.4mb/sec while i was watching it download... don't know why so slow tho, when i do a speed test i get...
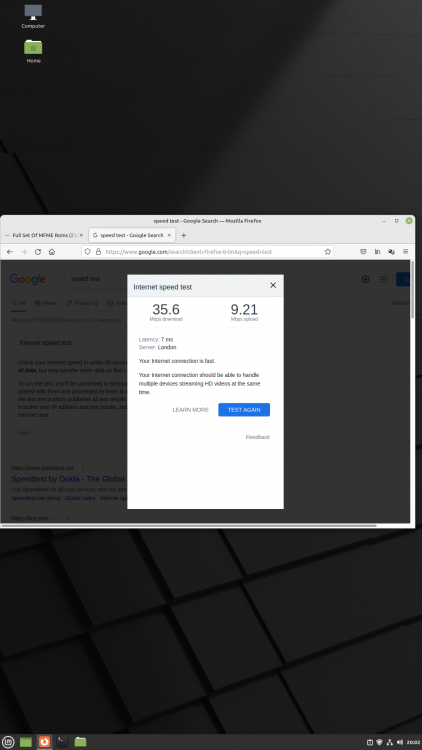
-
I tried downloading this twice, gets stopped with a "Gah your tab just crashed " and then it's asking to pay a monthly sub with the message -
"your queued download exceeds the current transfer quota available for your IP address and could be interrupted before completion. Please consider subscribing to a MEGA Pro plan which will substantially raise your transfer quota. "
I wish it had told me 1st rather than making me wait 20 mins - twice - while waiting for it to download!
- was downloading on ethernet, so fastest i can do, (trans rate was avg. 2.4Mb/sec ) even tho my ethernet should be 4.5Mb/sec - shame.

-
4 minutes ago, woodsy said:
Thanks for your pictures and sharing your experiences, it’s really helpful and motivating.
You're welcome, matey!
I'm trying to include as much as I can so others can either build a carbon copy of this, or use it as a guide to making their own take on it... will be amazing to see a whole army of MFME Keyboards springing up on these forums!
I remember seeing Reg's MFME Keyboard tutorial, and was in awe, - wished i'd done this sooner, i'd always wanted to make one, but 4 flippin' years!!?? - god, i'm slow on the take-up!
Cheers,
Gary
777
-
 1
1
-
-
53 minutes ago, Reg said:
From a drawing POV I can't see anything wrong with it - that looks good to me.
The only thing I can't remember is the microswitch conenctors - what goes where - but I think I cover that in my keyboard guide. Also for them it probably does not make a difference what way around it is.
I'd happily wire up again the diagram here.
19 minutes ago, No1Stoney said:Yes, all correct.
It doesn't matter what way round the microswitch wires go as the button press just completes the circuit back to the ipac
Ahhh, brilliant, lads... thanks for your feedback - much appreciated. :)
- I am relieved that I actually seem to know what i'm doing - (for once in my life! )
Thanks all,
Gary

-
1
-
1
-
-
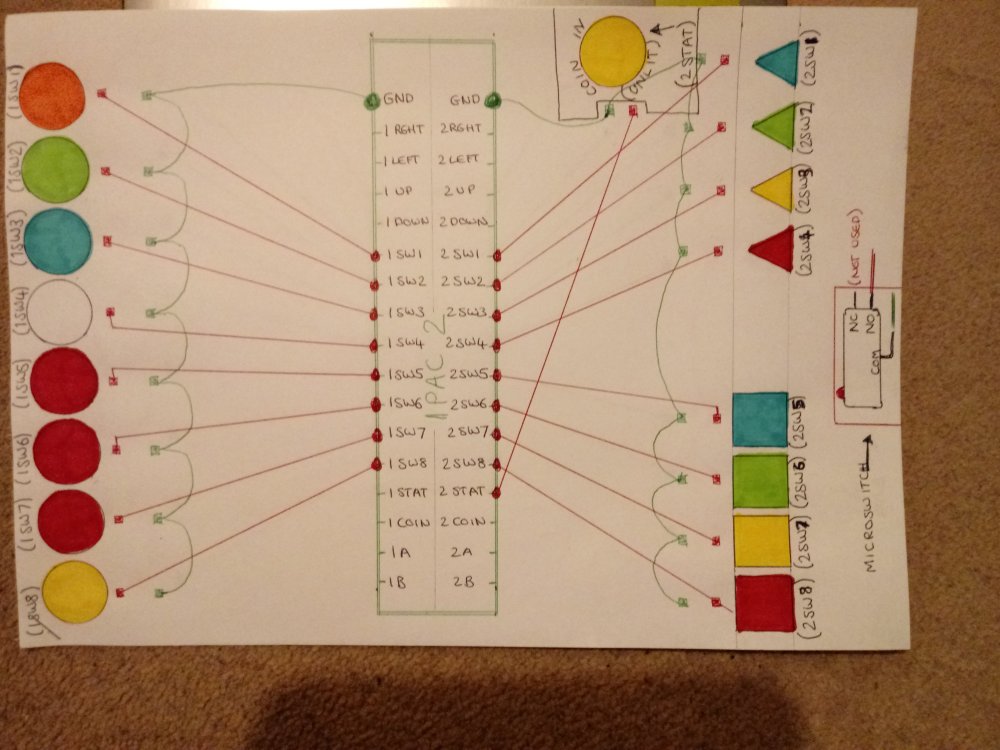
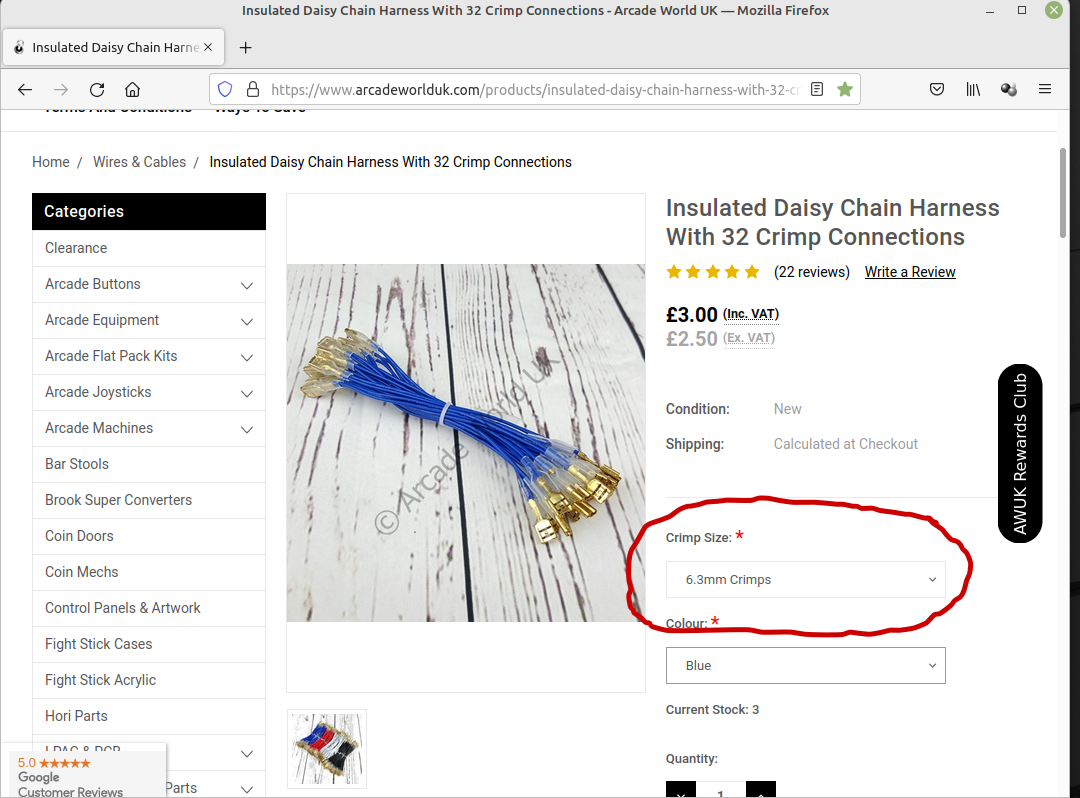
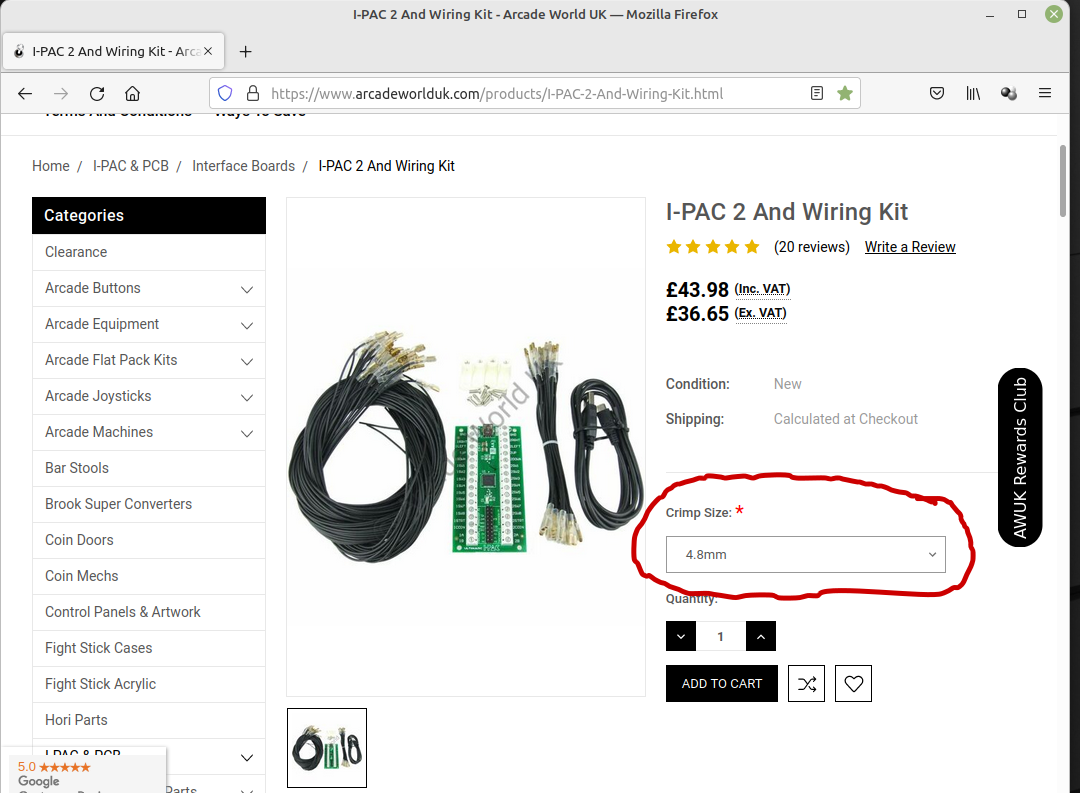
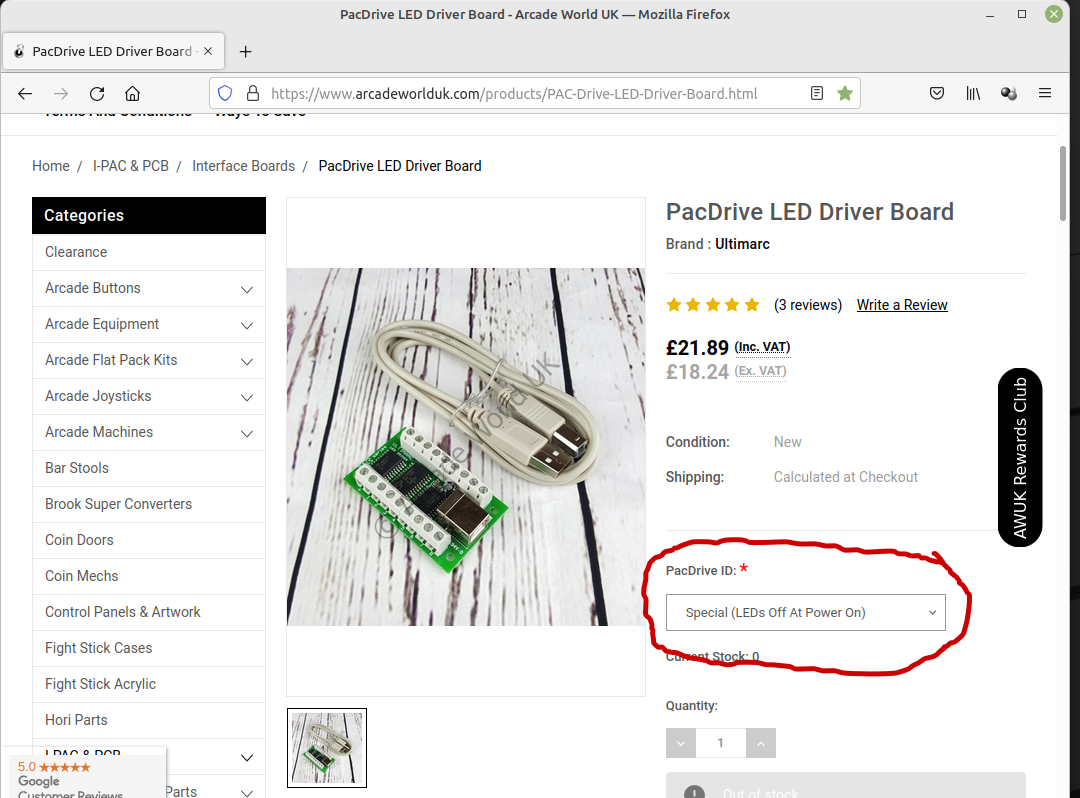
So while the wooden box is still in my brothers capable hands, I have been thinking about the wiring of the buttons.
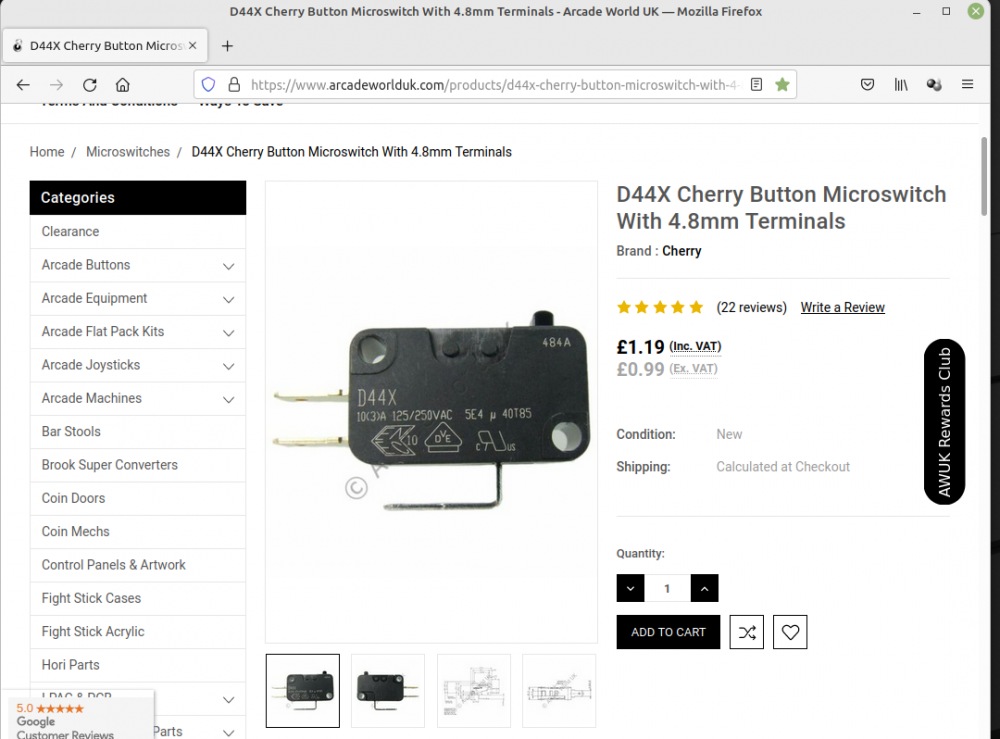
I will need to take one spare 6.3mm crimp and add it onto the 4.8mm daisy chain harness as the Orange Starpoint button's microswitch uses 6.3mm connectors vs all the other microswitches being 4.8mm
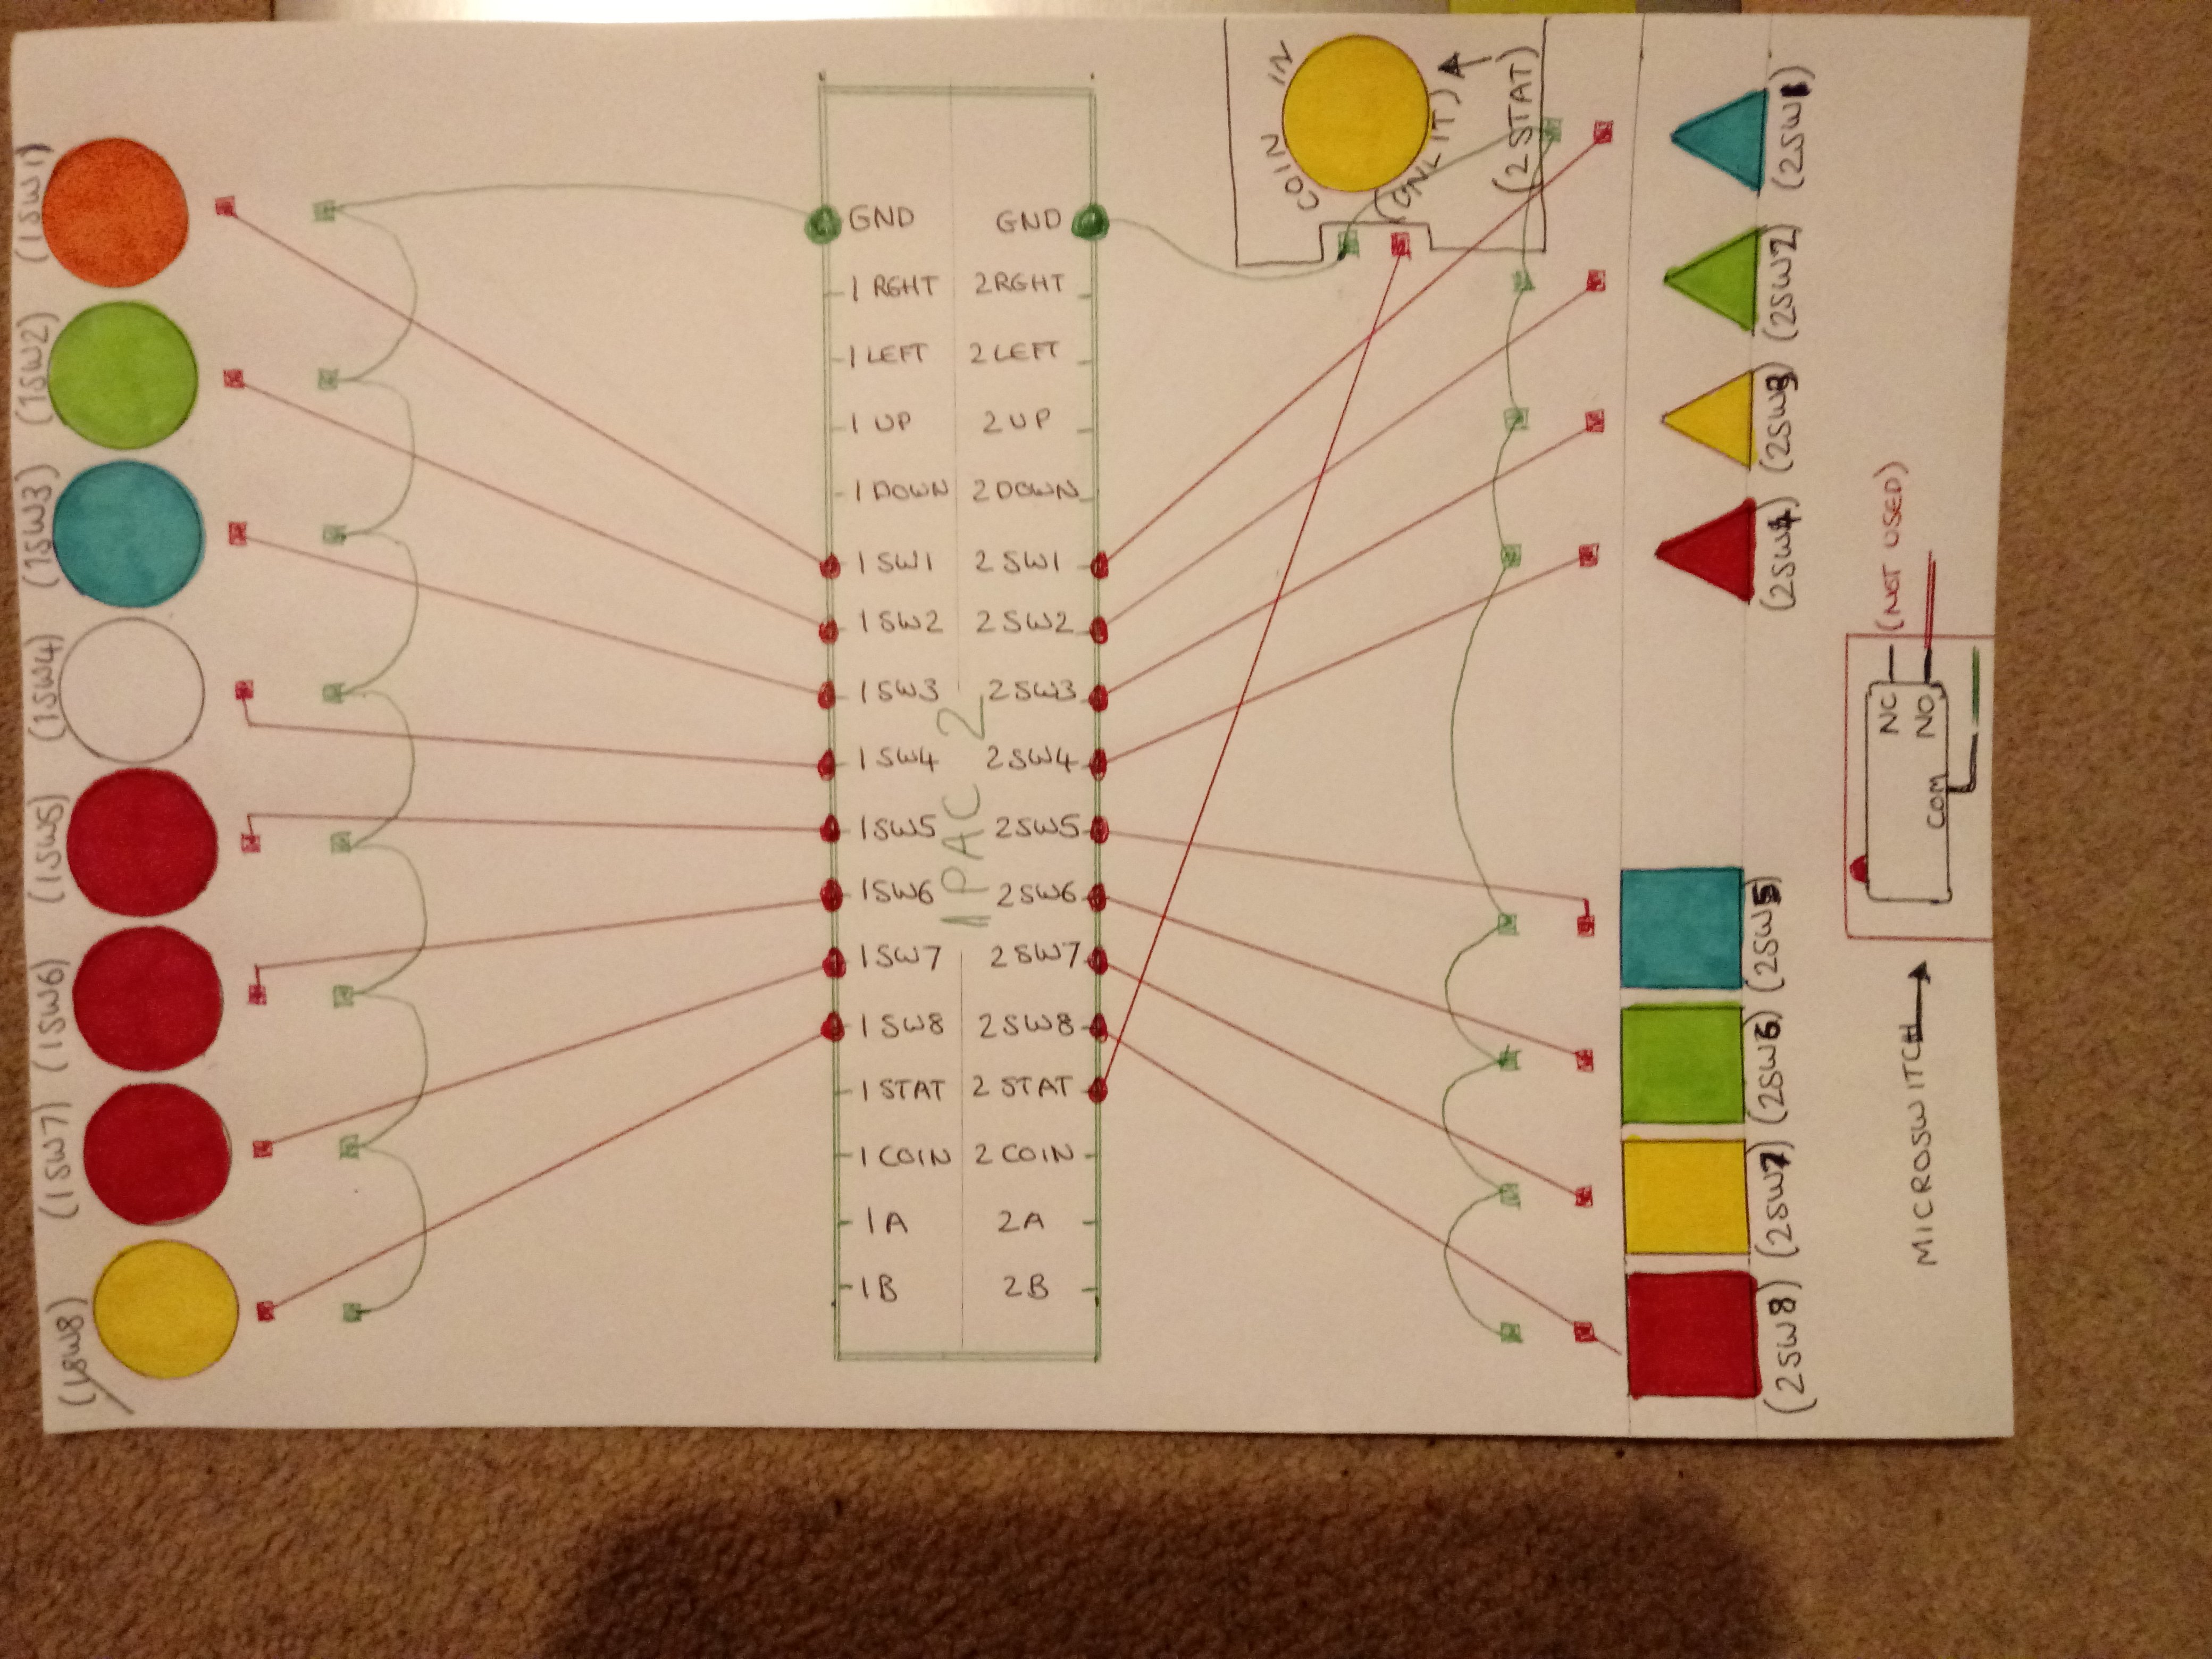
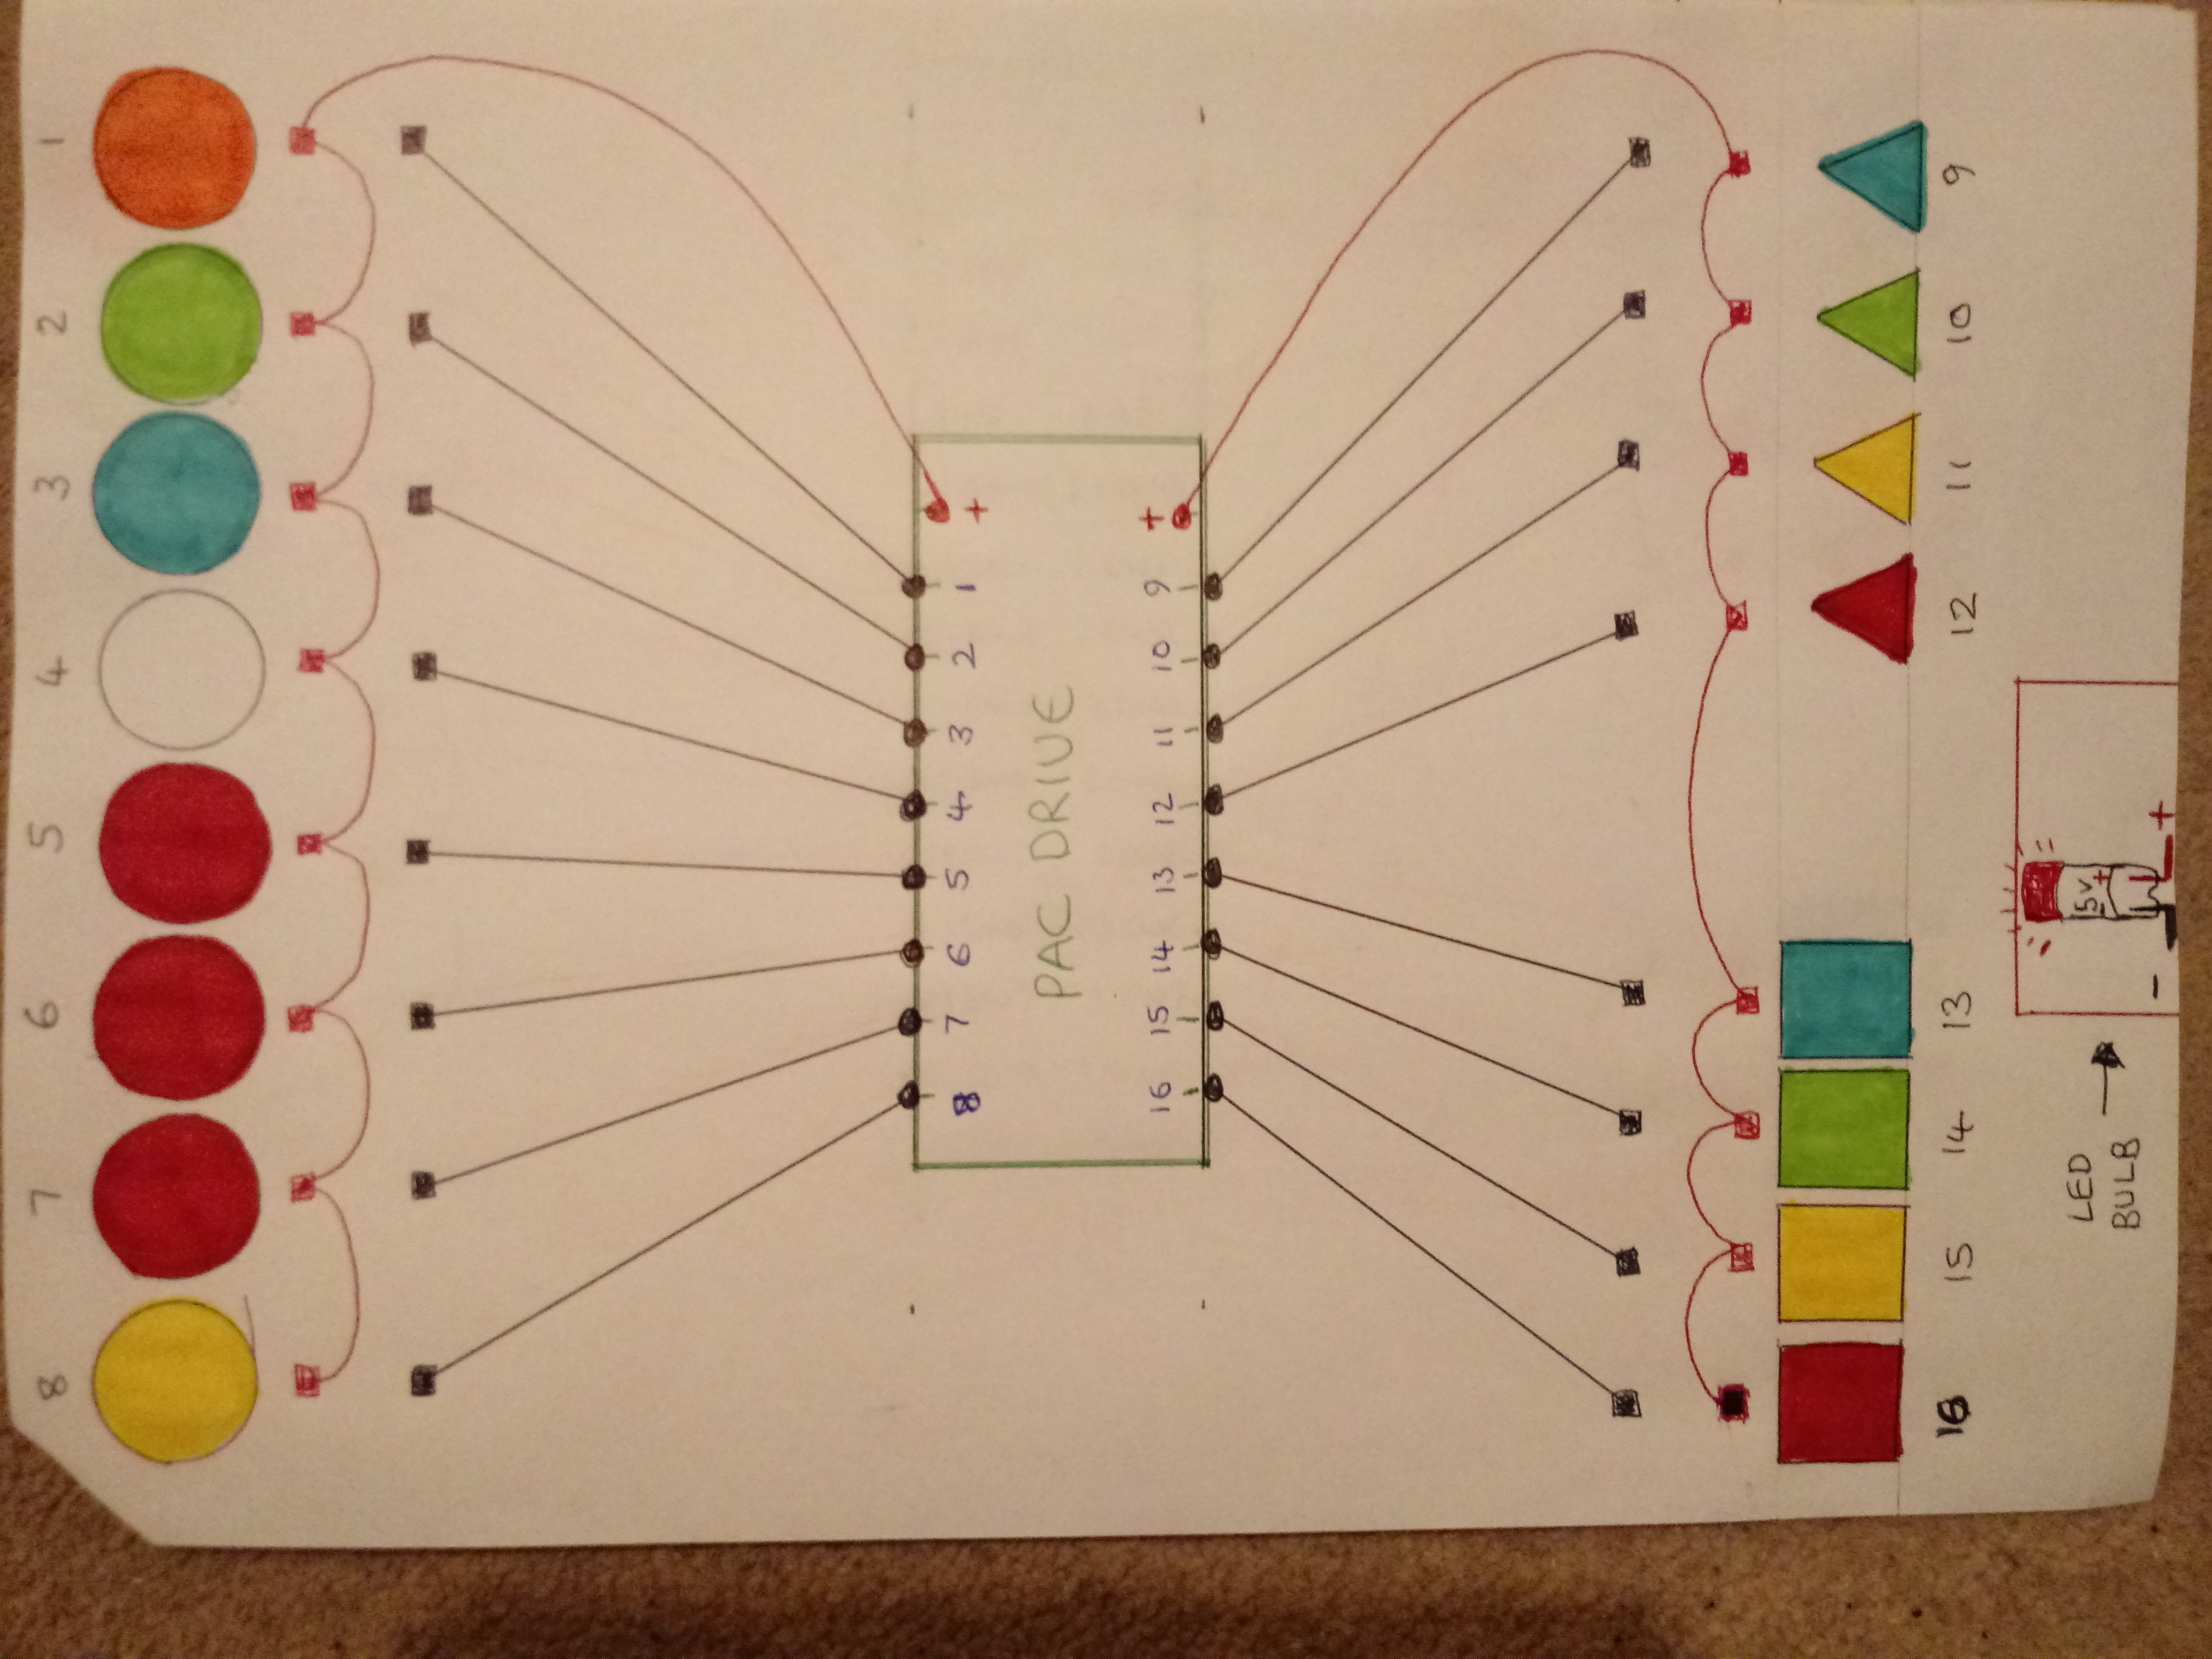
After looking at Reg's tutorial and viewing bits n bobs on YouTube about IPacs and PacDrives, I have drawn 2 diagrams to show how i will be wiring the buttons - 1 for the I-Pac2 and the other for the PacDrive.
The 17th button will be on the side of the keyboard and used for £1 input, and so will not be lit, just the other 16 main buttons.
I think it's all correct, but can any of you guys tagged below just check my diagrams, to give me the nod that i won't be blowing up my I-Pac / PacDrive please.
Thanks in advance.
@No1Stoney@Reg@WibbleWobble@uptown47@Amusements@cja272
Here's the 2 wiring diagrams:
.thumb.jpg.3bb55d08882f10b6e809f573a5636c7d.jpg)

-
3
-
-
@johnparker007 Loving the way your arcade is progressing... I had an idea!
so far you have:
 Fruit machines in MFME,
 Arcade machines in MAME,
so how about...

 Pinball machines in Visual Pinball ?
I dare say only top spec PC's could run all that, mind - but would'nt that be awesome!
I'd deffo need a new PC... I run MFME on the newest PC i have which is a 2007 Dell XPS 420 8Gb Ram, Q6600 so yeah.. i best do some overtime at work and get saving!
Cheers.
Gary

-
1
-
-
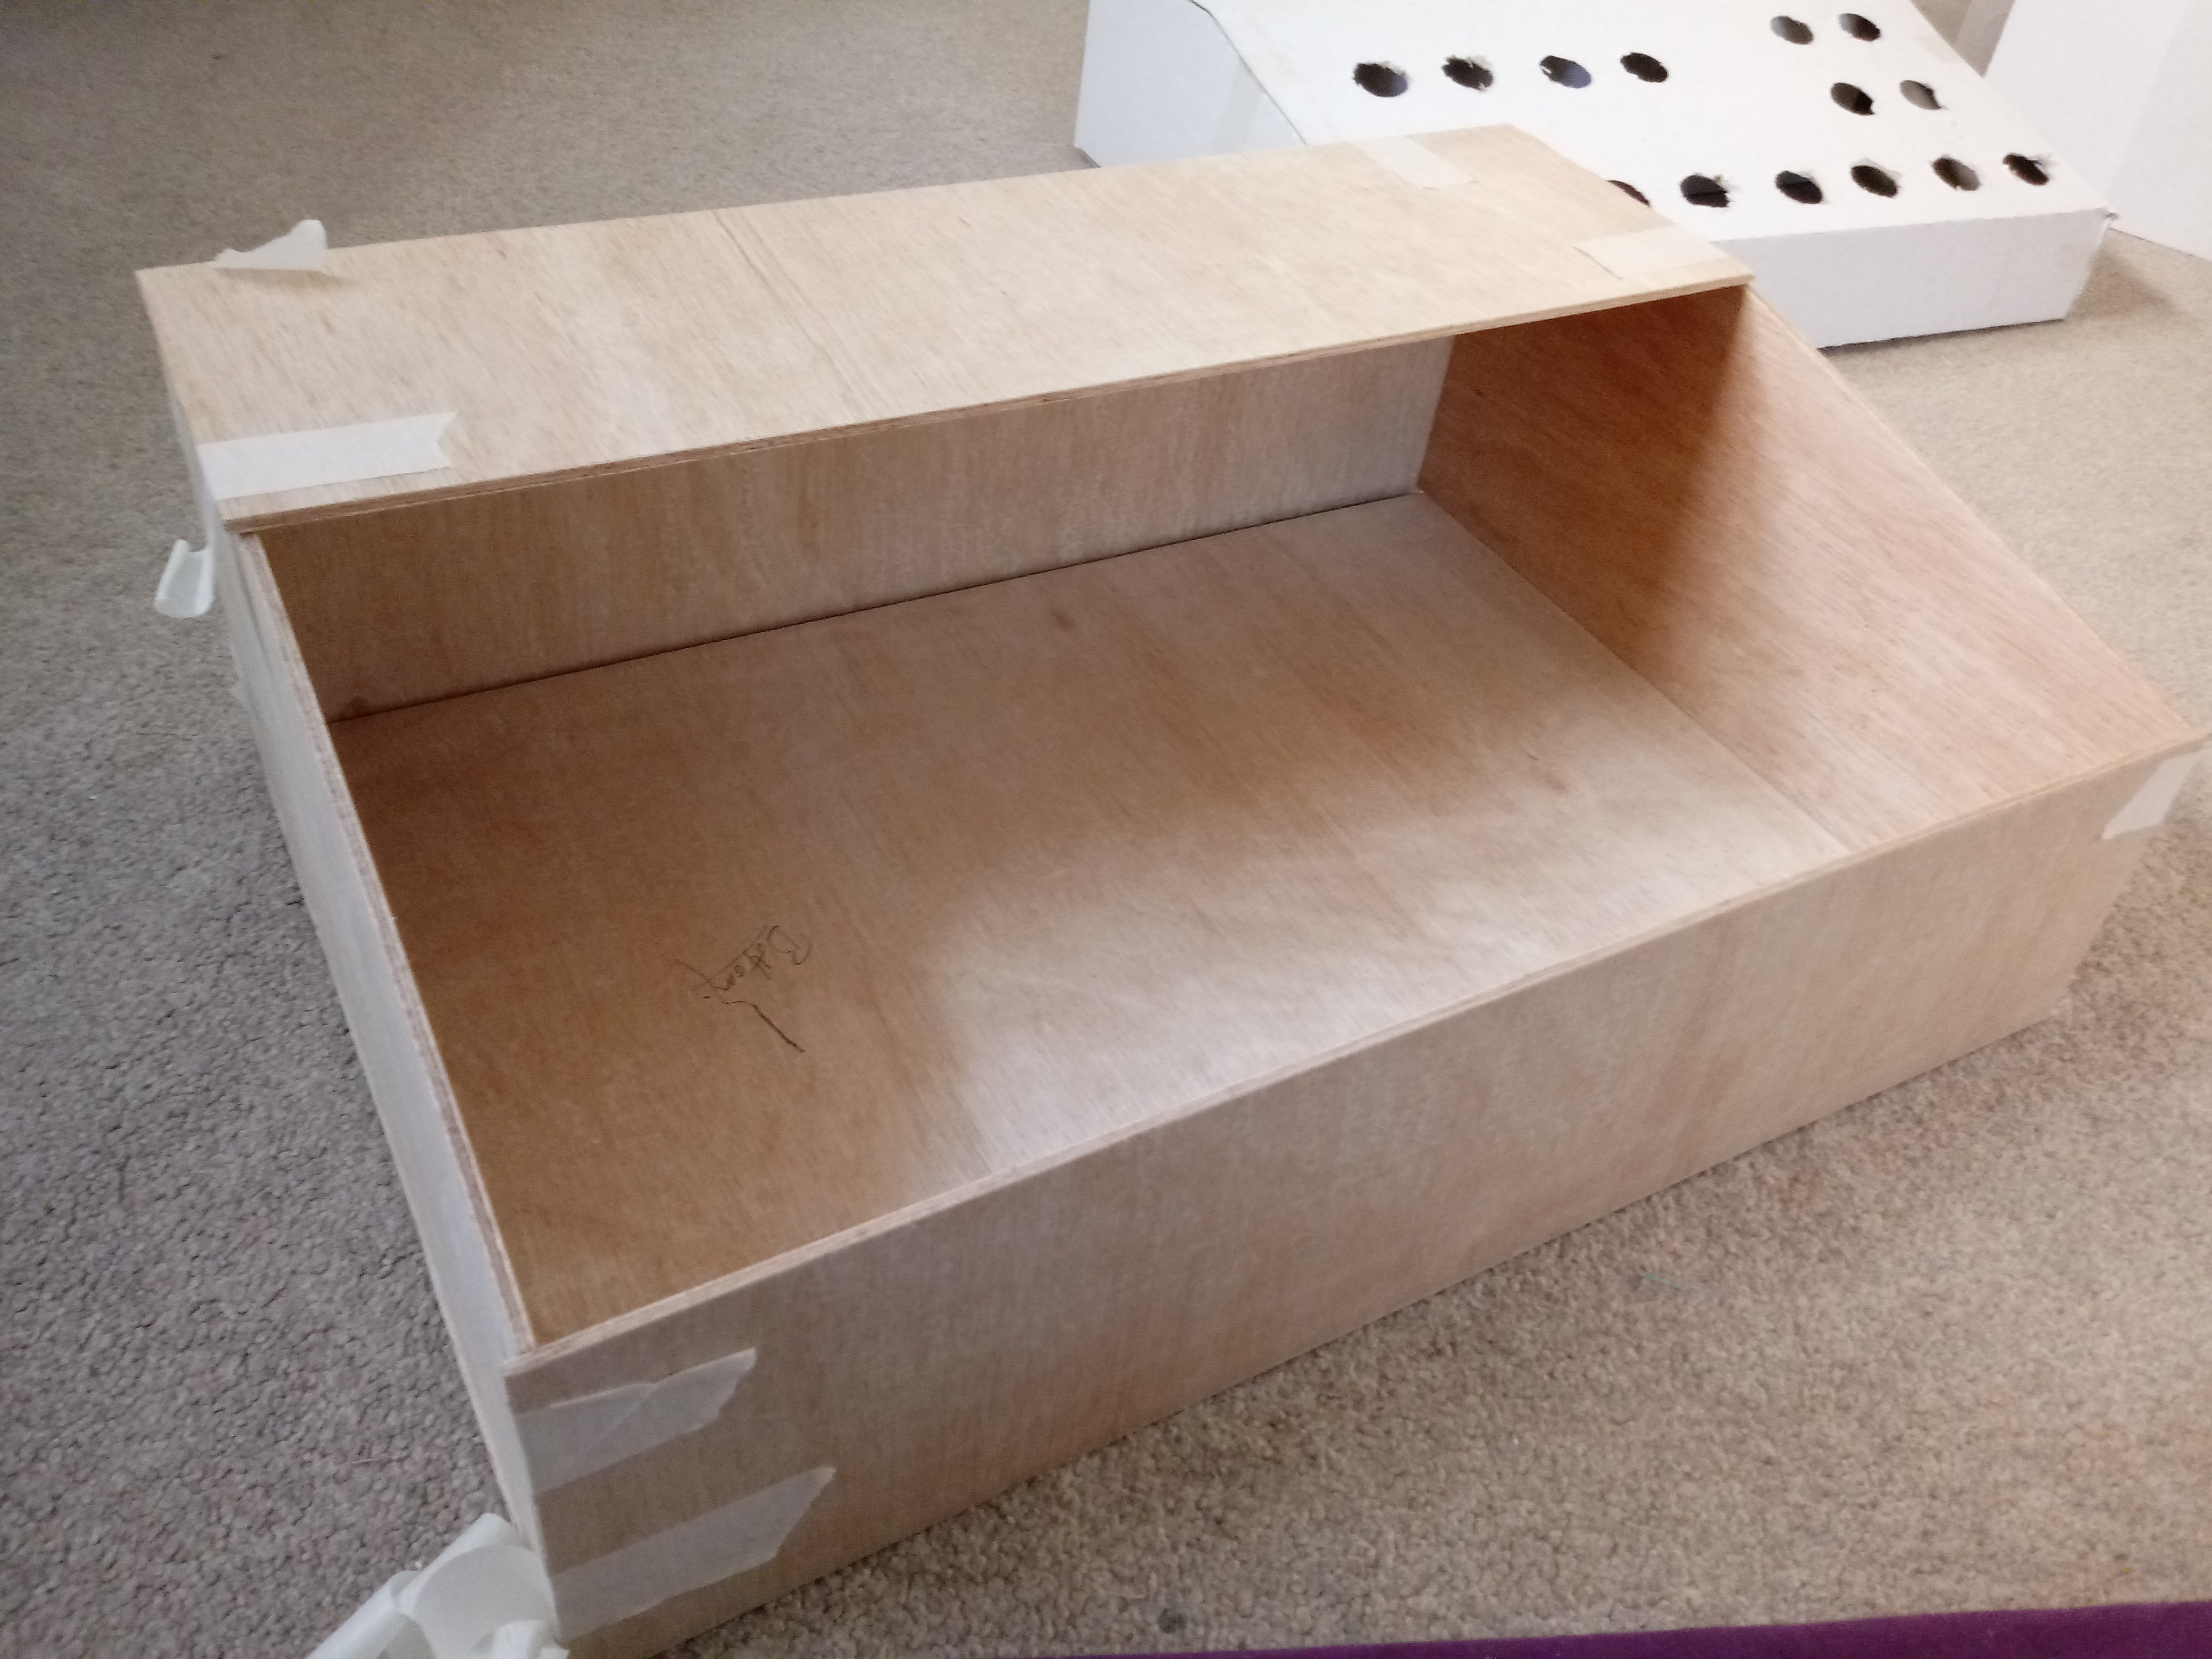
....forgot to say, the bottom will be screwed on so if i ever need to access the inside to change an LED or a loose wire, my chunky hands will have an easy time getting to all the bits inside... my brother also said he will add a small bit of wood inside the top of the box so i can mount the I-Pac2 and PacDrive to that... should be cool!
-
1
-
 1
1
-
-
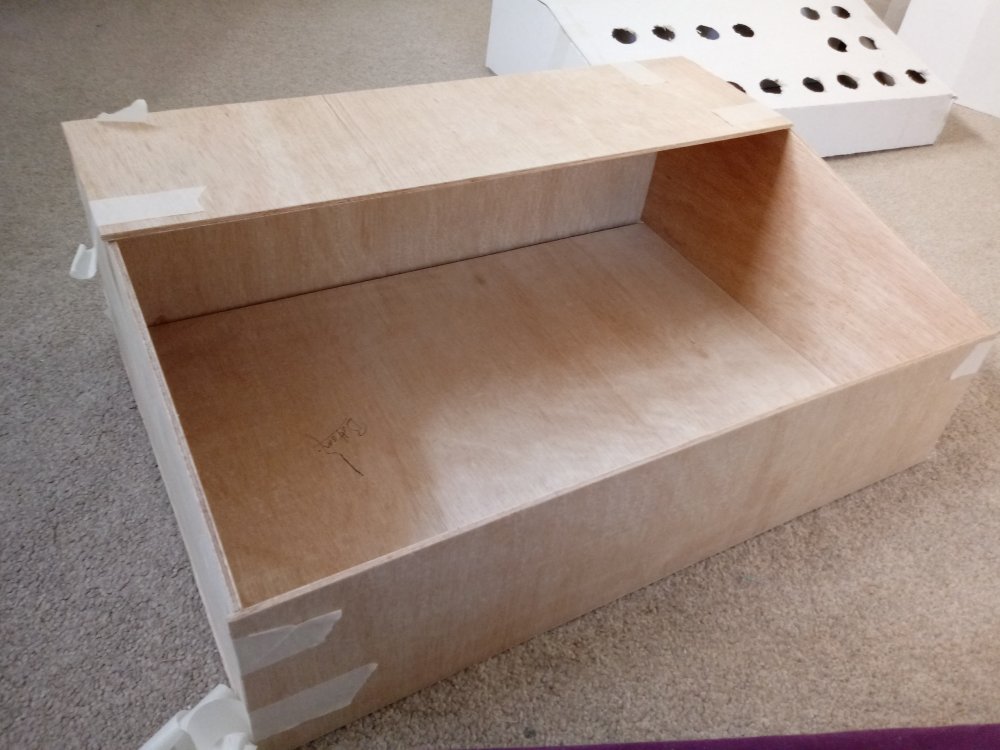
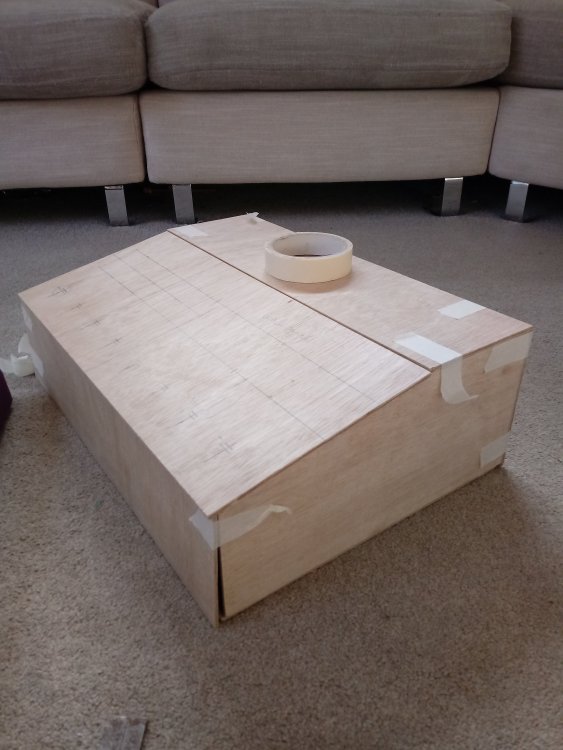
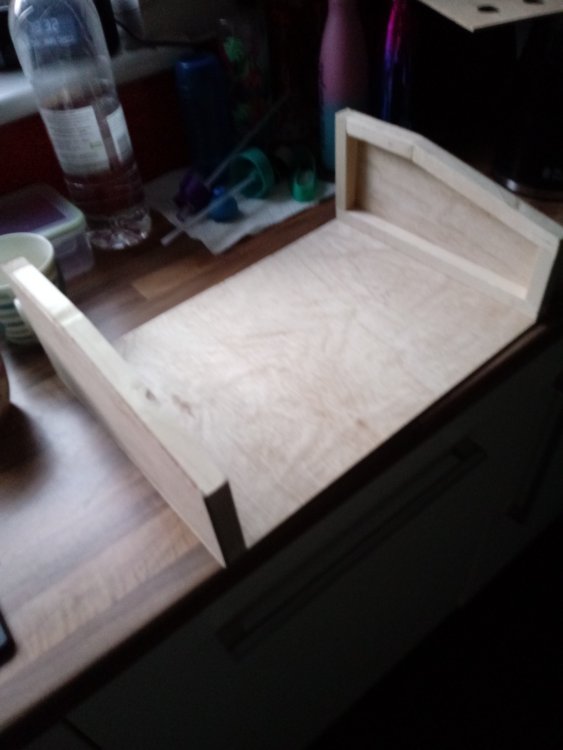
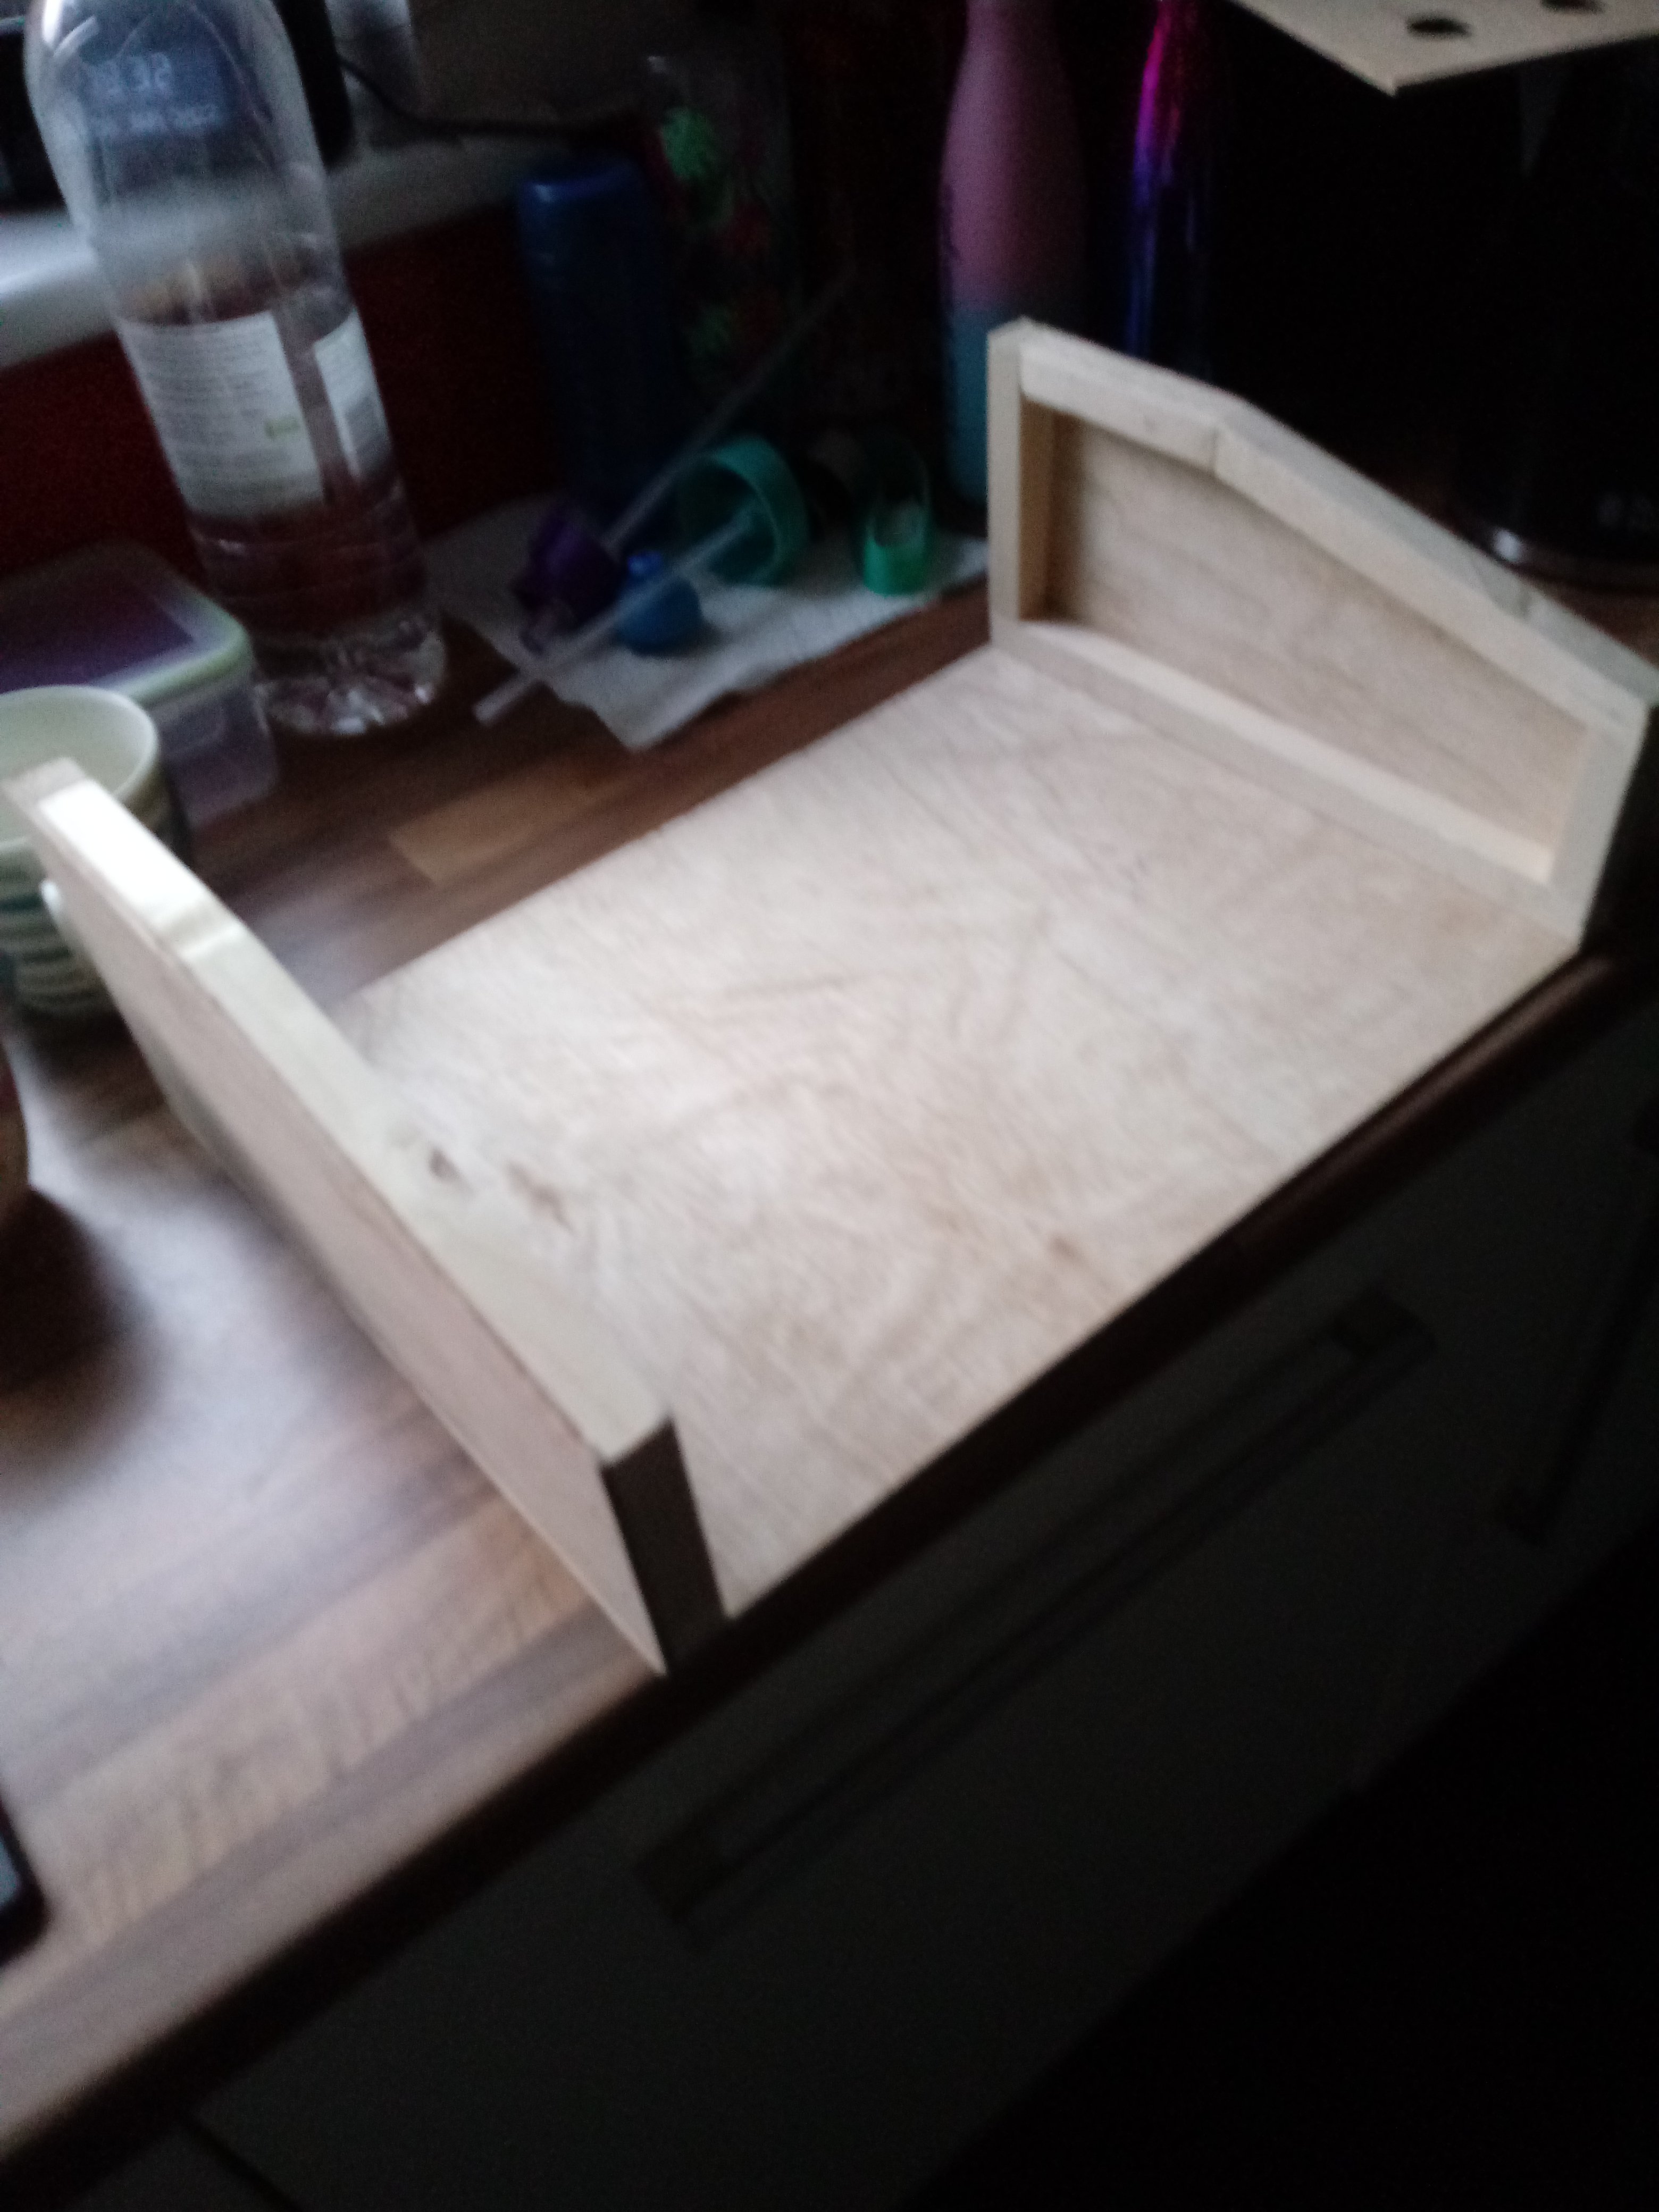
Well, what a day today was!
Visited my brother and his family, with a box of buttons and my cardboard prototype keyboard with me, and he done me flippin' proud so he did!
He began to put together a wooden replica, while i was chatting to my nieces and his wife... I felt a right lazy so n so! The intention was to at least help him build it - in the end he did it all himself while i was chatting, bless him! Although admittedly i am crap at anything involving tools - he's definately the handyman of the family!
It's not finished yet but i love what he's done so far! It's even going to have either vinyl wrap on it or paint.. he has loads of different finishes including chrome paint - i rather liked the look of the plain white vinyl i saw there, and he even said i could have lettering put on it and the like... i thought it would be amazing if he could put the MFME logo on it and maybe the little yoda pic like Clo puts on her layouts with "in memory of Chris Wren 1965 - 2020" - I'll ask him and see if he can when i see him next.
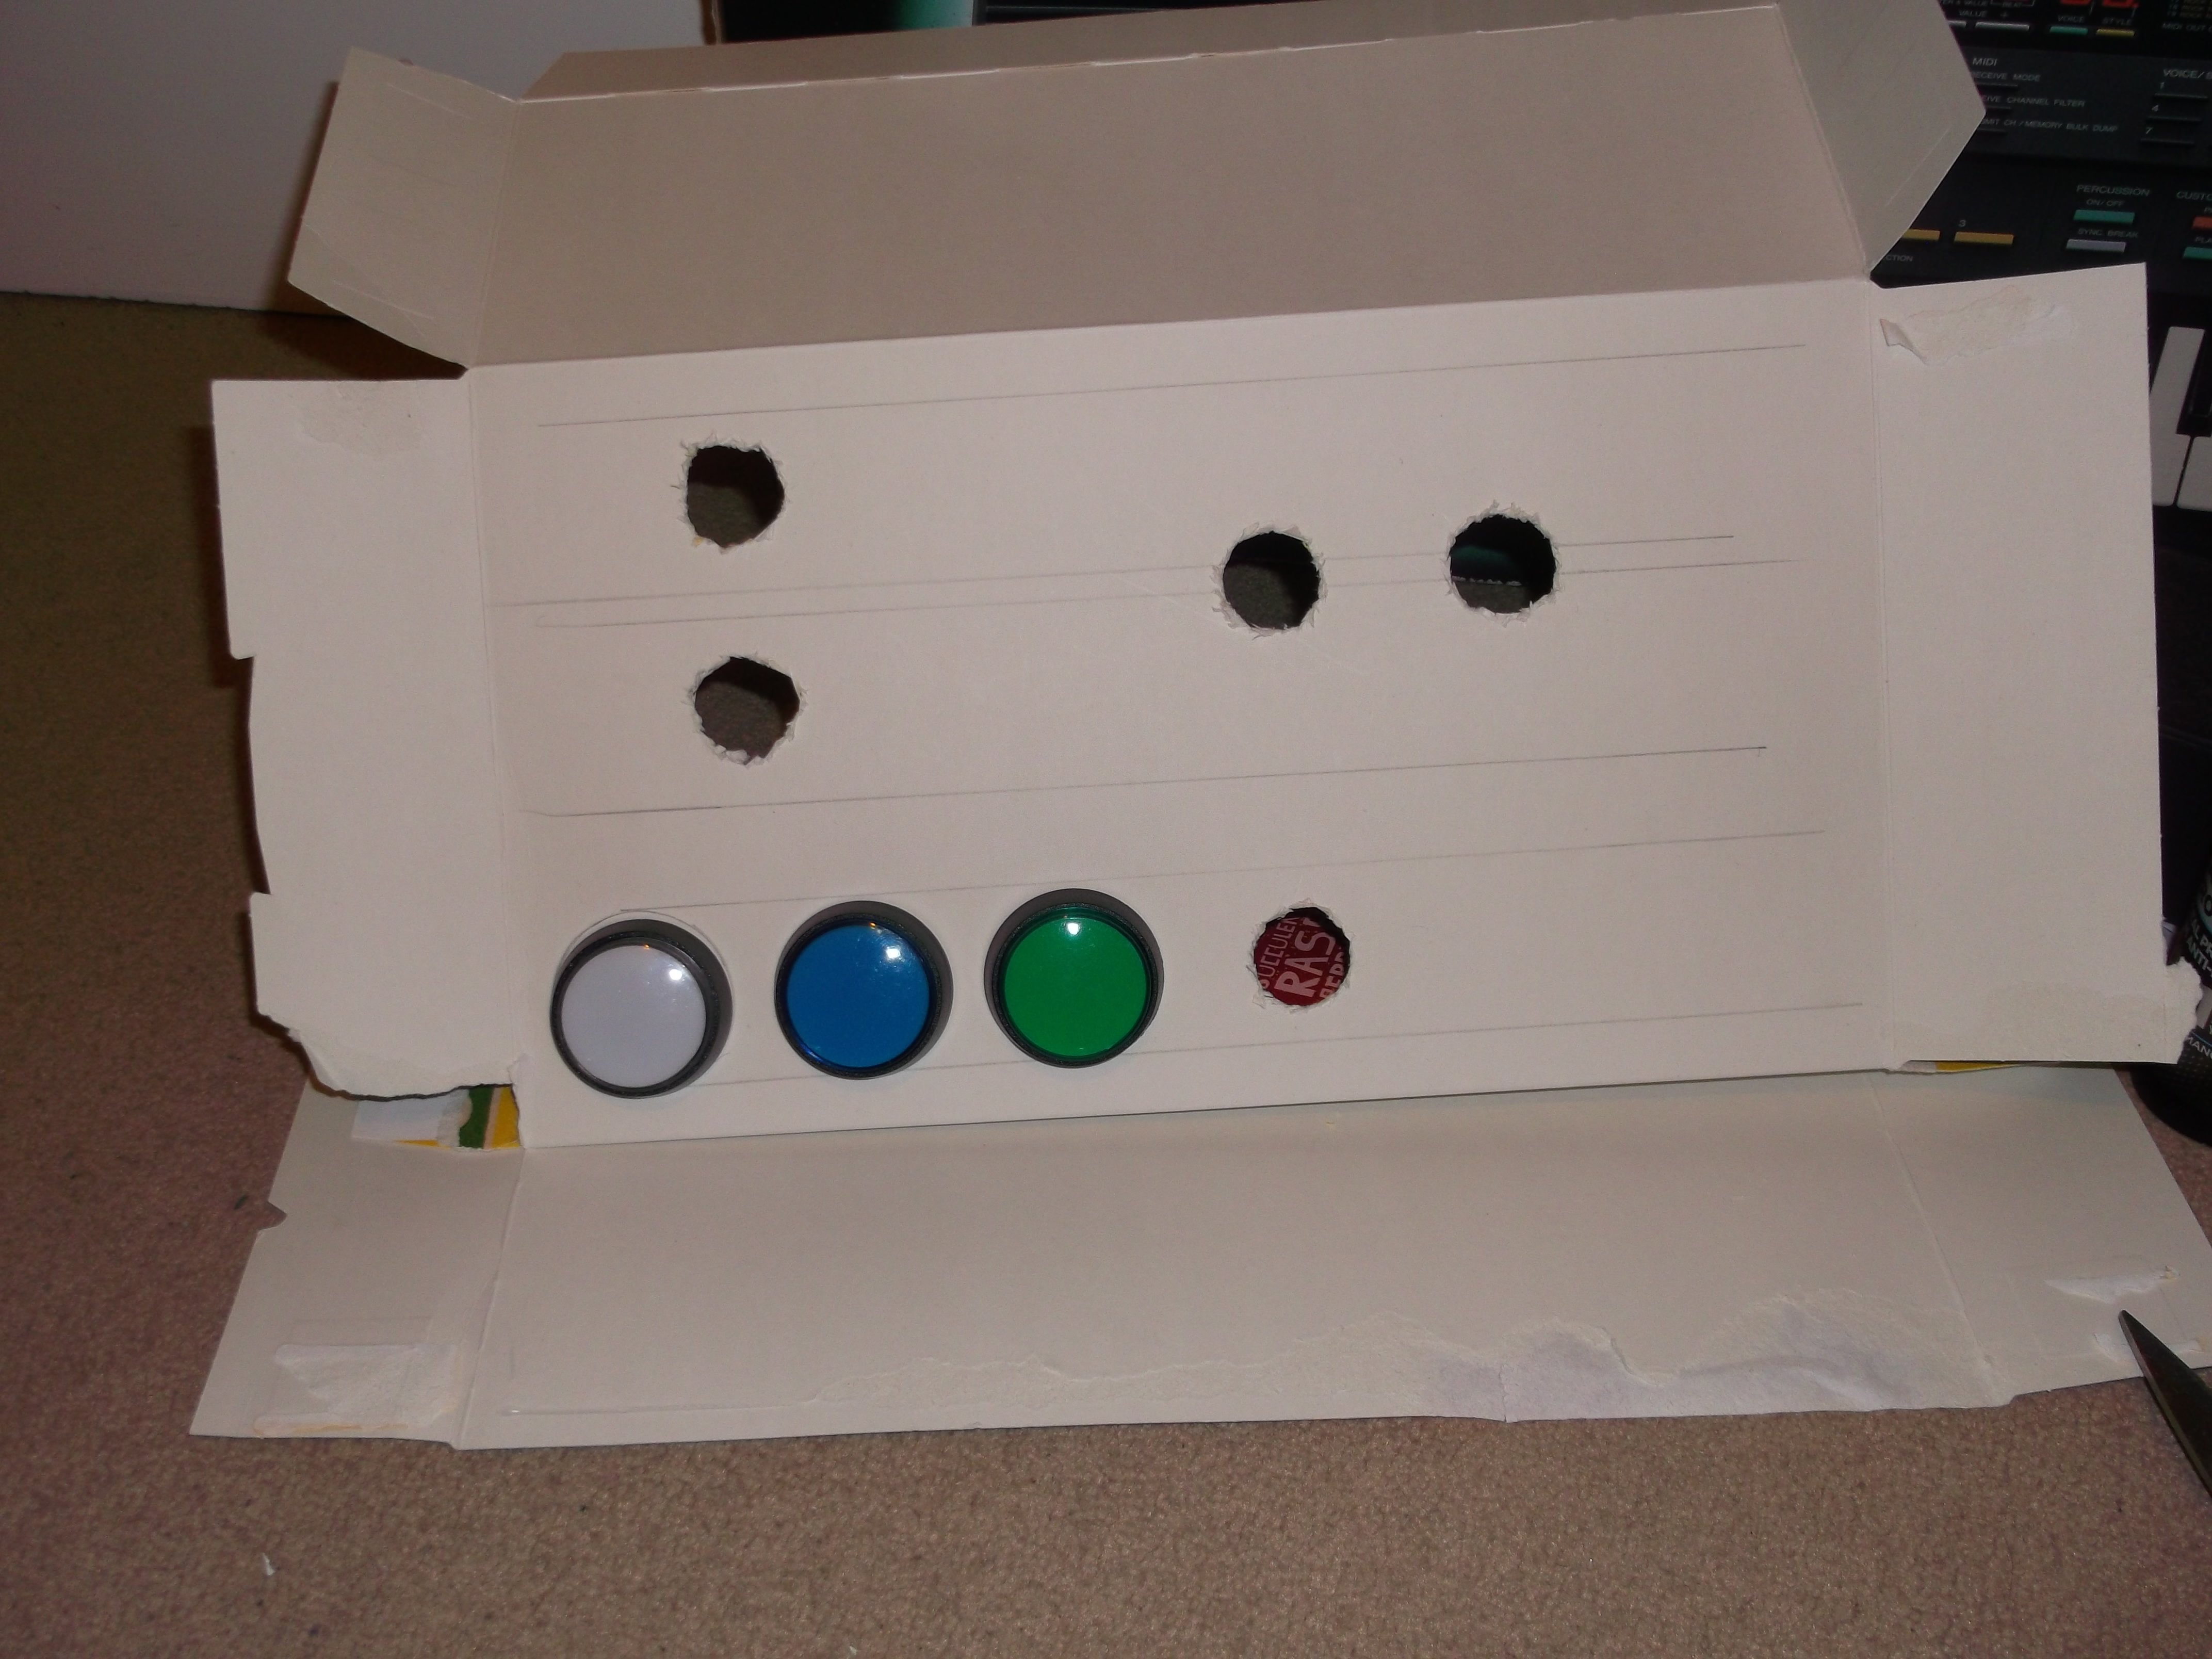
Below are pics of where i want the 17th button (£1 coin entry) on the cardboard prototype and a few early stages pics of my brother's handywork as it currently stands.
I'm well happy! The day of doing the wiring (the bit i dread the most is drawing nearer!) tho as long as i follow Reg's MFME Keyboard guide to the letter, i hopefully will be wondering what the worry was all about!
Anyway - to the pics!! ----->
Gary

.thumb.jpg.8beae2a95c5eecb58055e22756b26c6c.jpg)
.thumb.jpg.746eaab62676f0c330d894e8479685da.jpg)

-
1
-
-
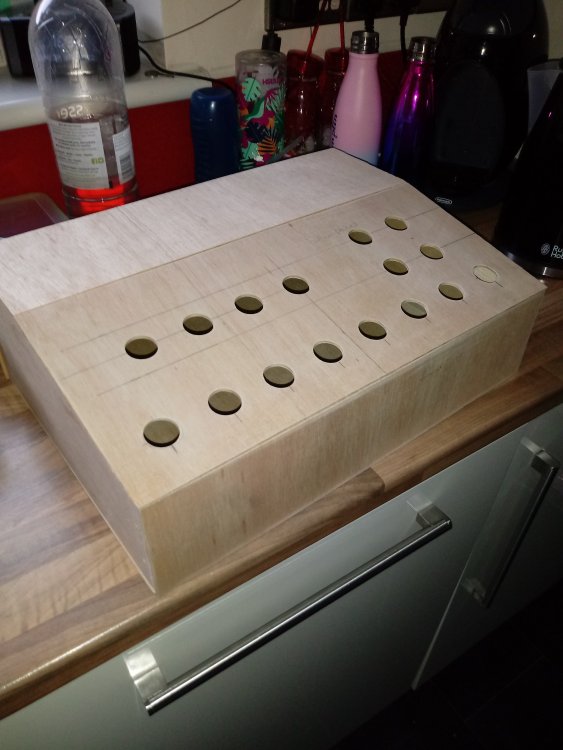
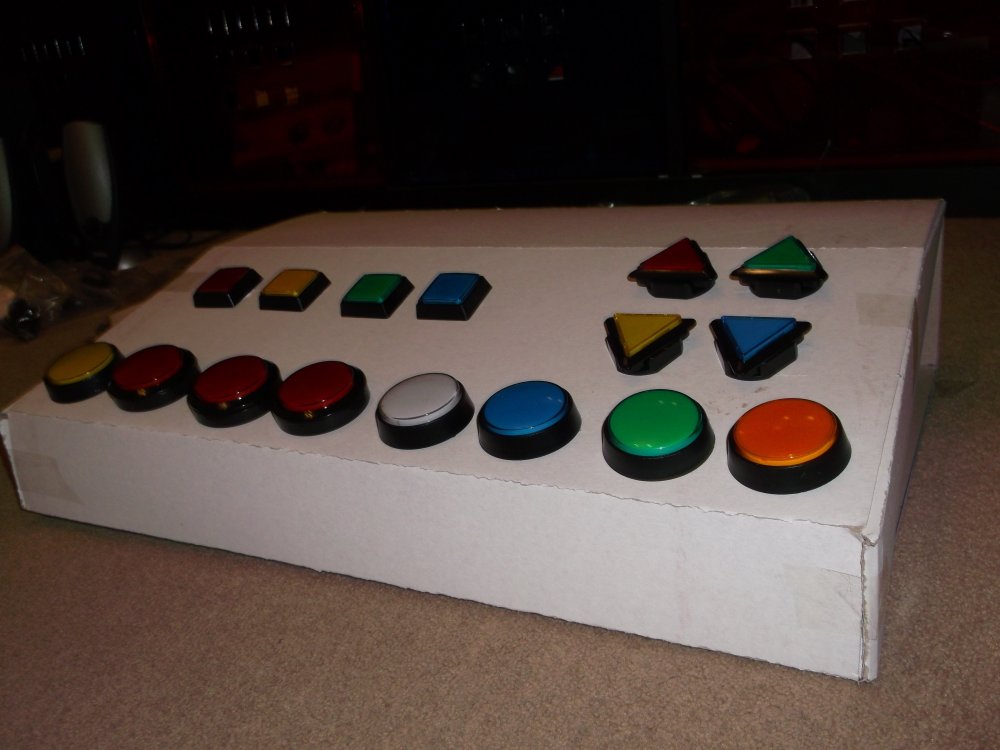
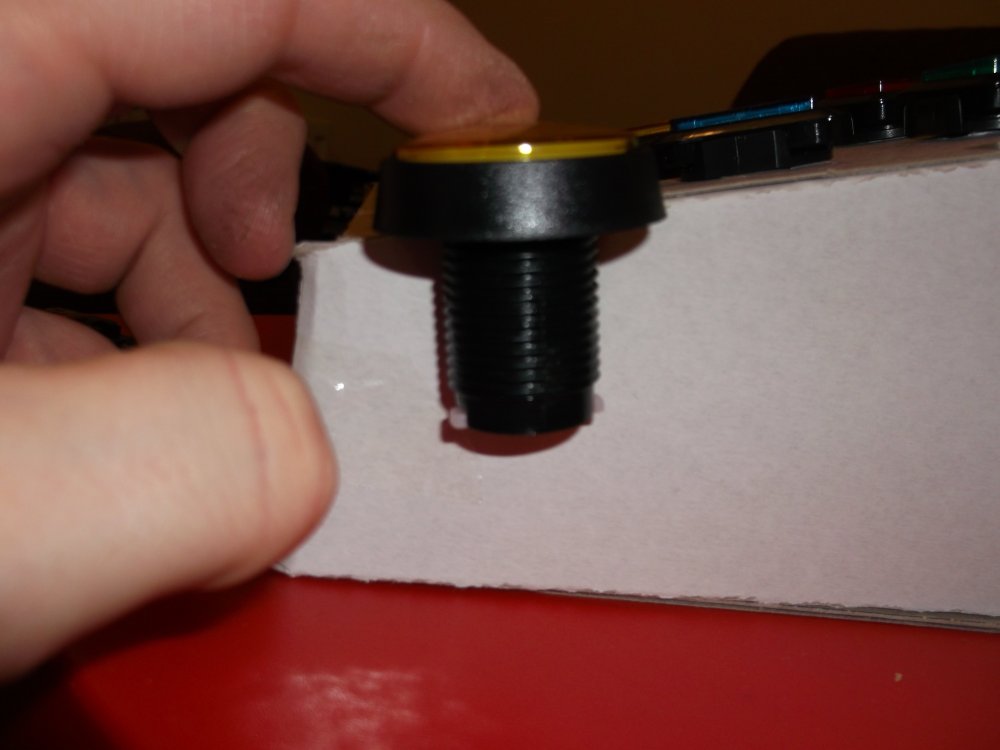
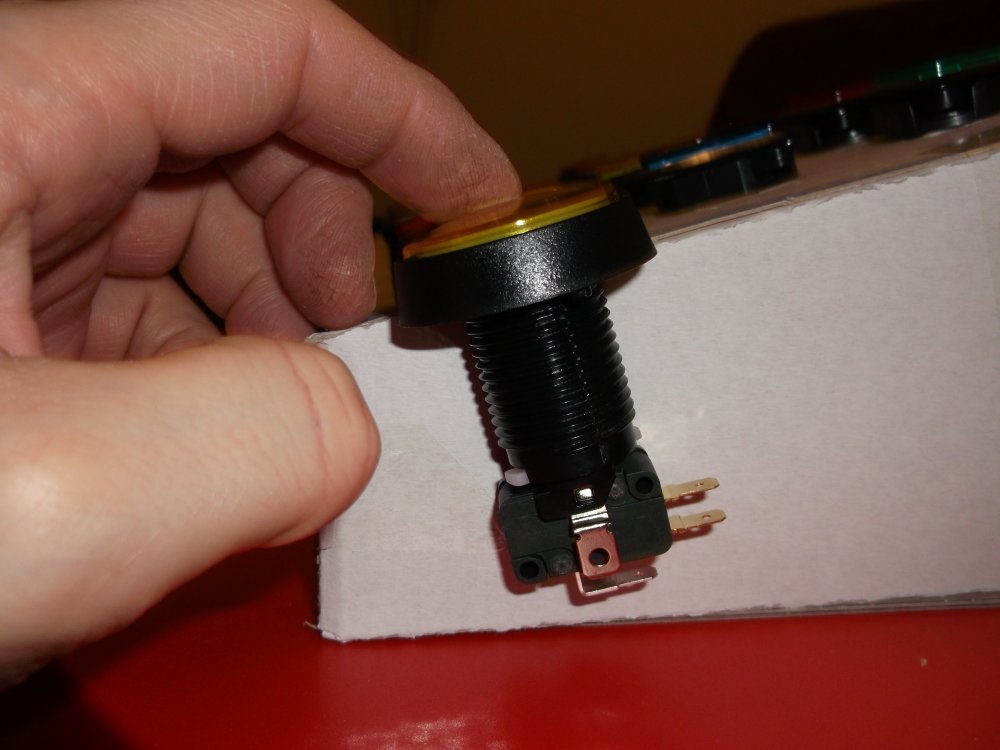
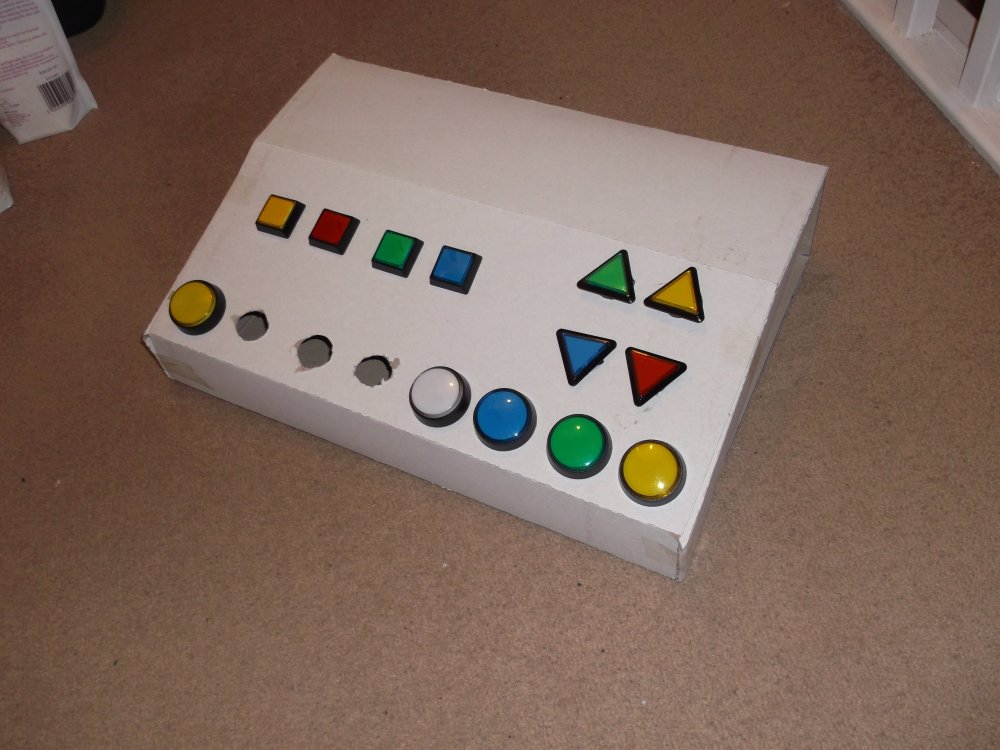
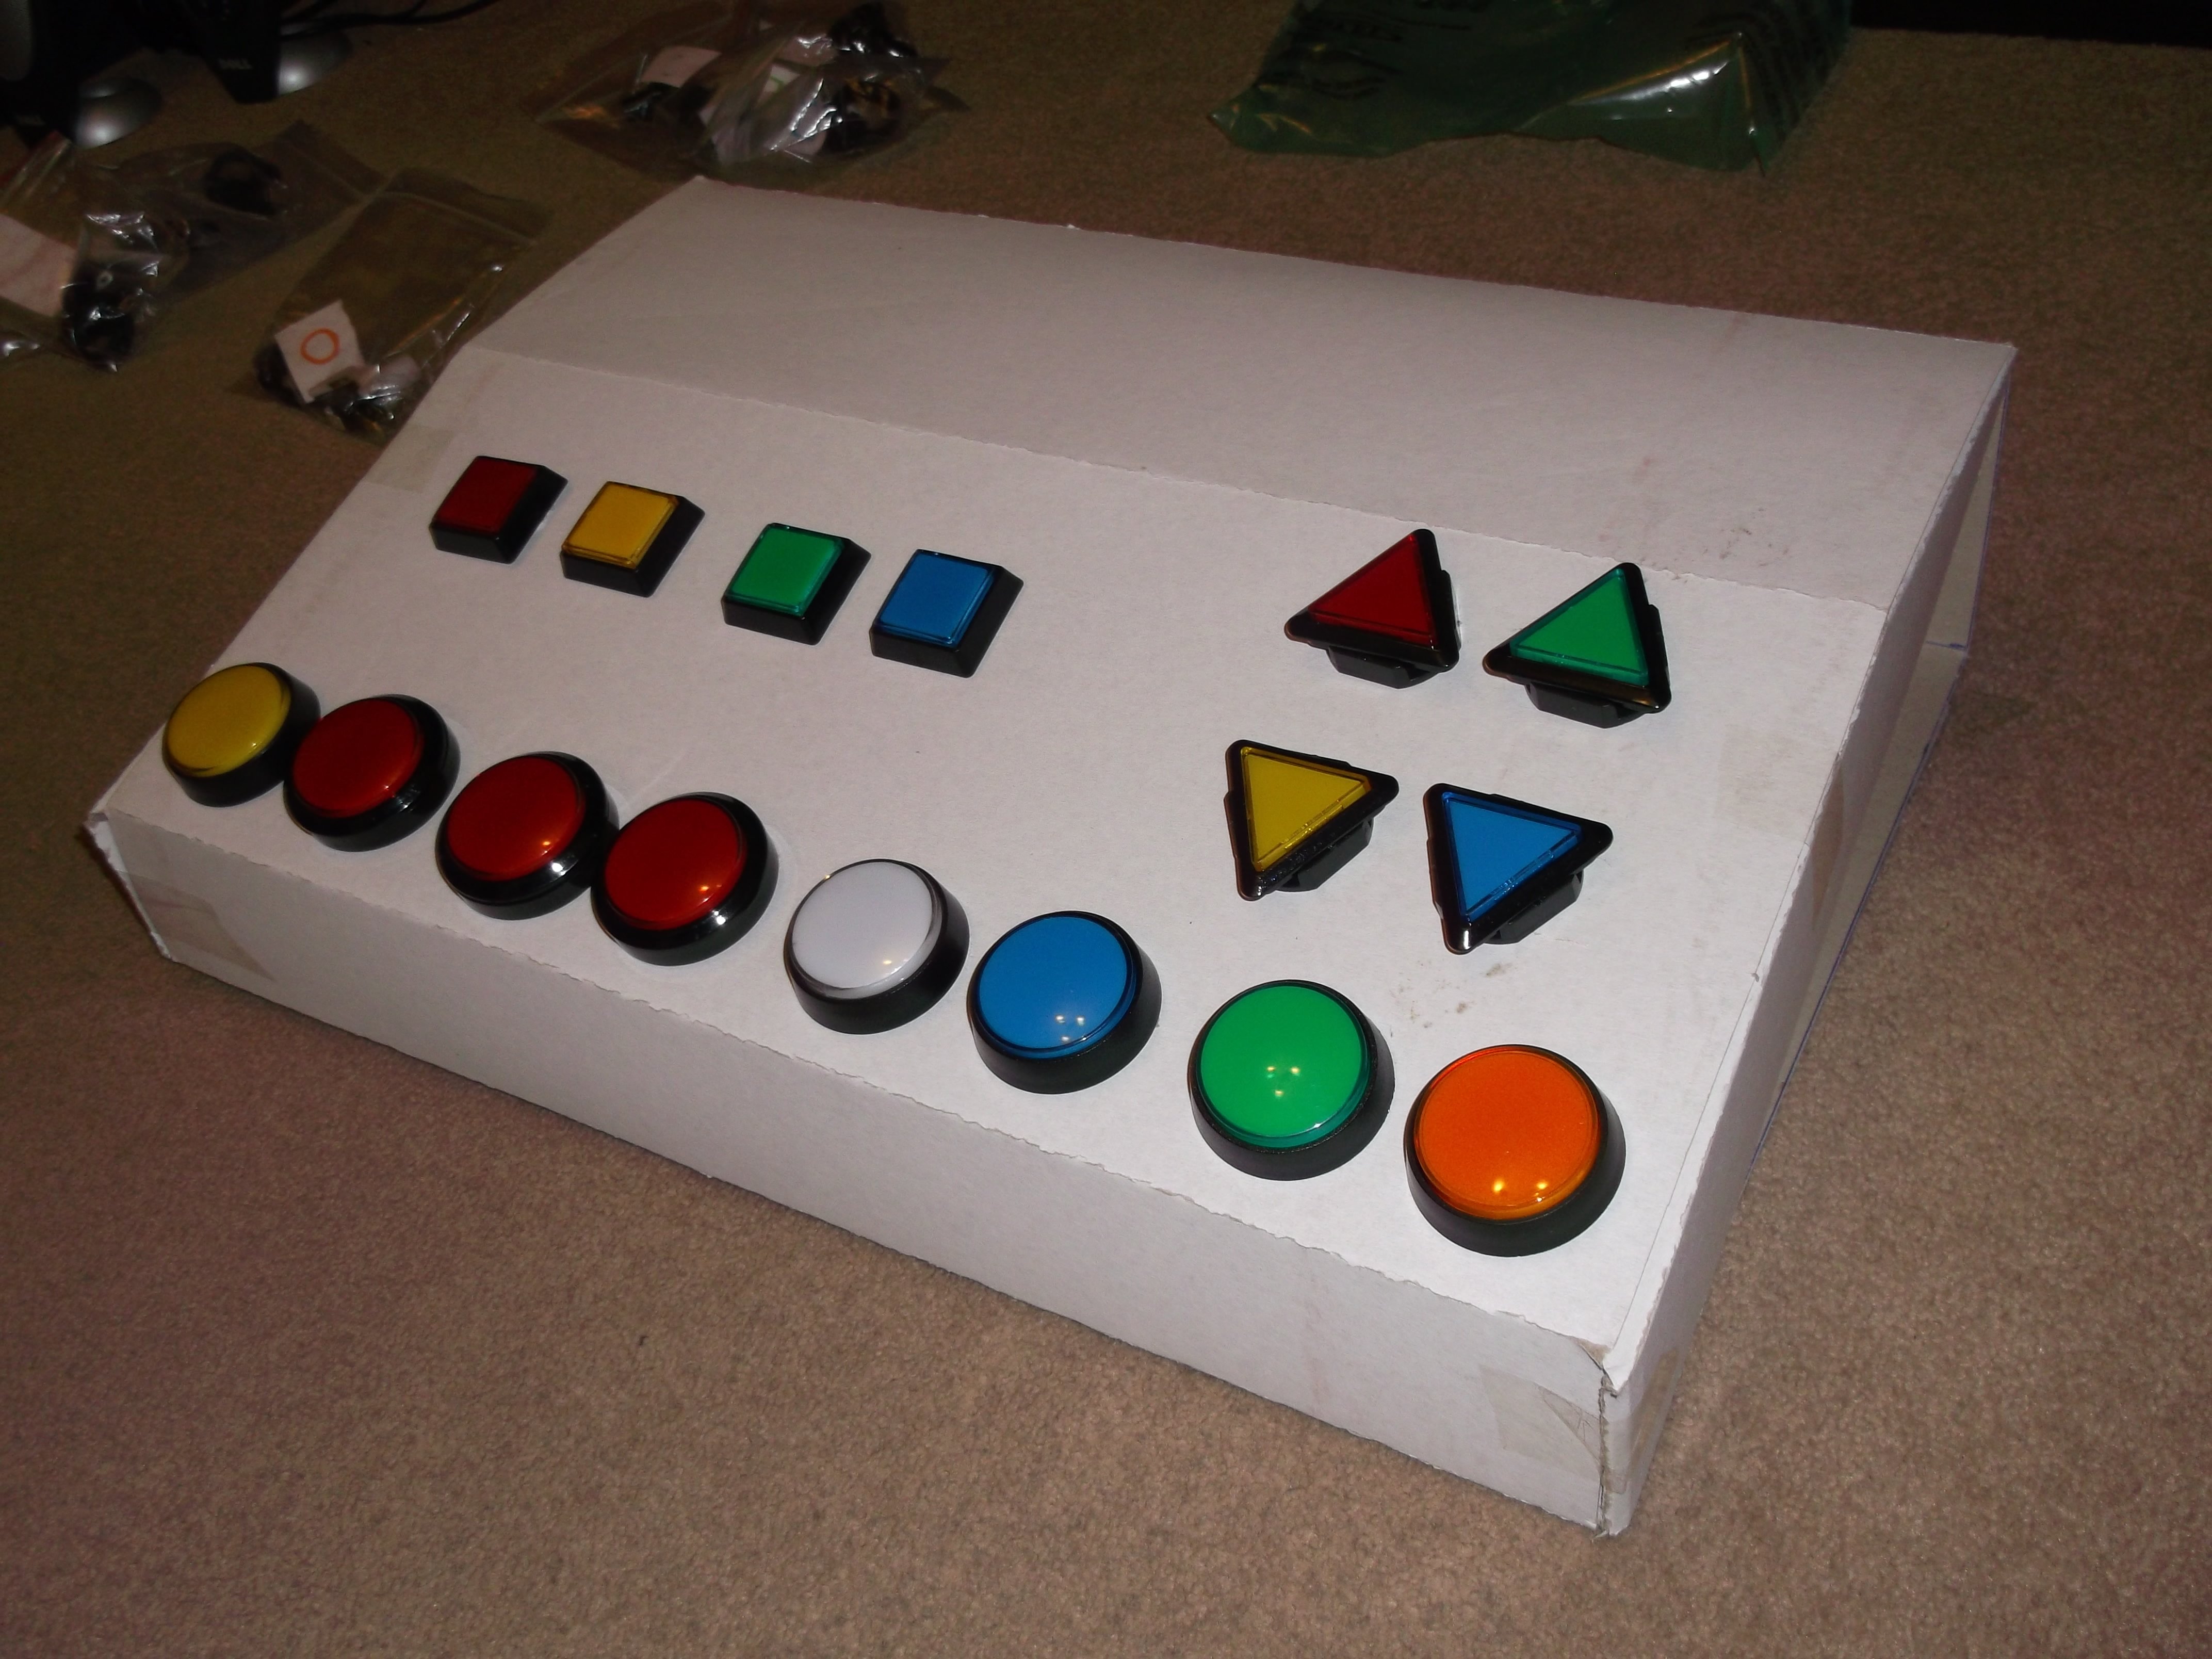
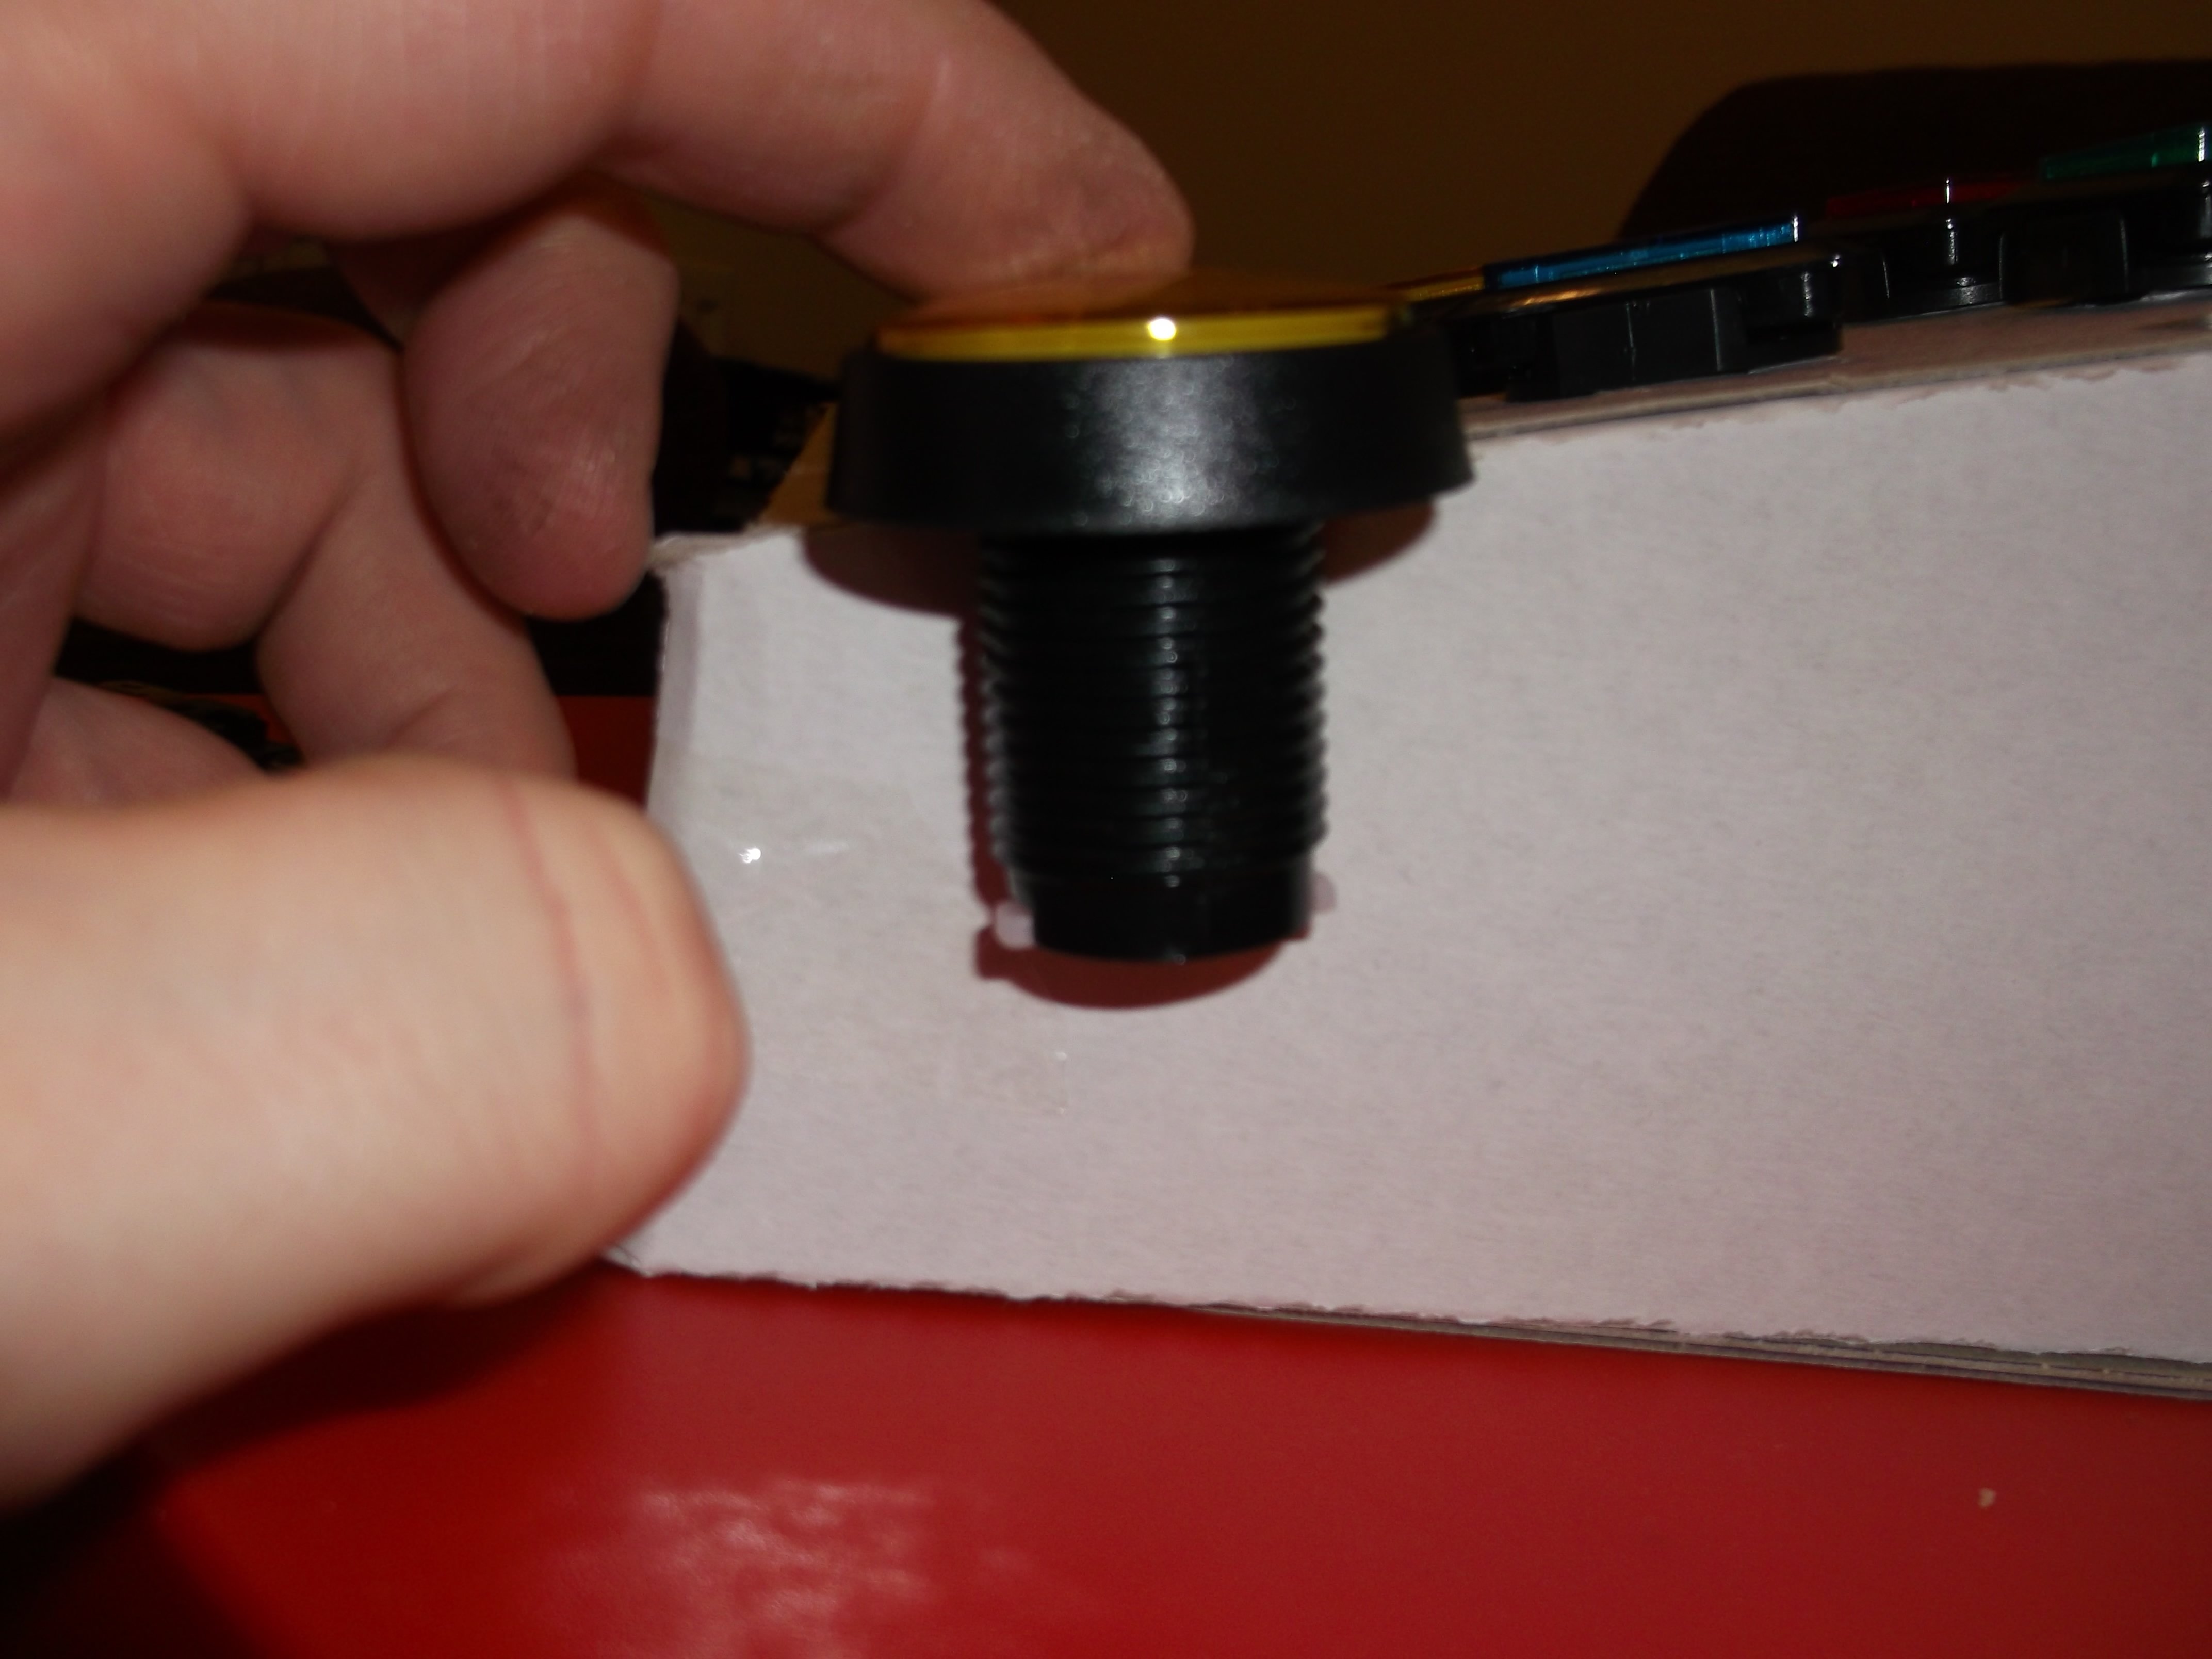
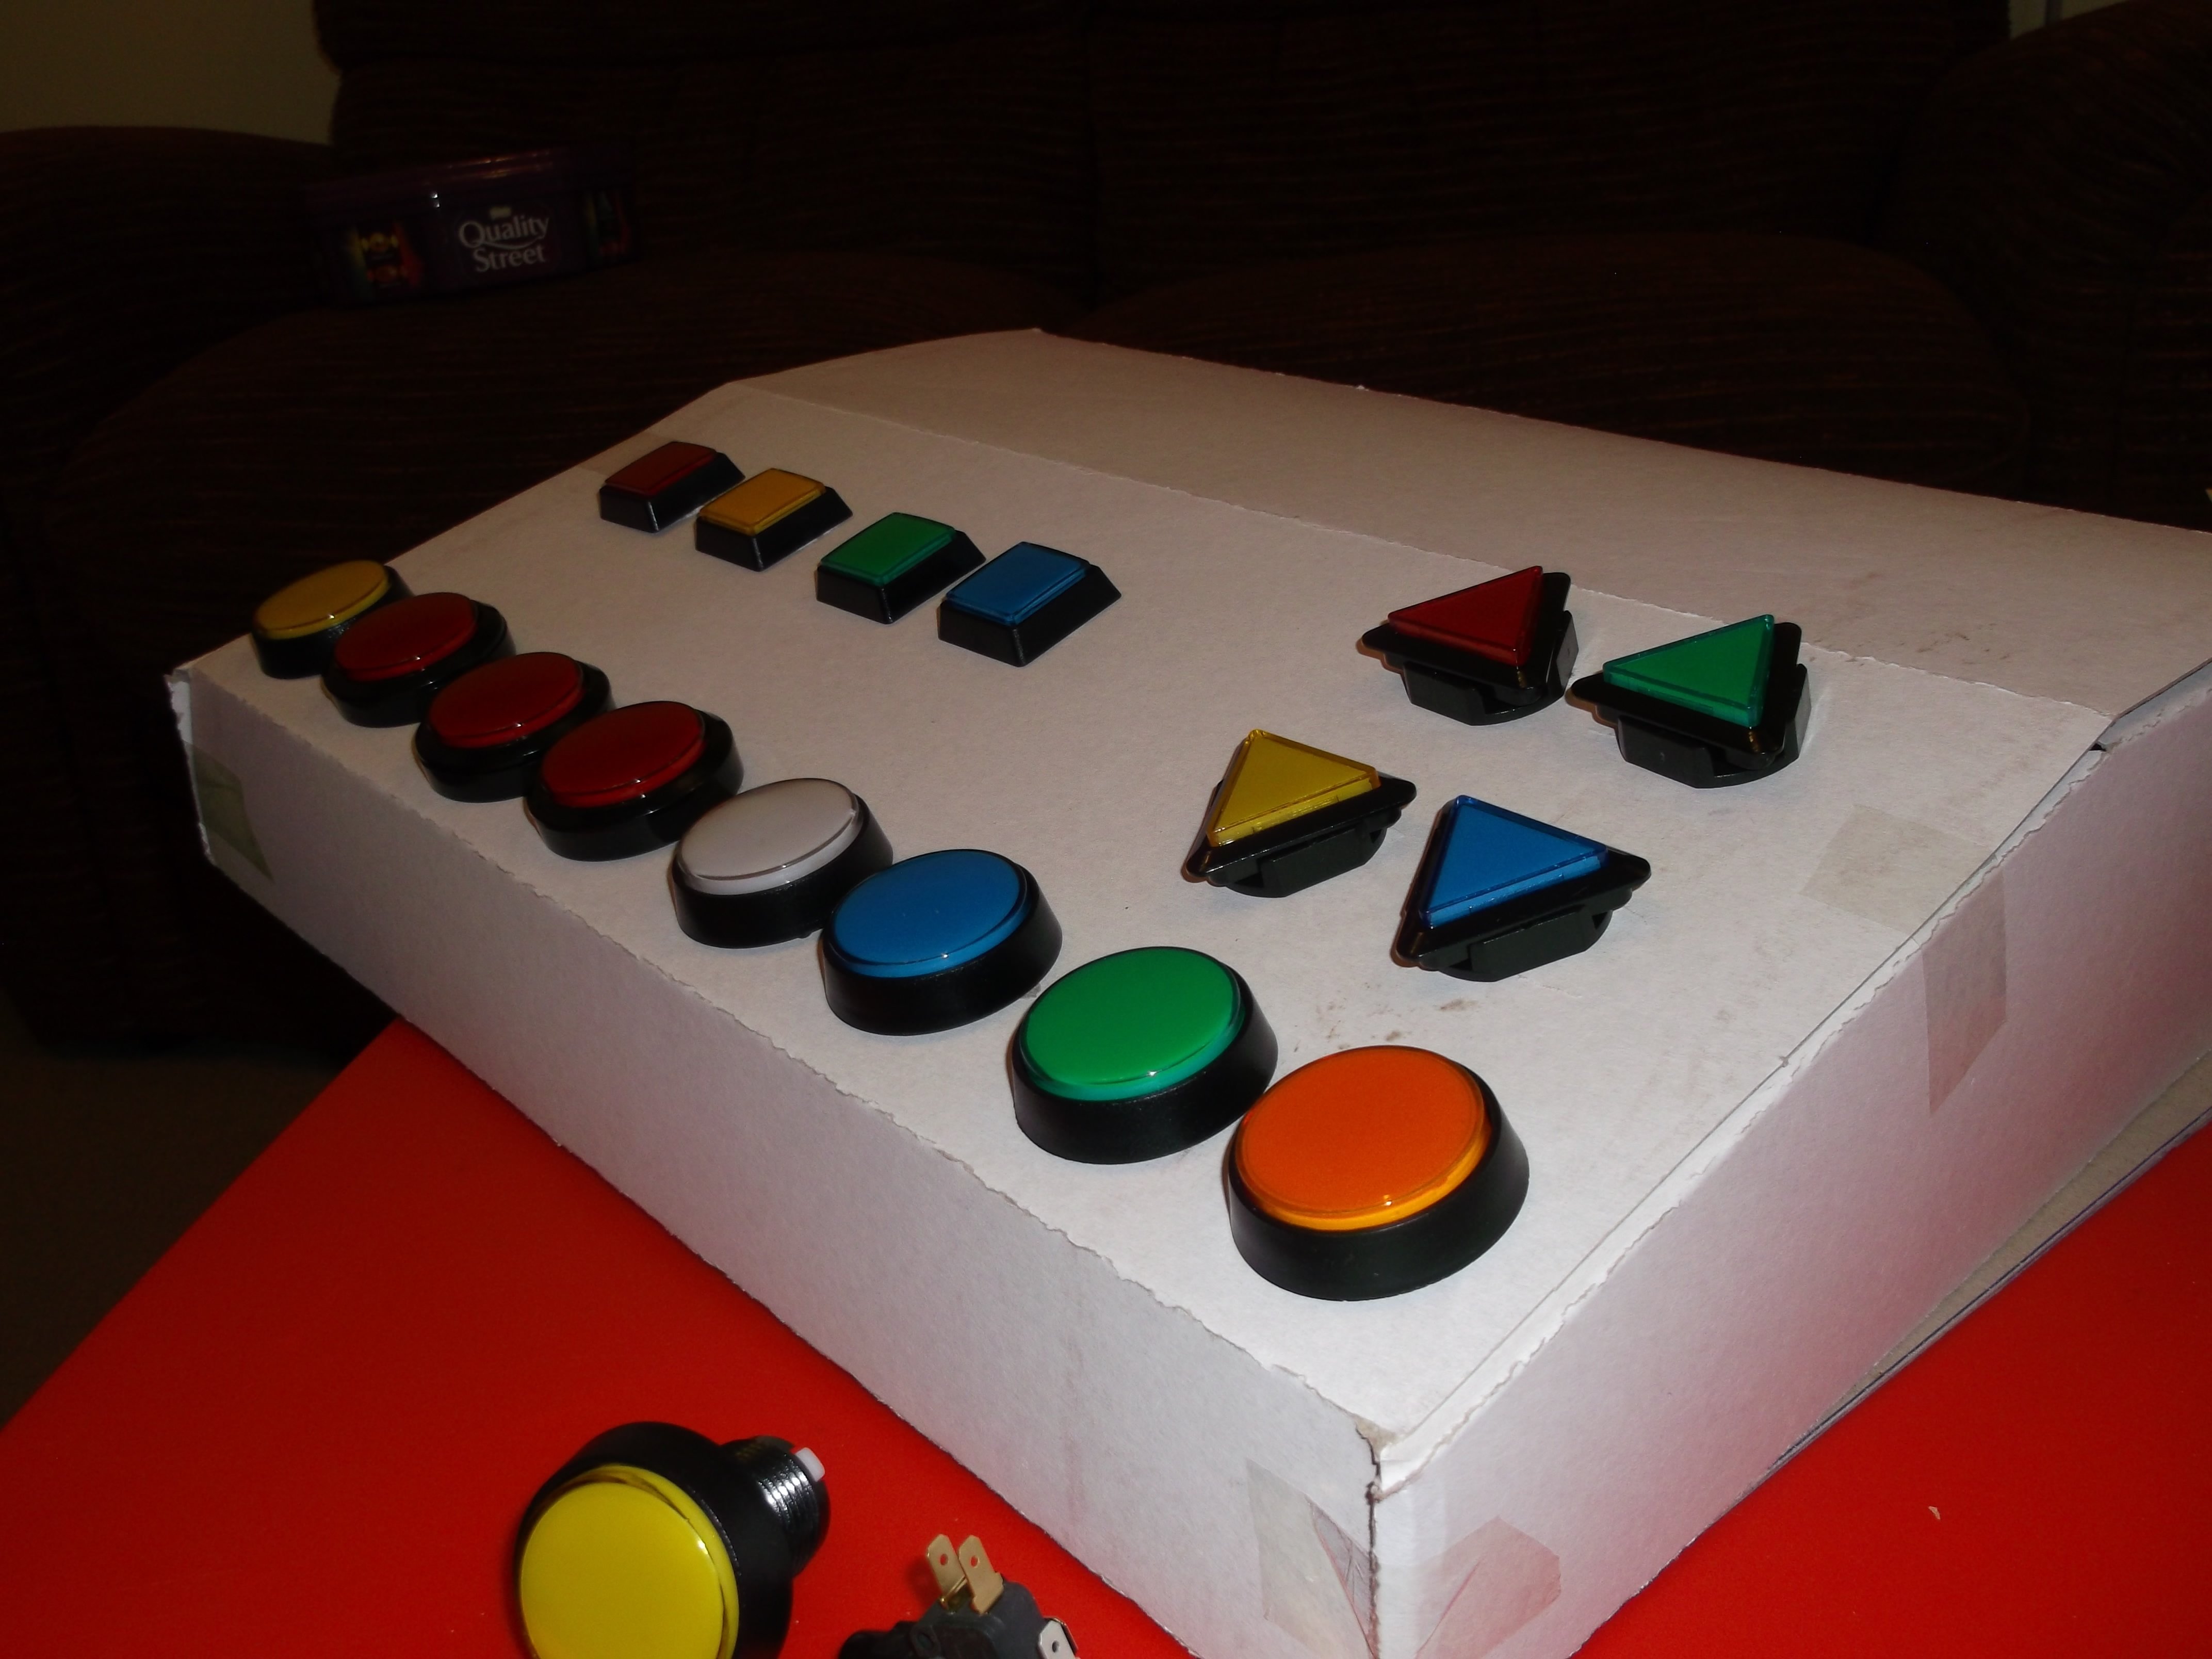
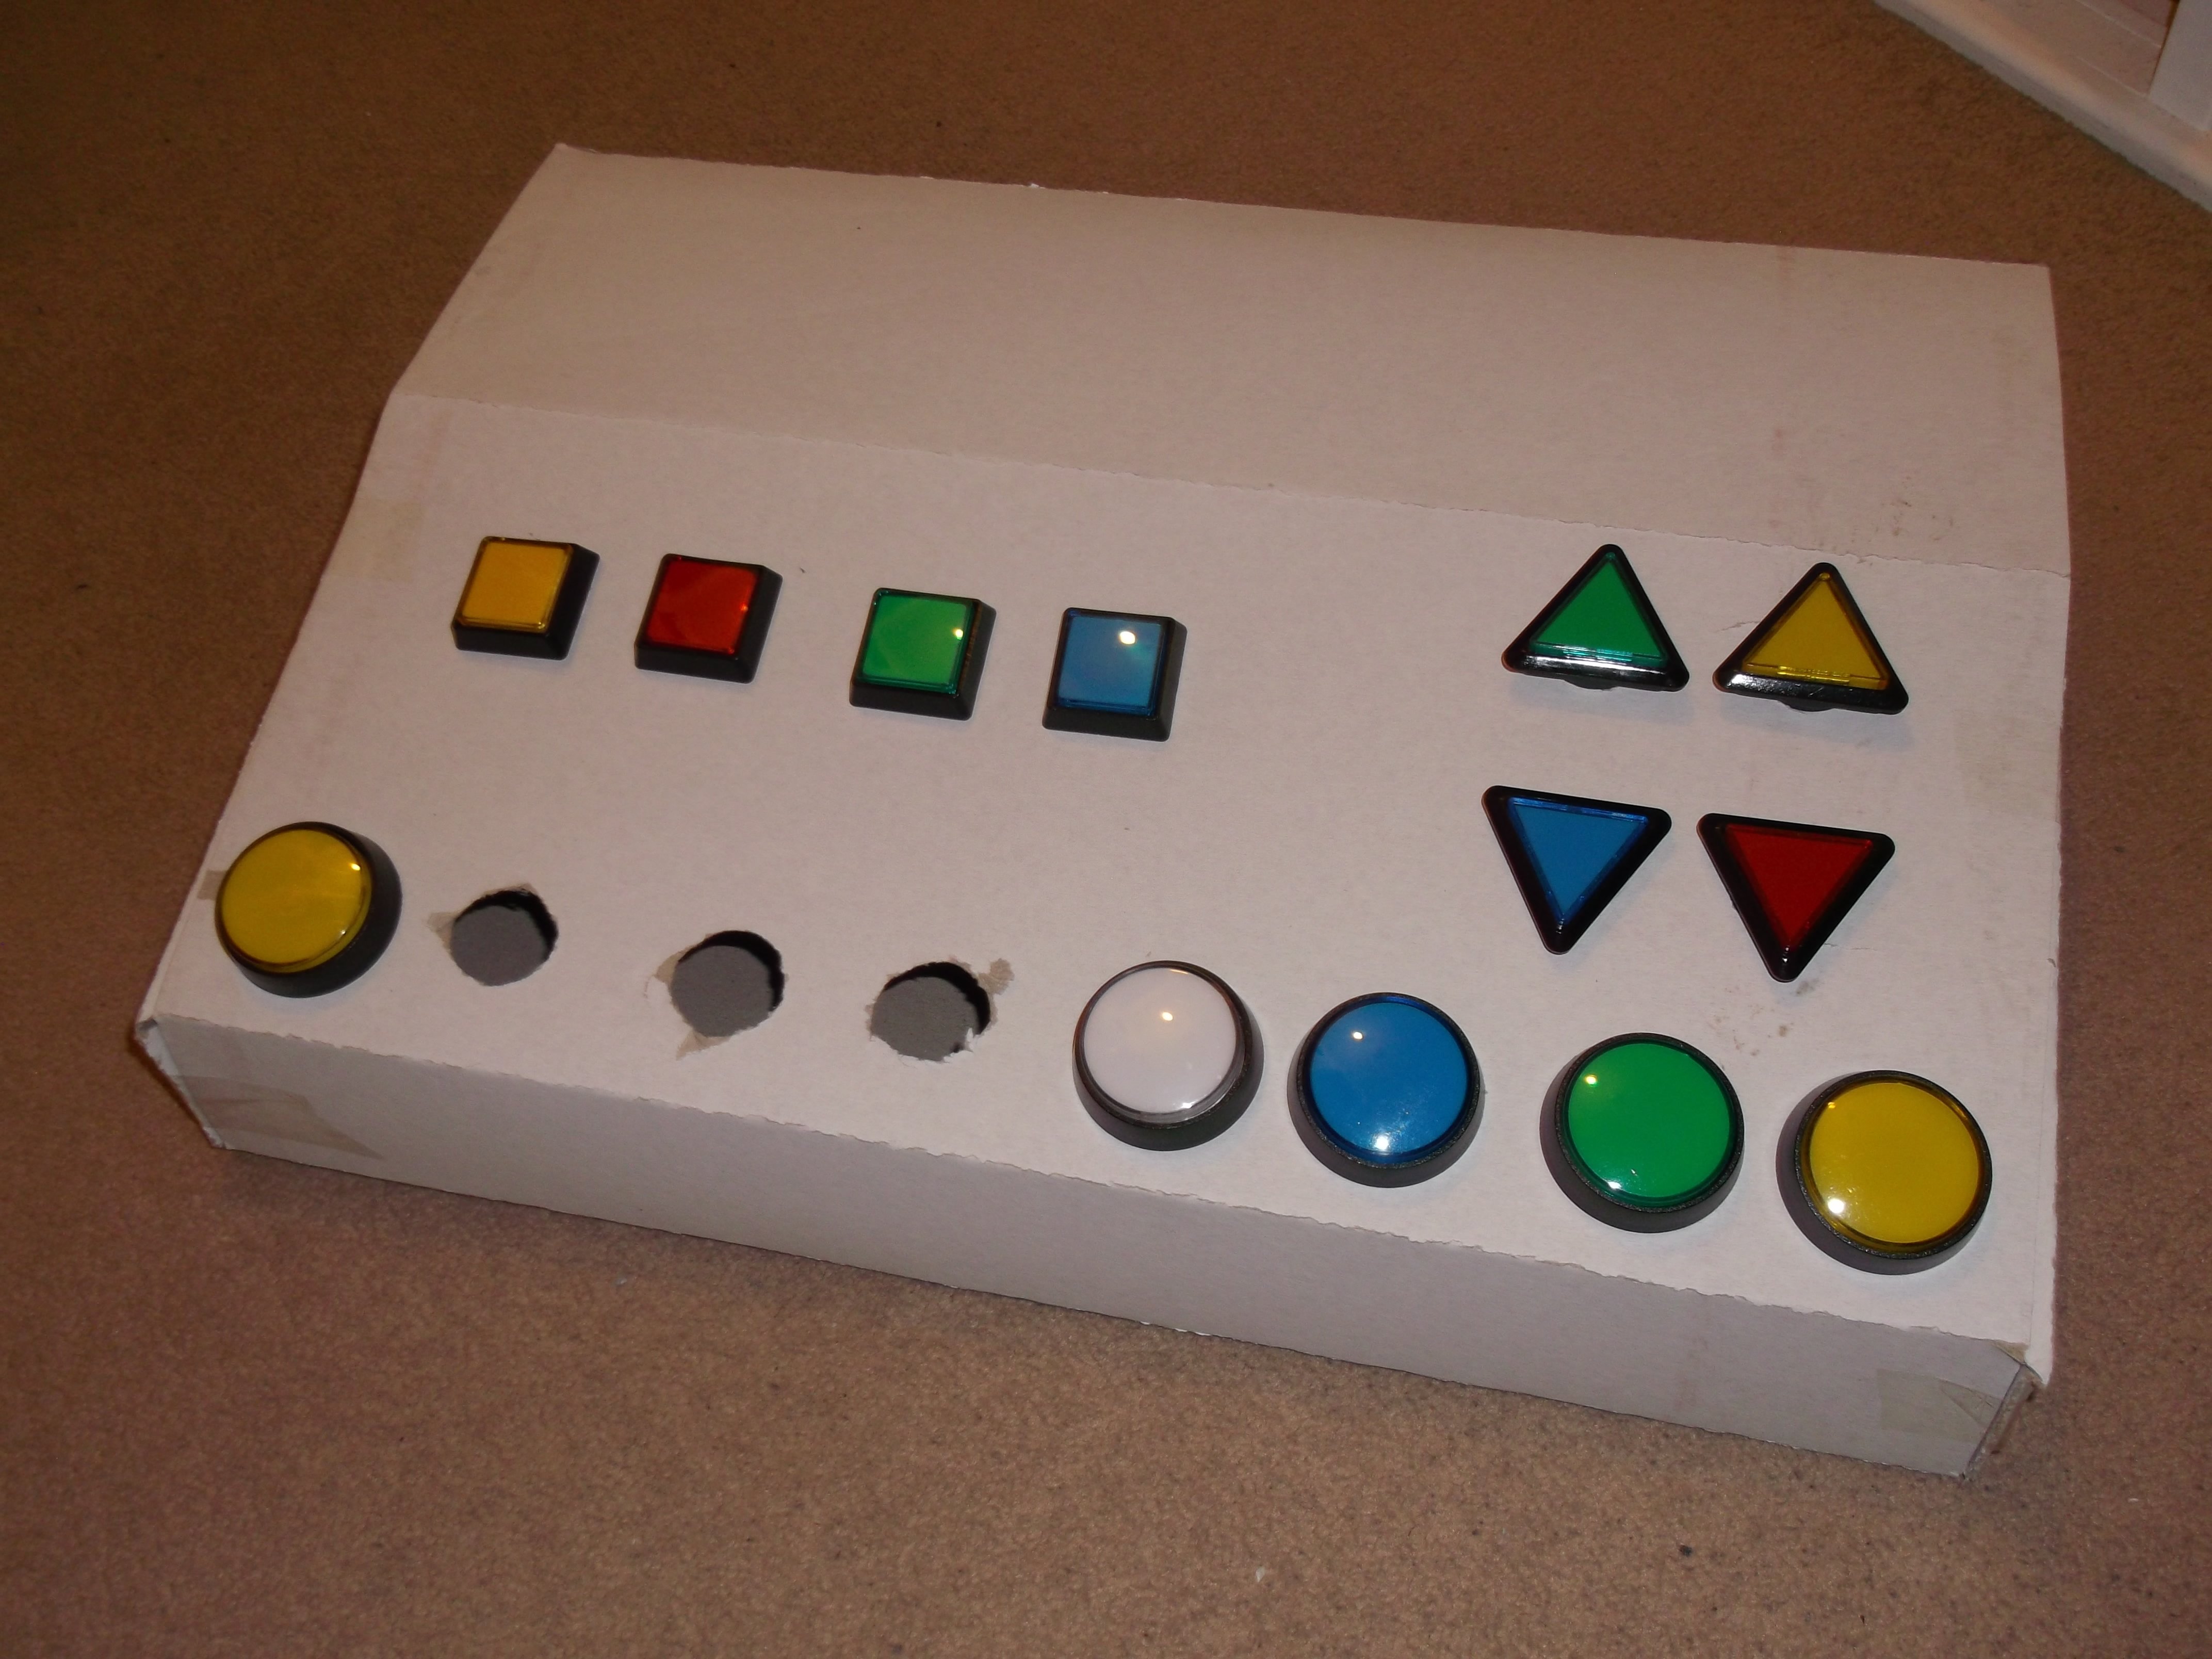
Small update, Postman Pat delivered the low profile red buttons, I think i won't need to get high profile ones as they have a spacer which makes em as chunky as the high profile buttons, they all look pretty much same heightwise - i like them!
I also treated myself to a Starpoint button simply because it added an extra splash of colour as it is orange!
 (at £5.40 a bit pricey, but it was only the one so sod it!)
https://www.arcadeworlduk.com/products/Starpoint-44mm-Illuminated-Arcade-Button.html
I love the way the coloured buttons all look now they are all here. The spare yellow button will be the 17th button (so will be unlit) and will go on the side of the case and will be the £1 coin input button.
Think i may have to make the front panel slant a bit steeper and/or make the front step higher by a cm or two as looking at a button complete with microswitch makes it almost touch the bottom and that could be fiddly as f**k when putting the wires in and/or any future maintenance - tho I would imagine once it's built it should stand the test of time... it better had anyway!
Next thing to do is do some woodwork with my brother - I am tempted to see how much it would cost to have a plastic case made tho, there is a company in my area that makes displays for shops and businesses out of Acrylic and they do custom designs but no idea how much that is... i'm poor so have a very low budget but might chuck em an email and see what they say - I mean if it was awesome enough they may find a fair few peeps from here would be grabbing one off em too and they'd be quids in! - anyway I'm waffling! - Here's some pics...
Till next time!
Gary.


-
3
-
-
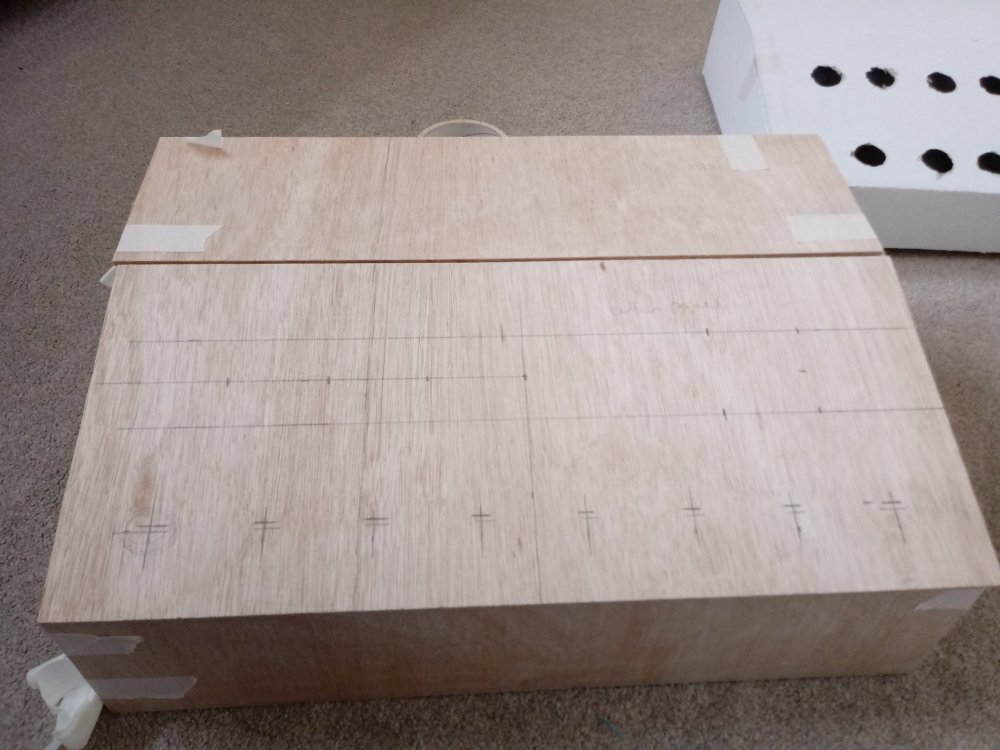
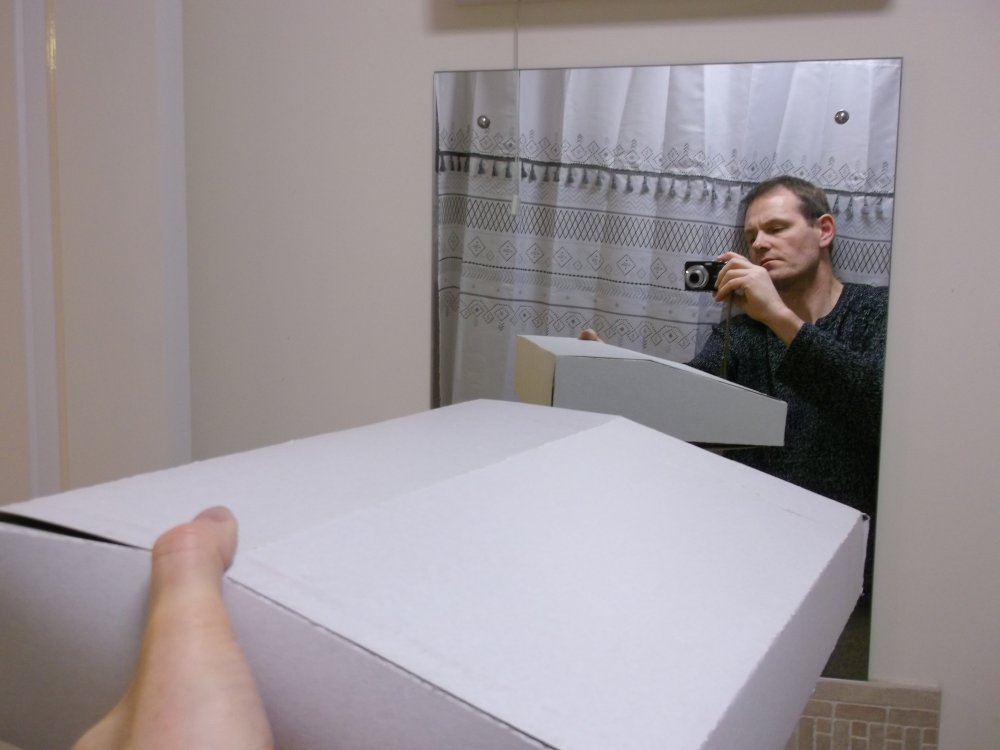
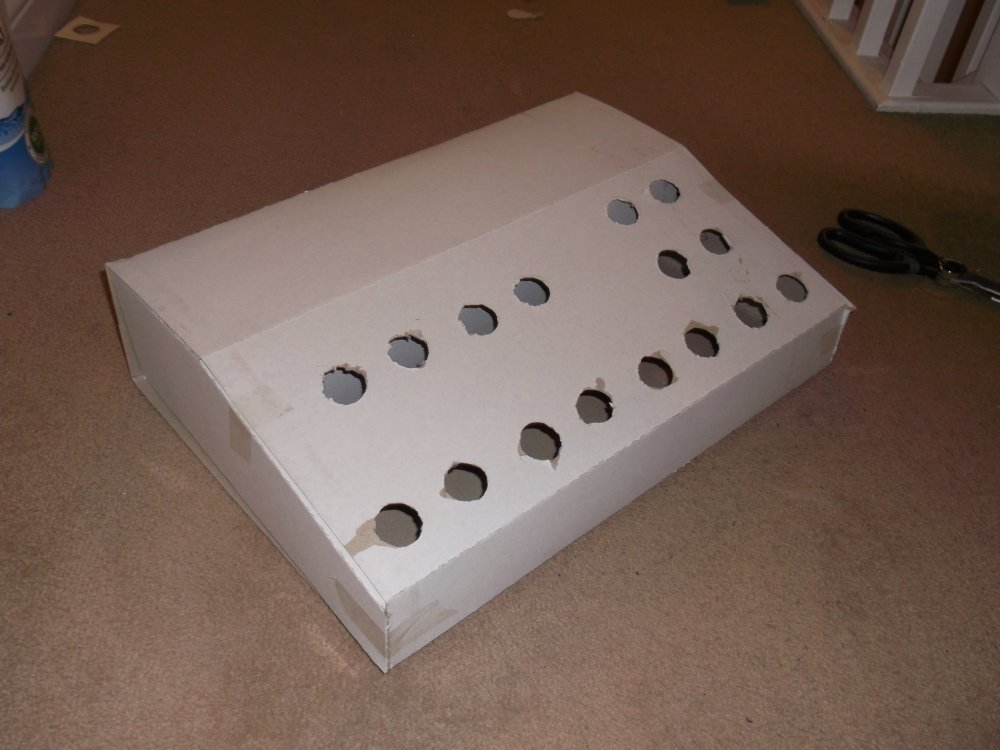
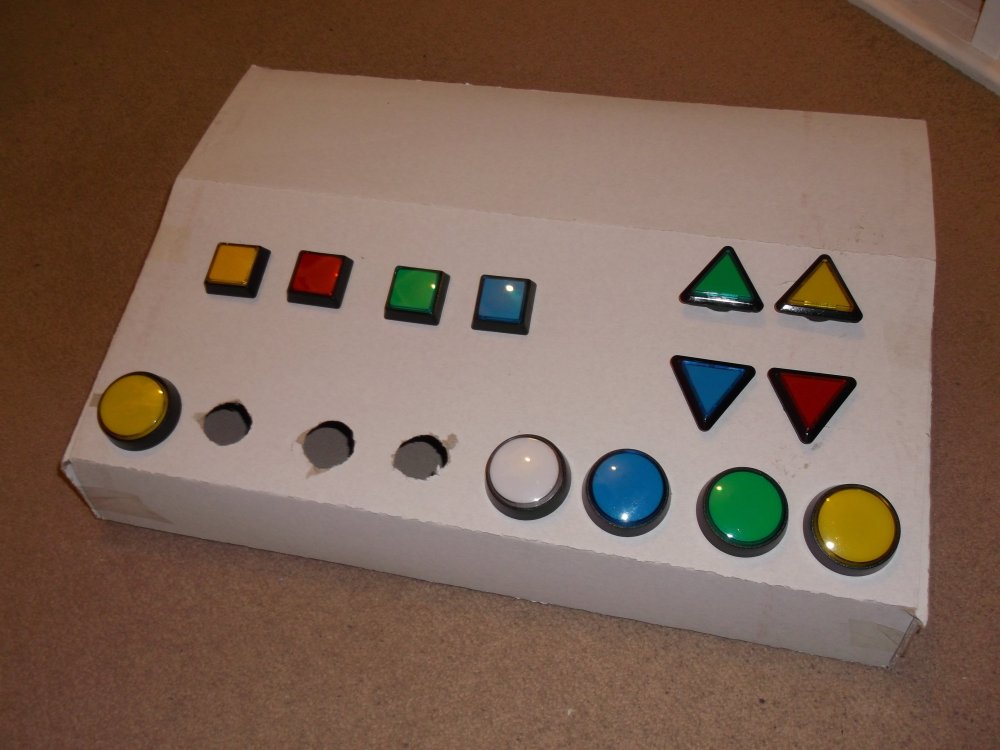
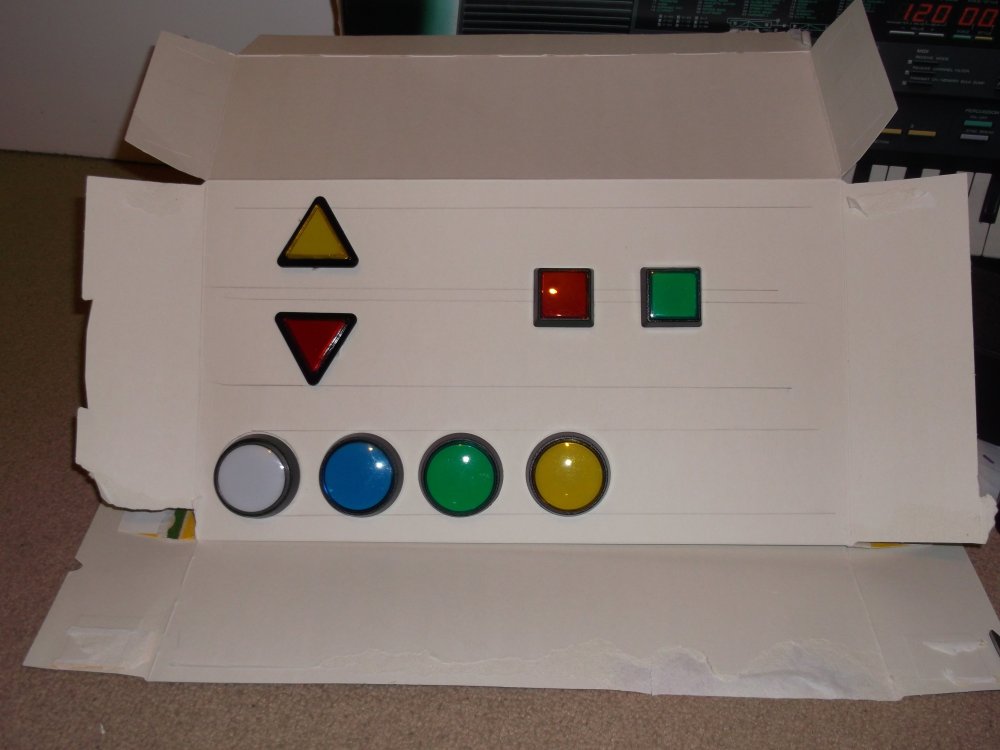
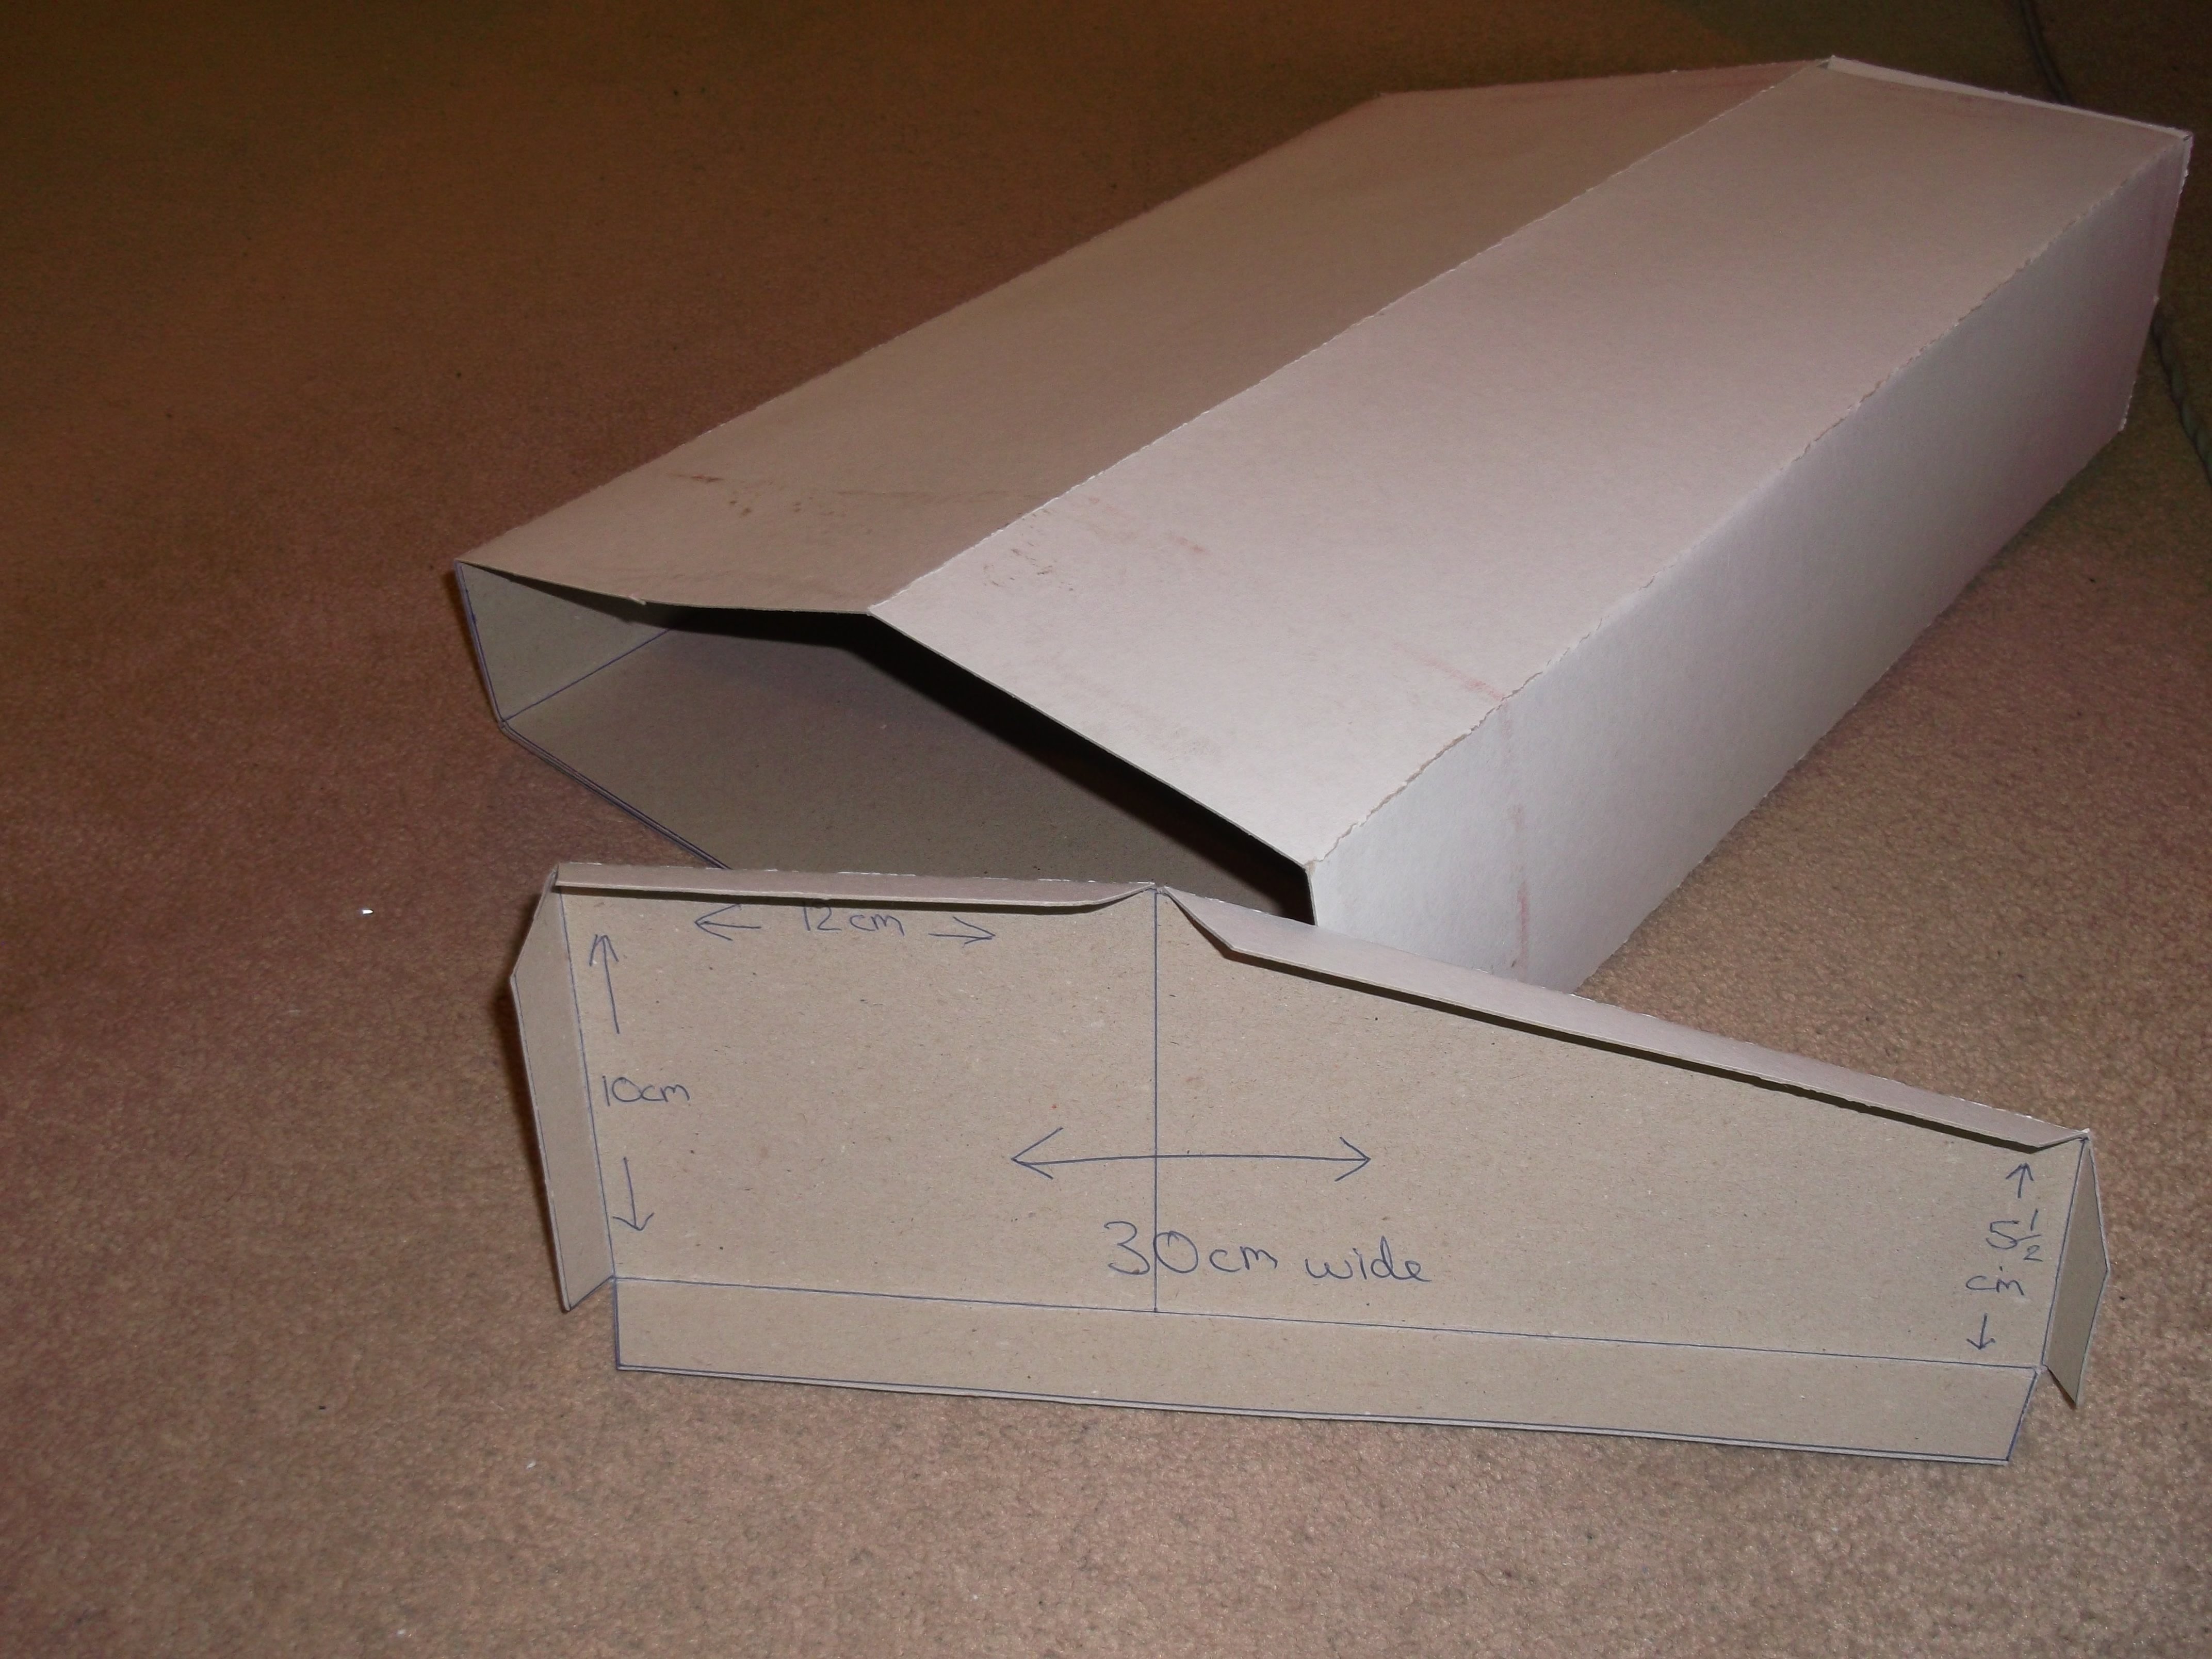
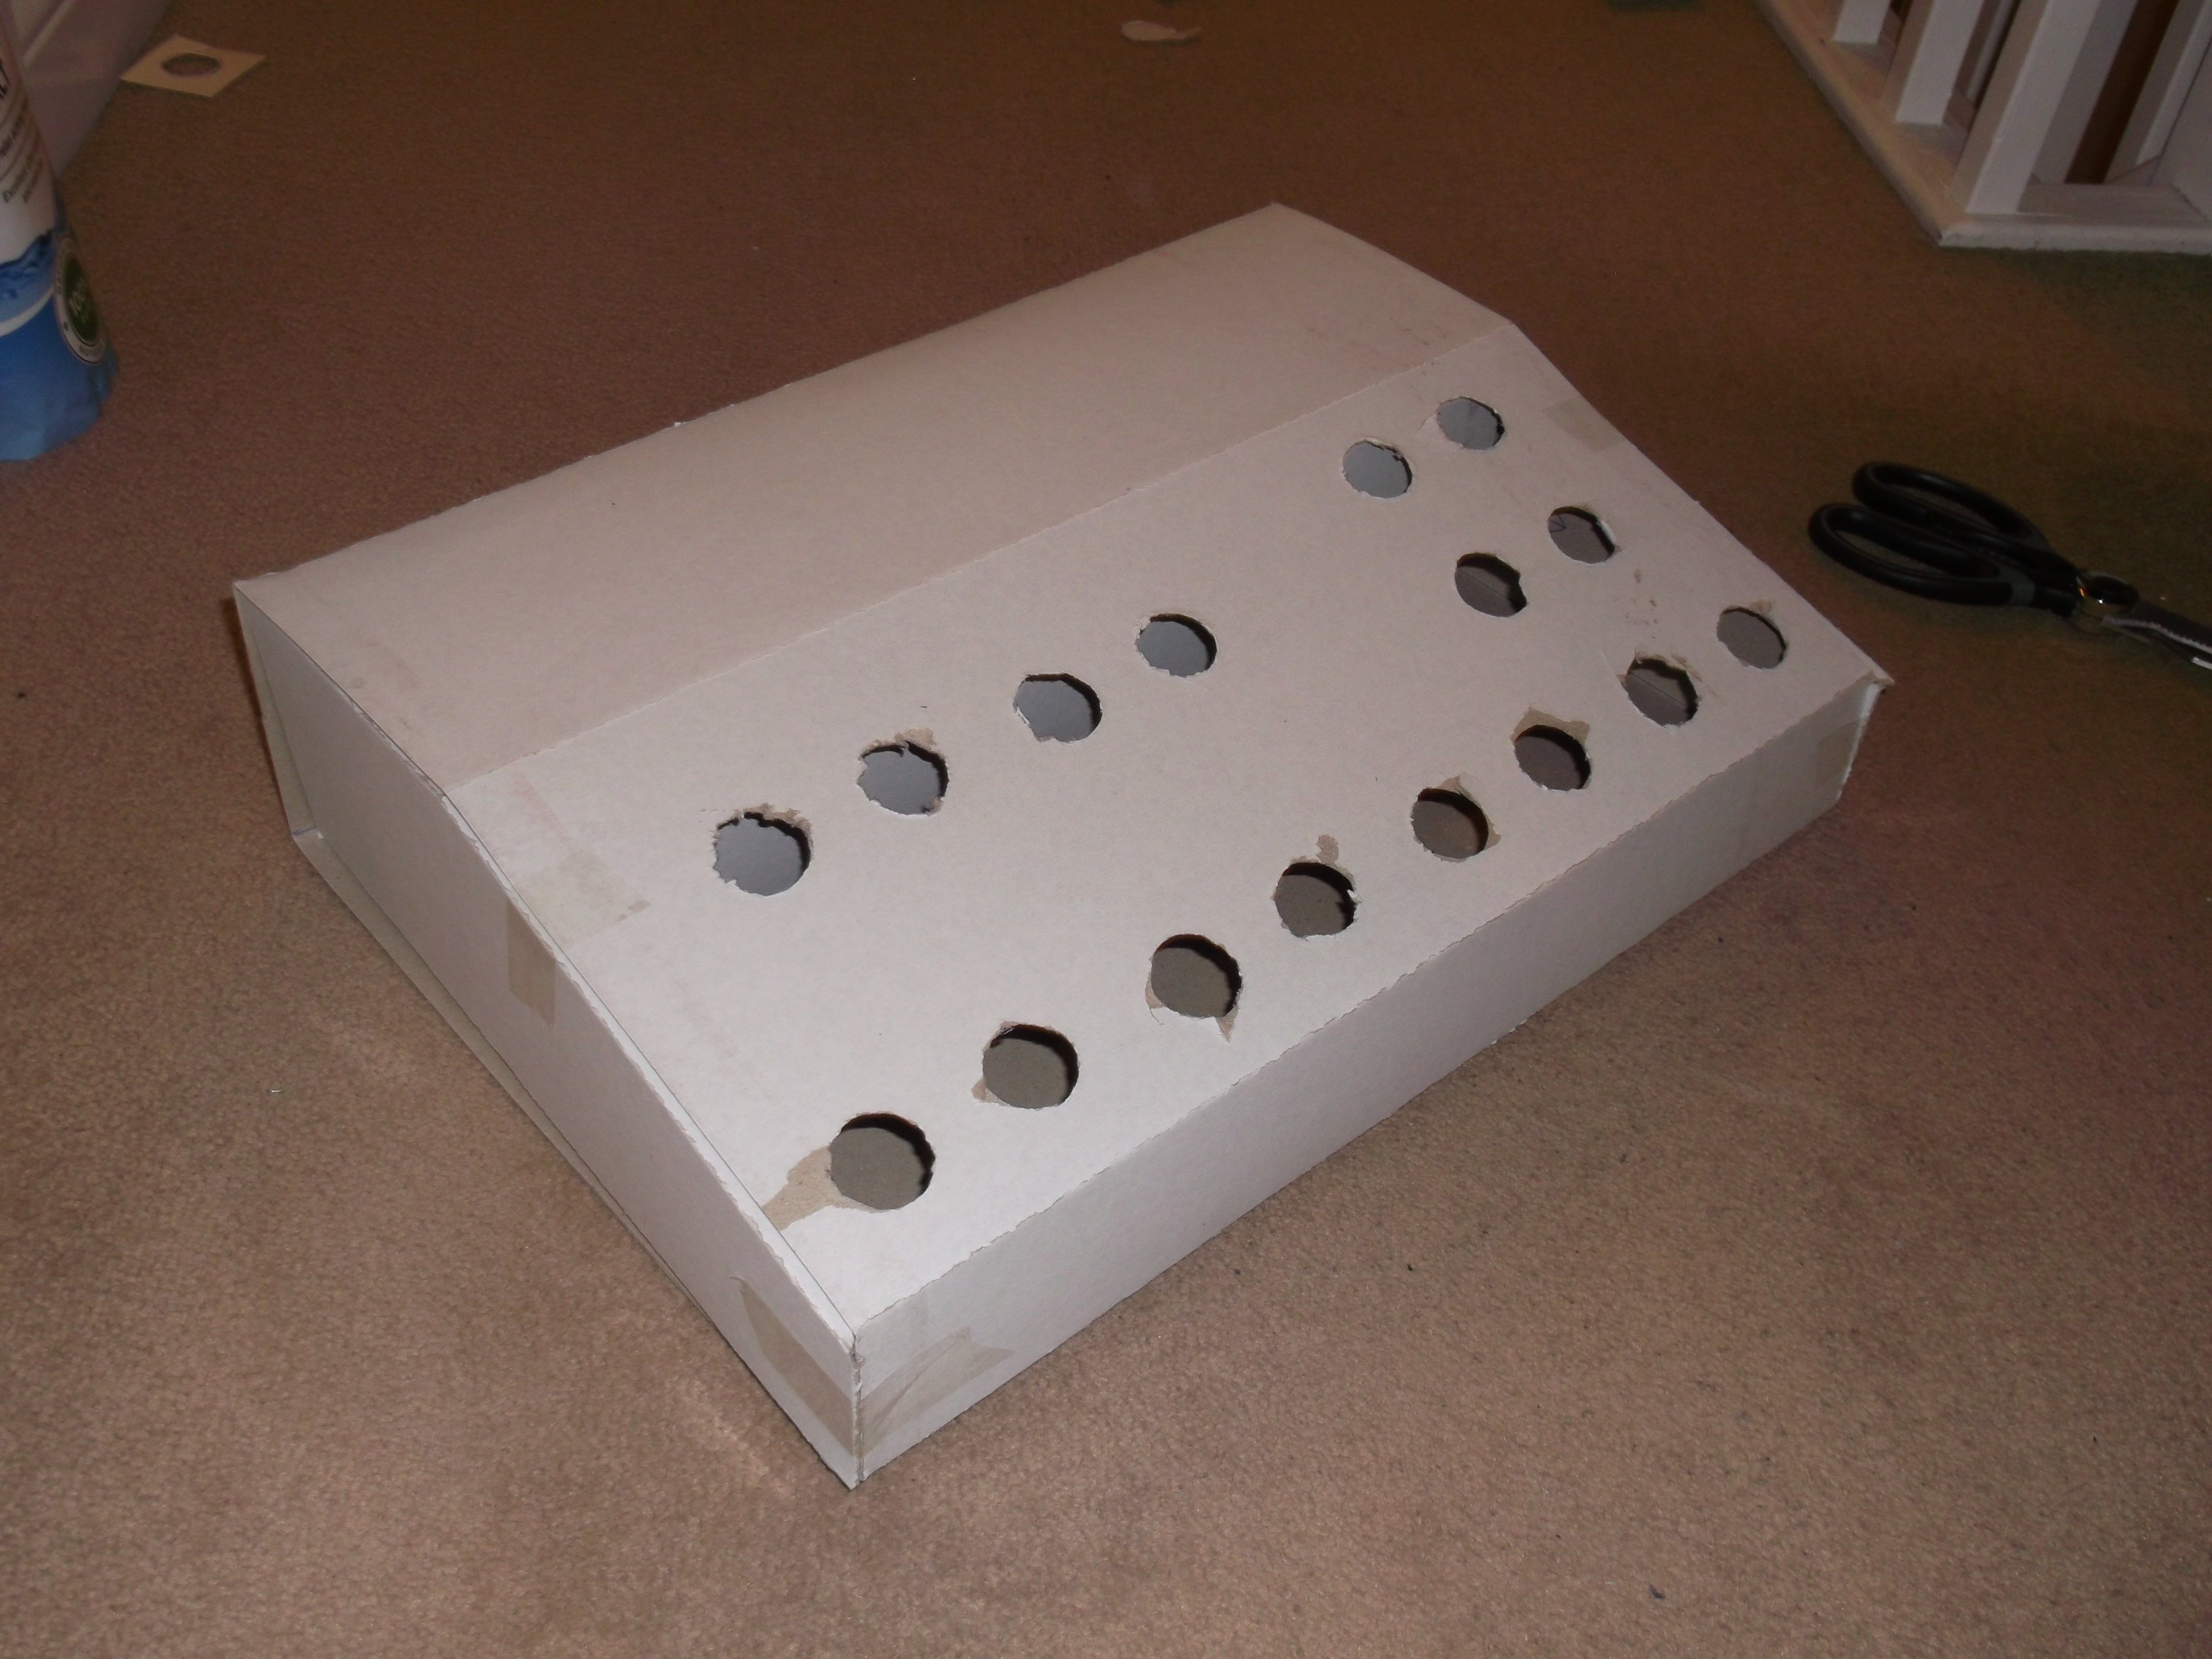
Prototype Keyboard box:
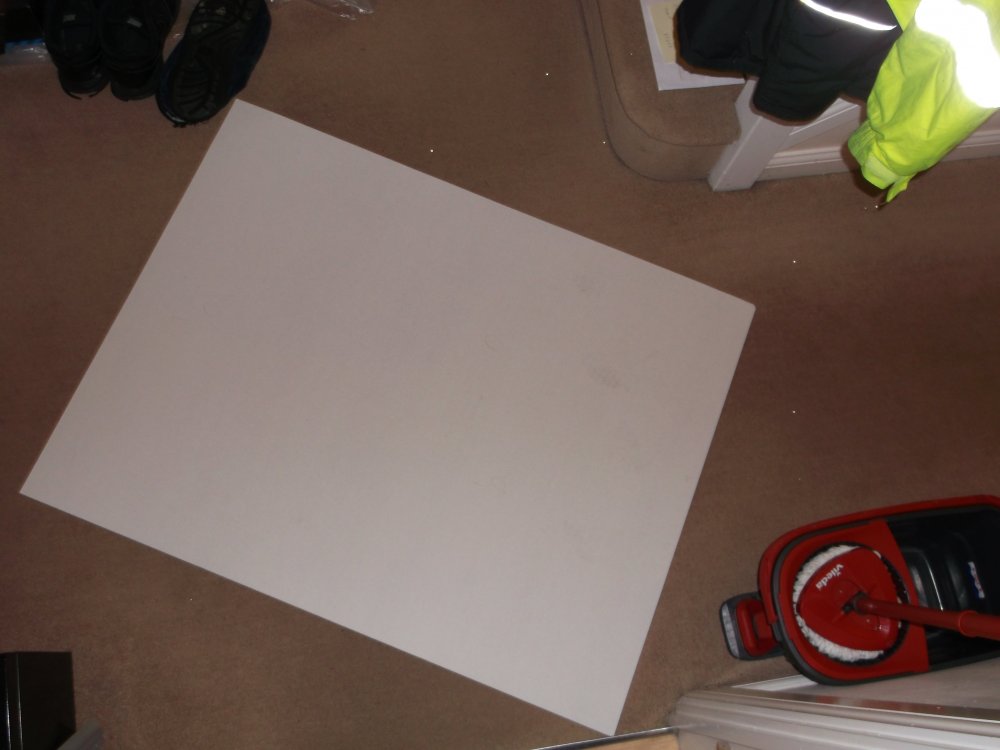
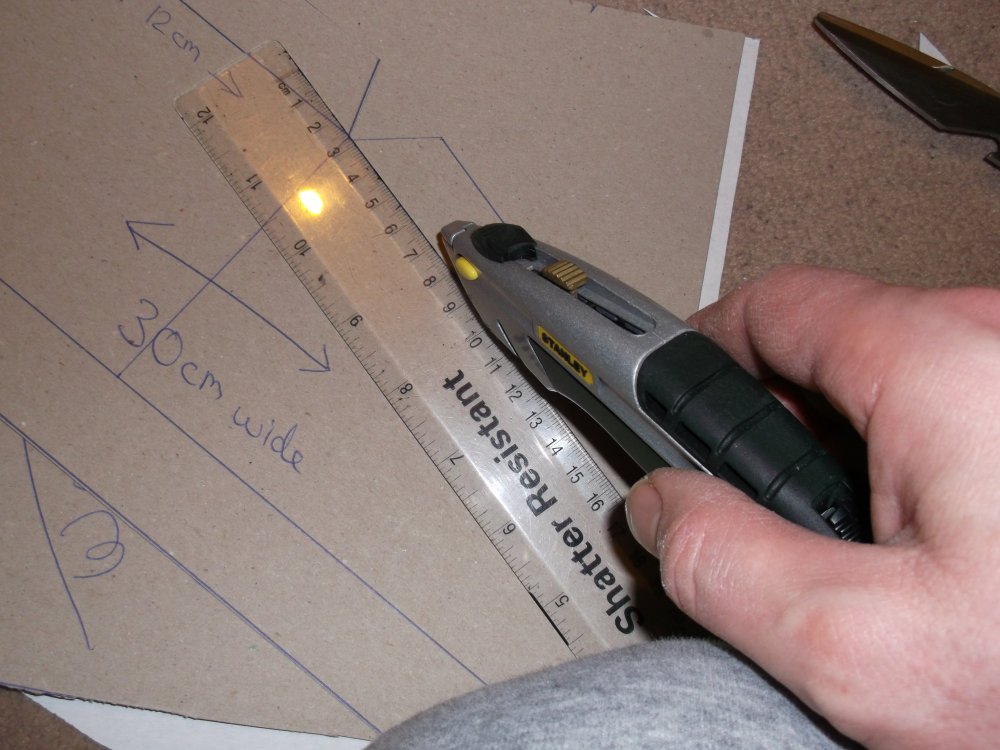
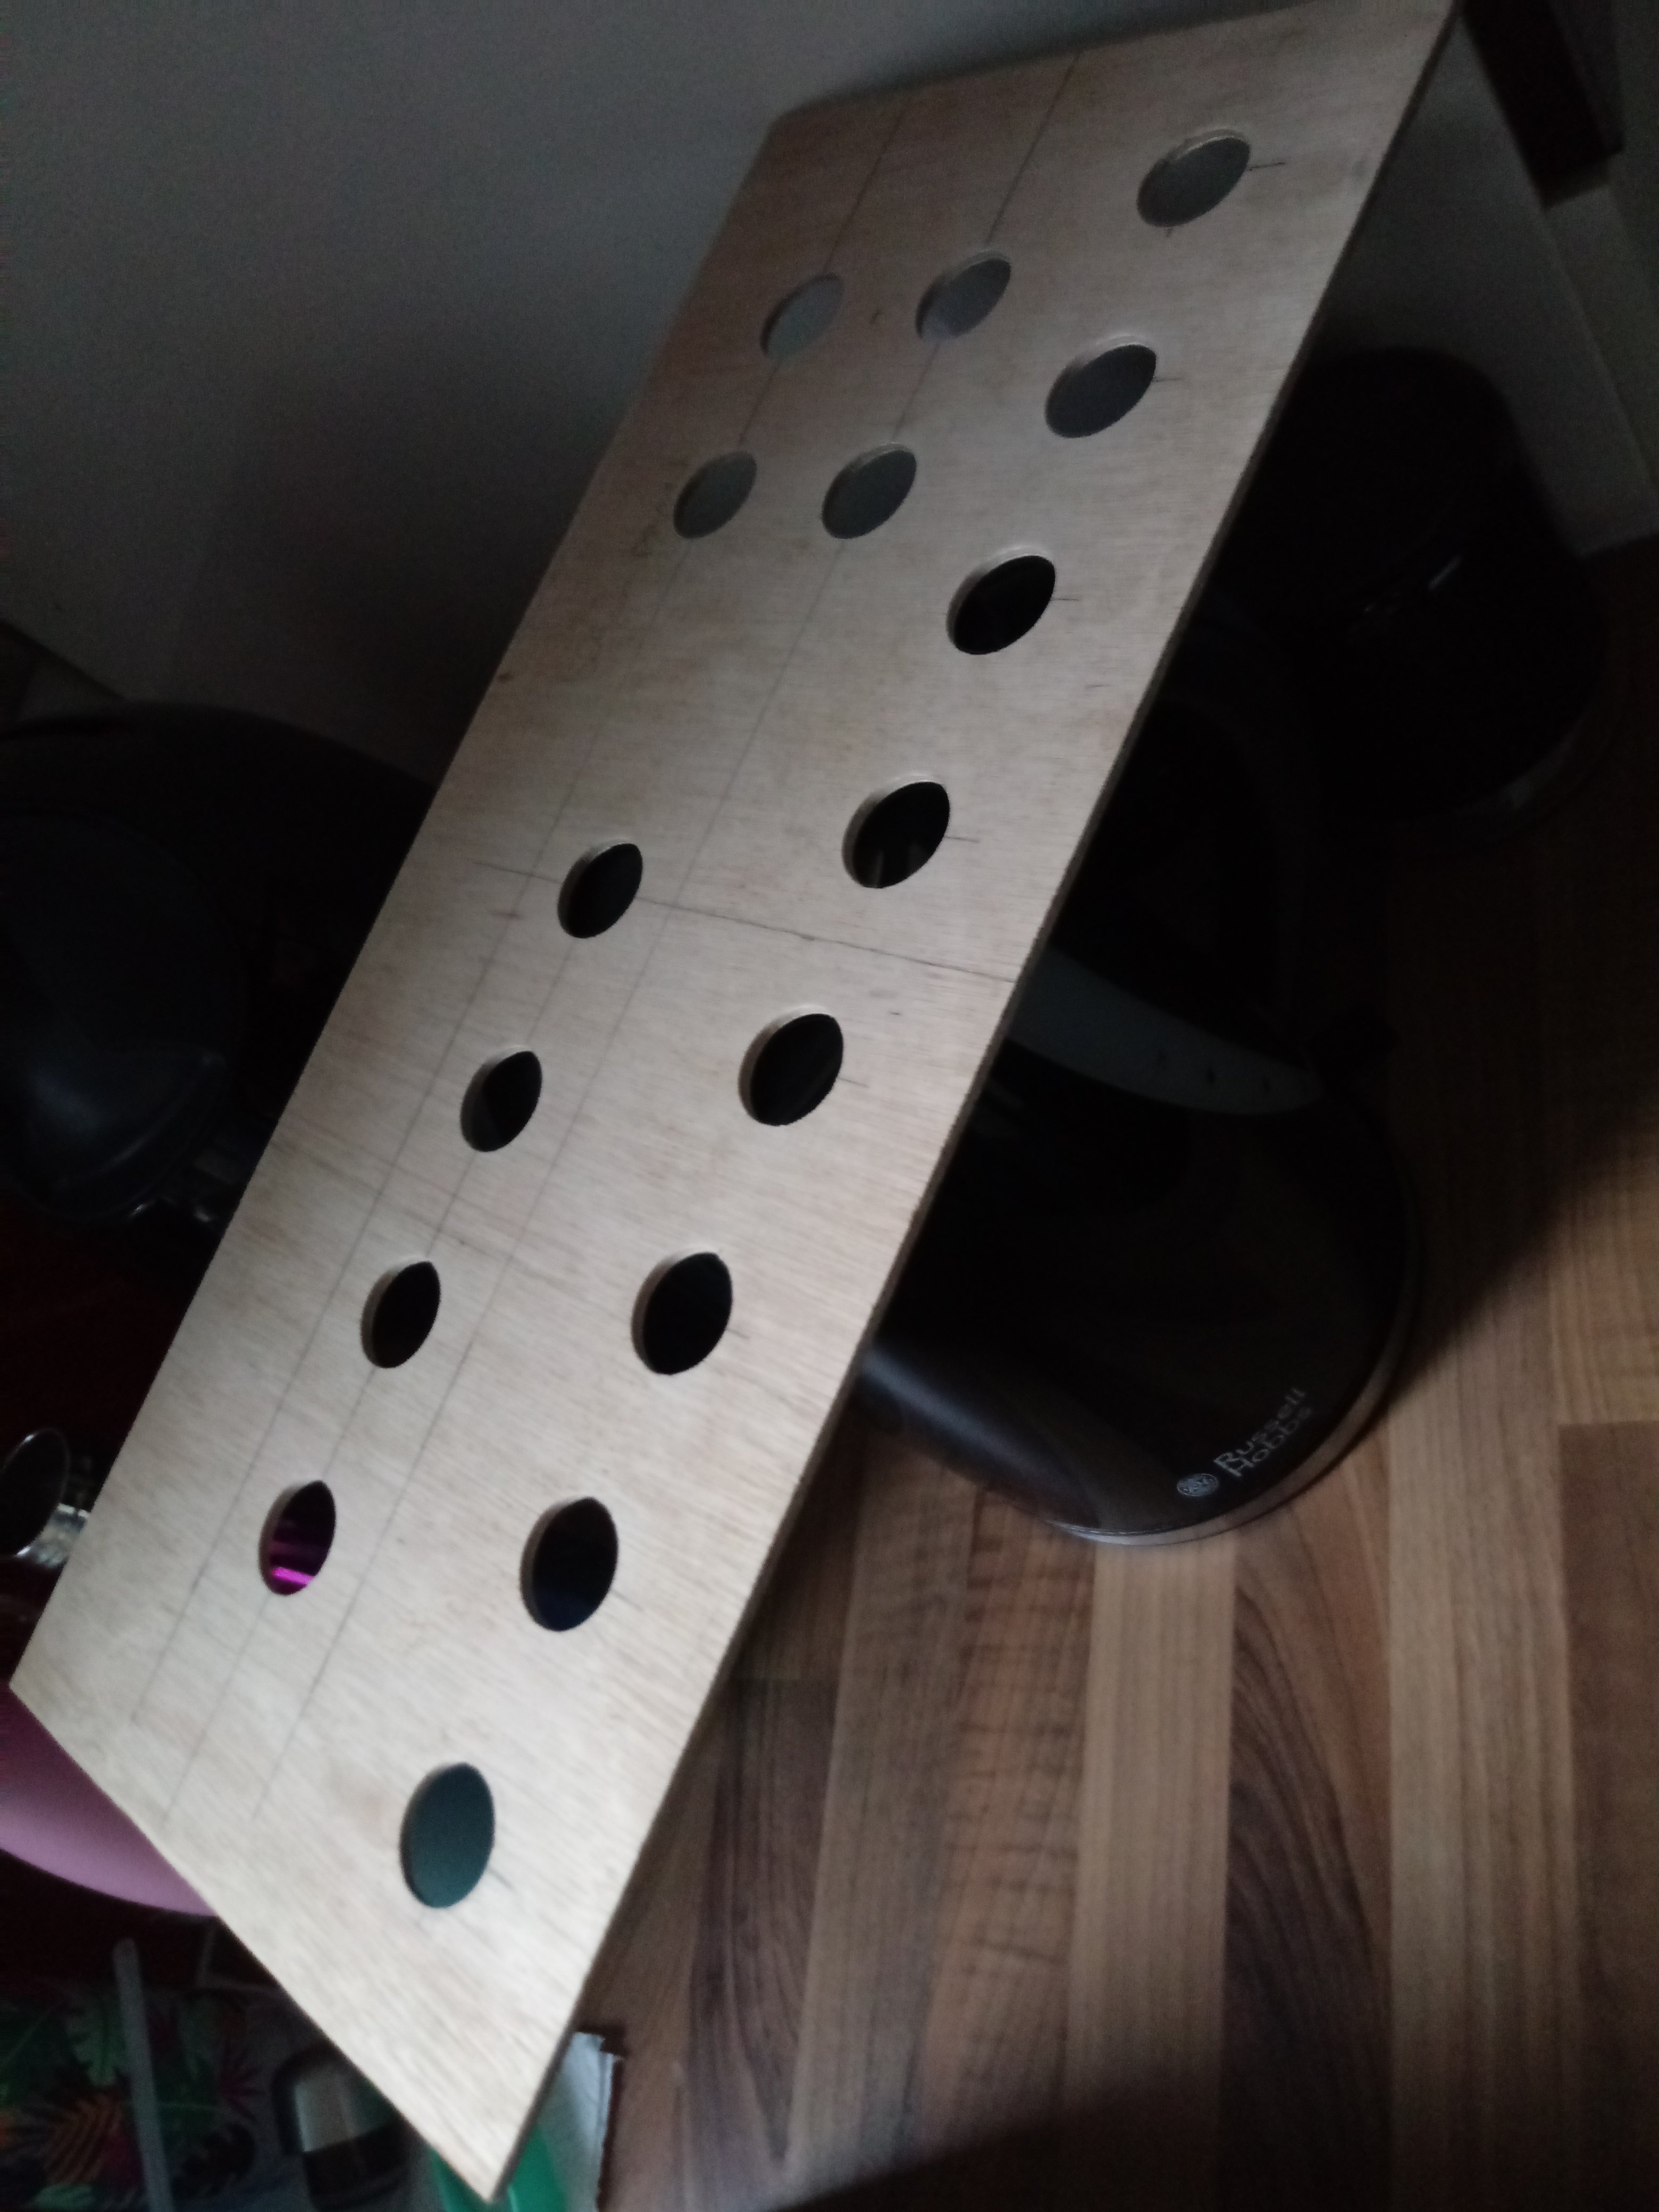
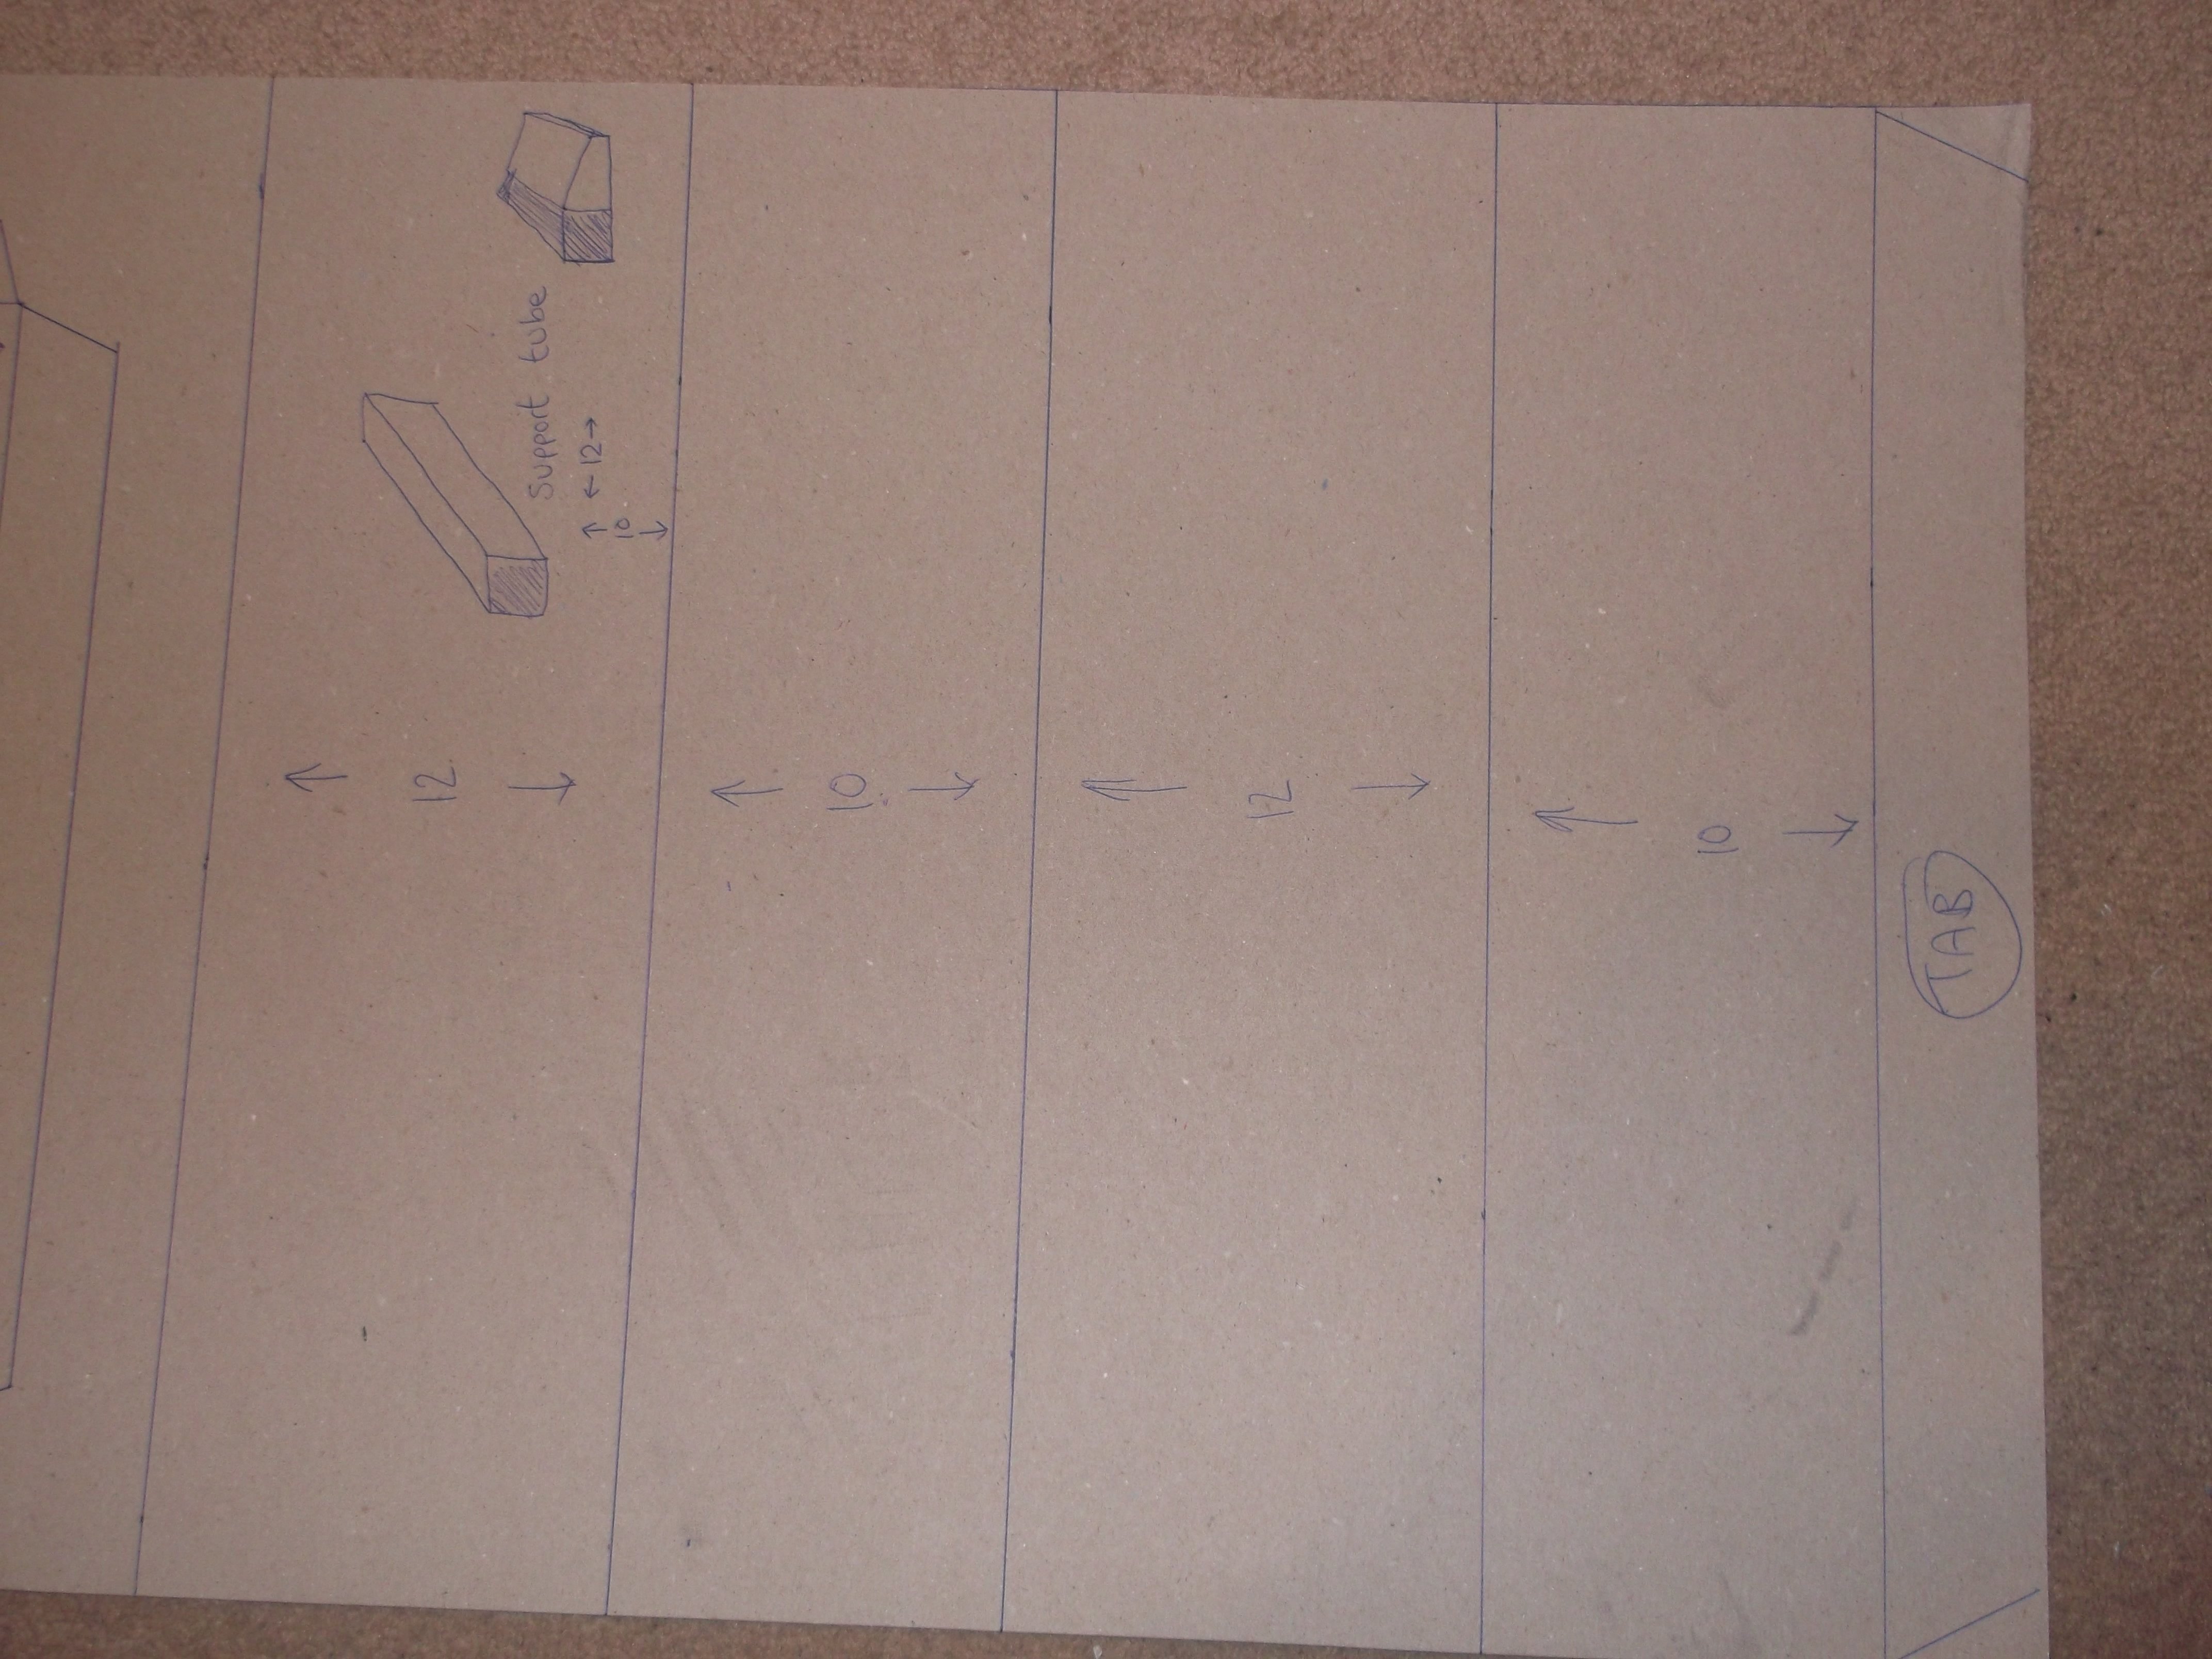
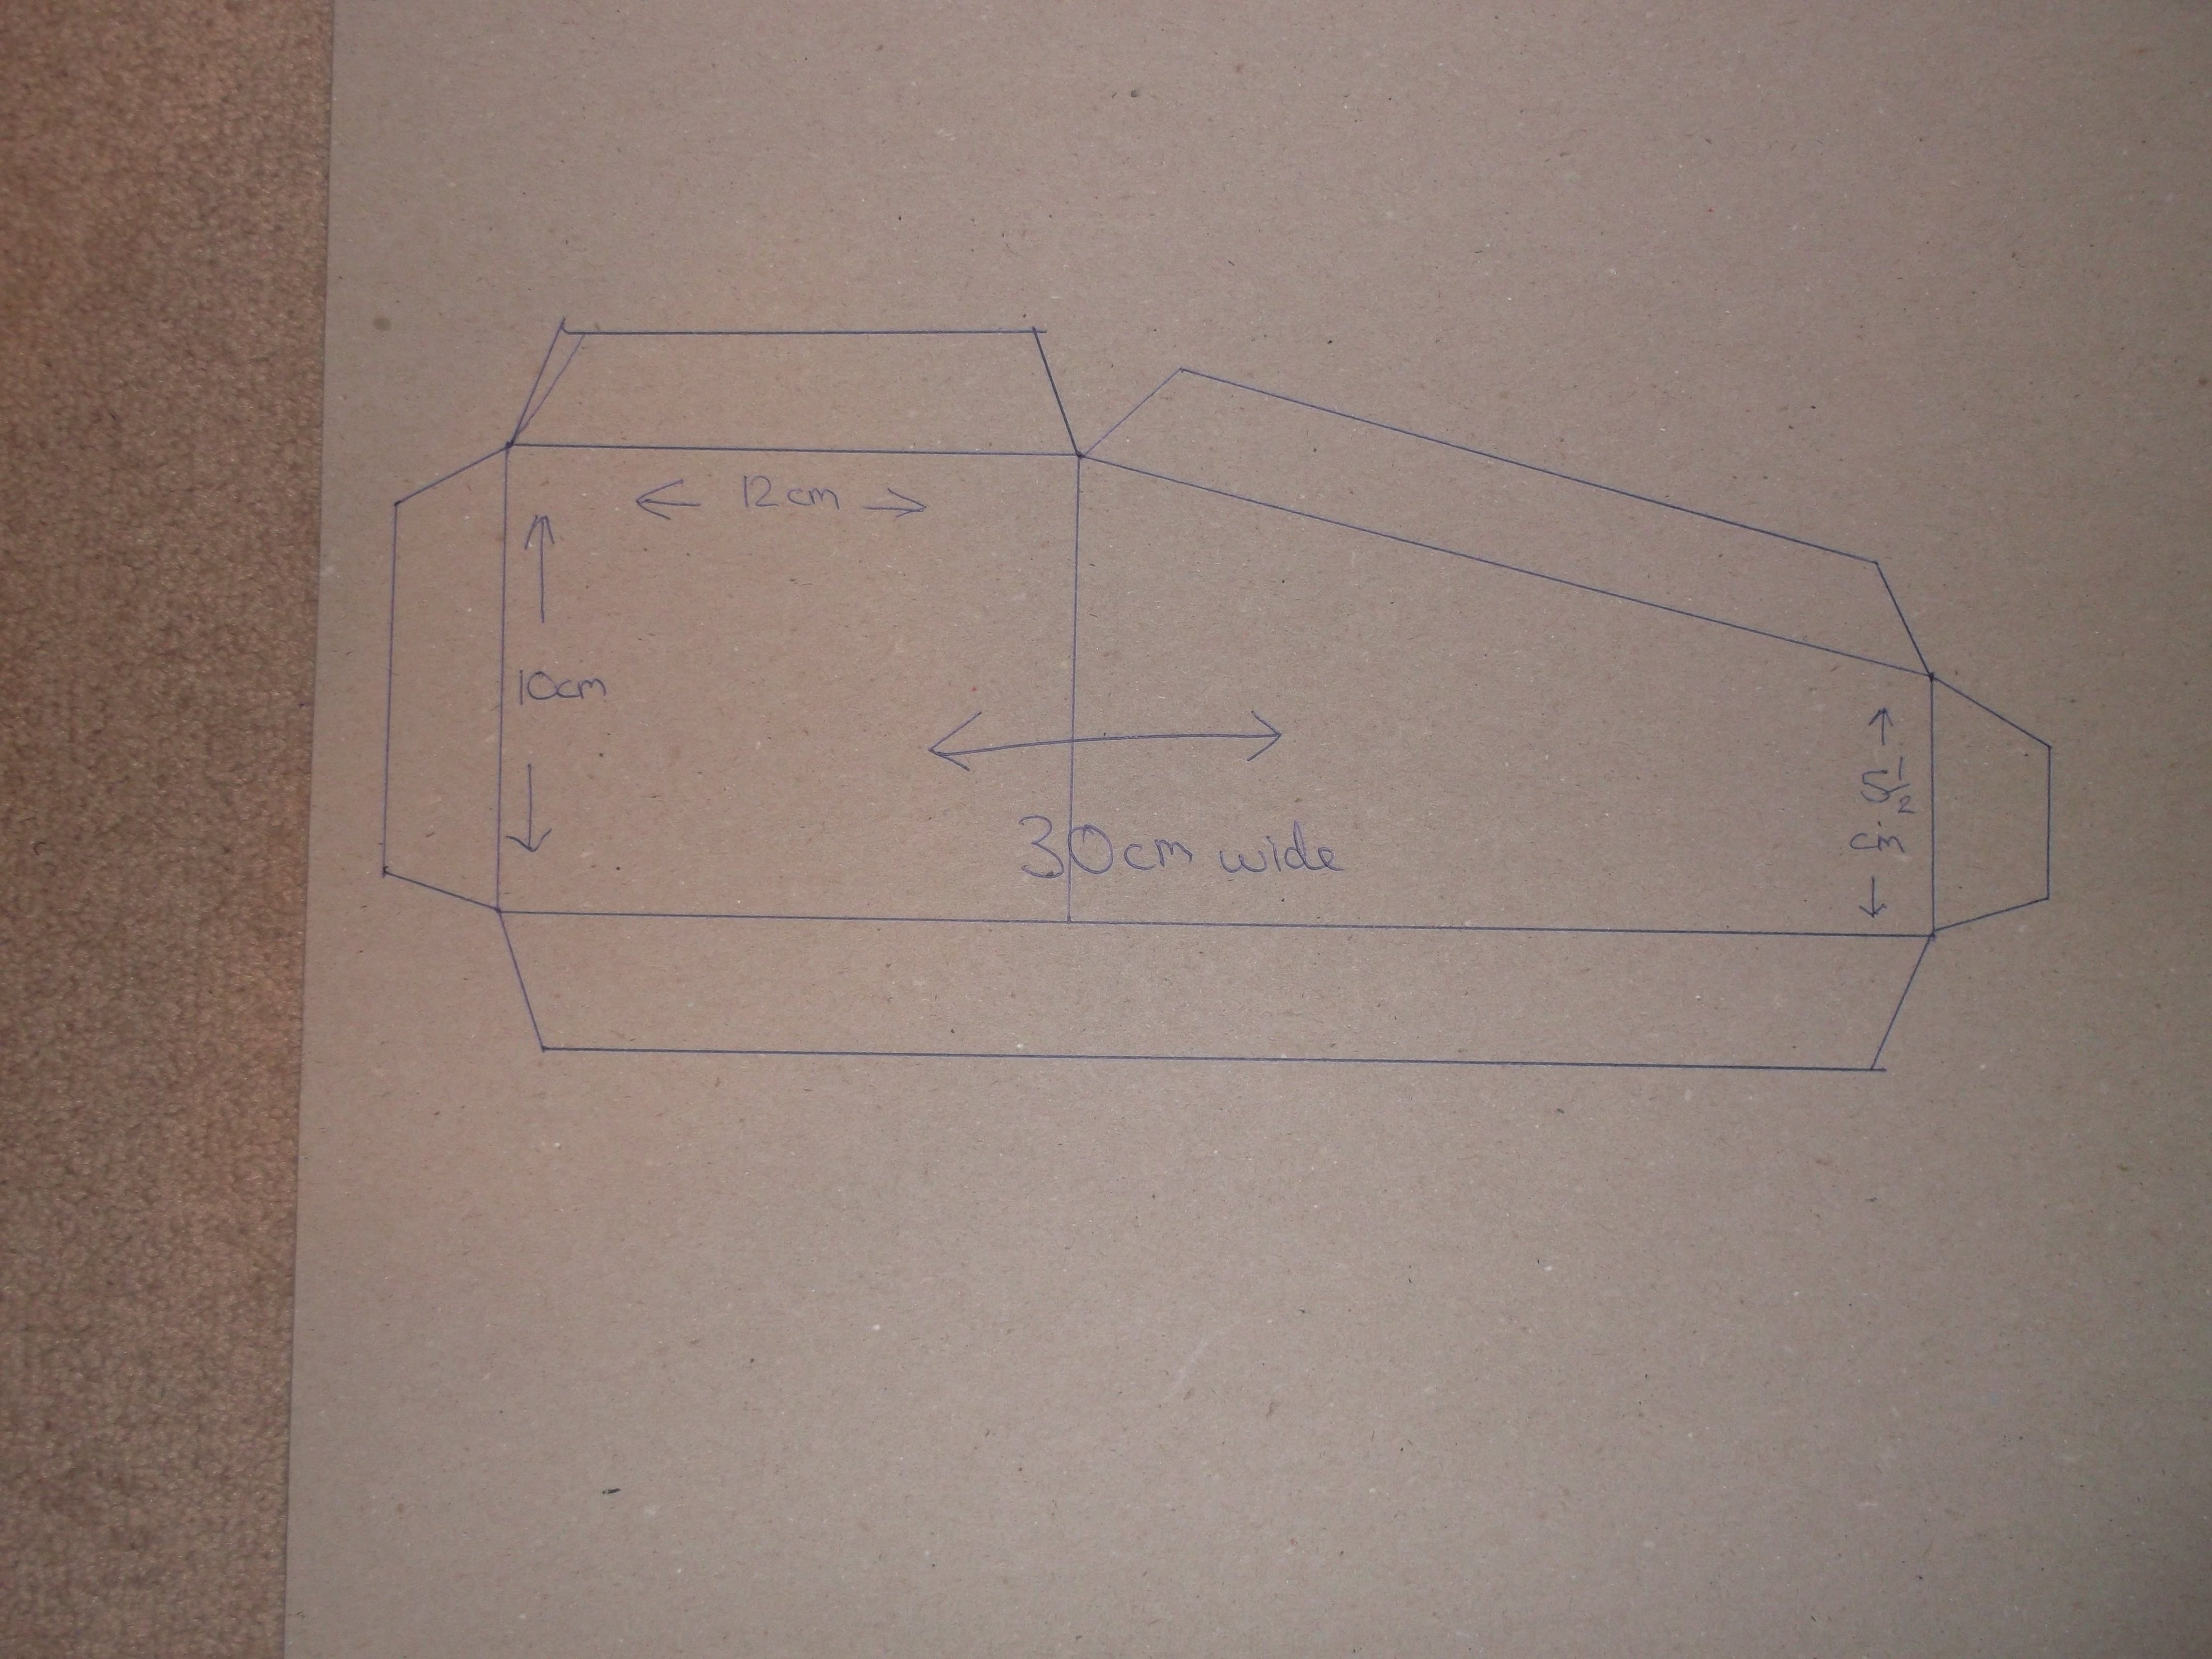
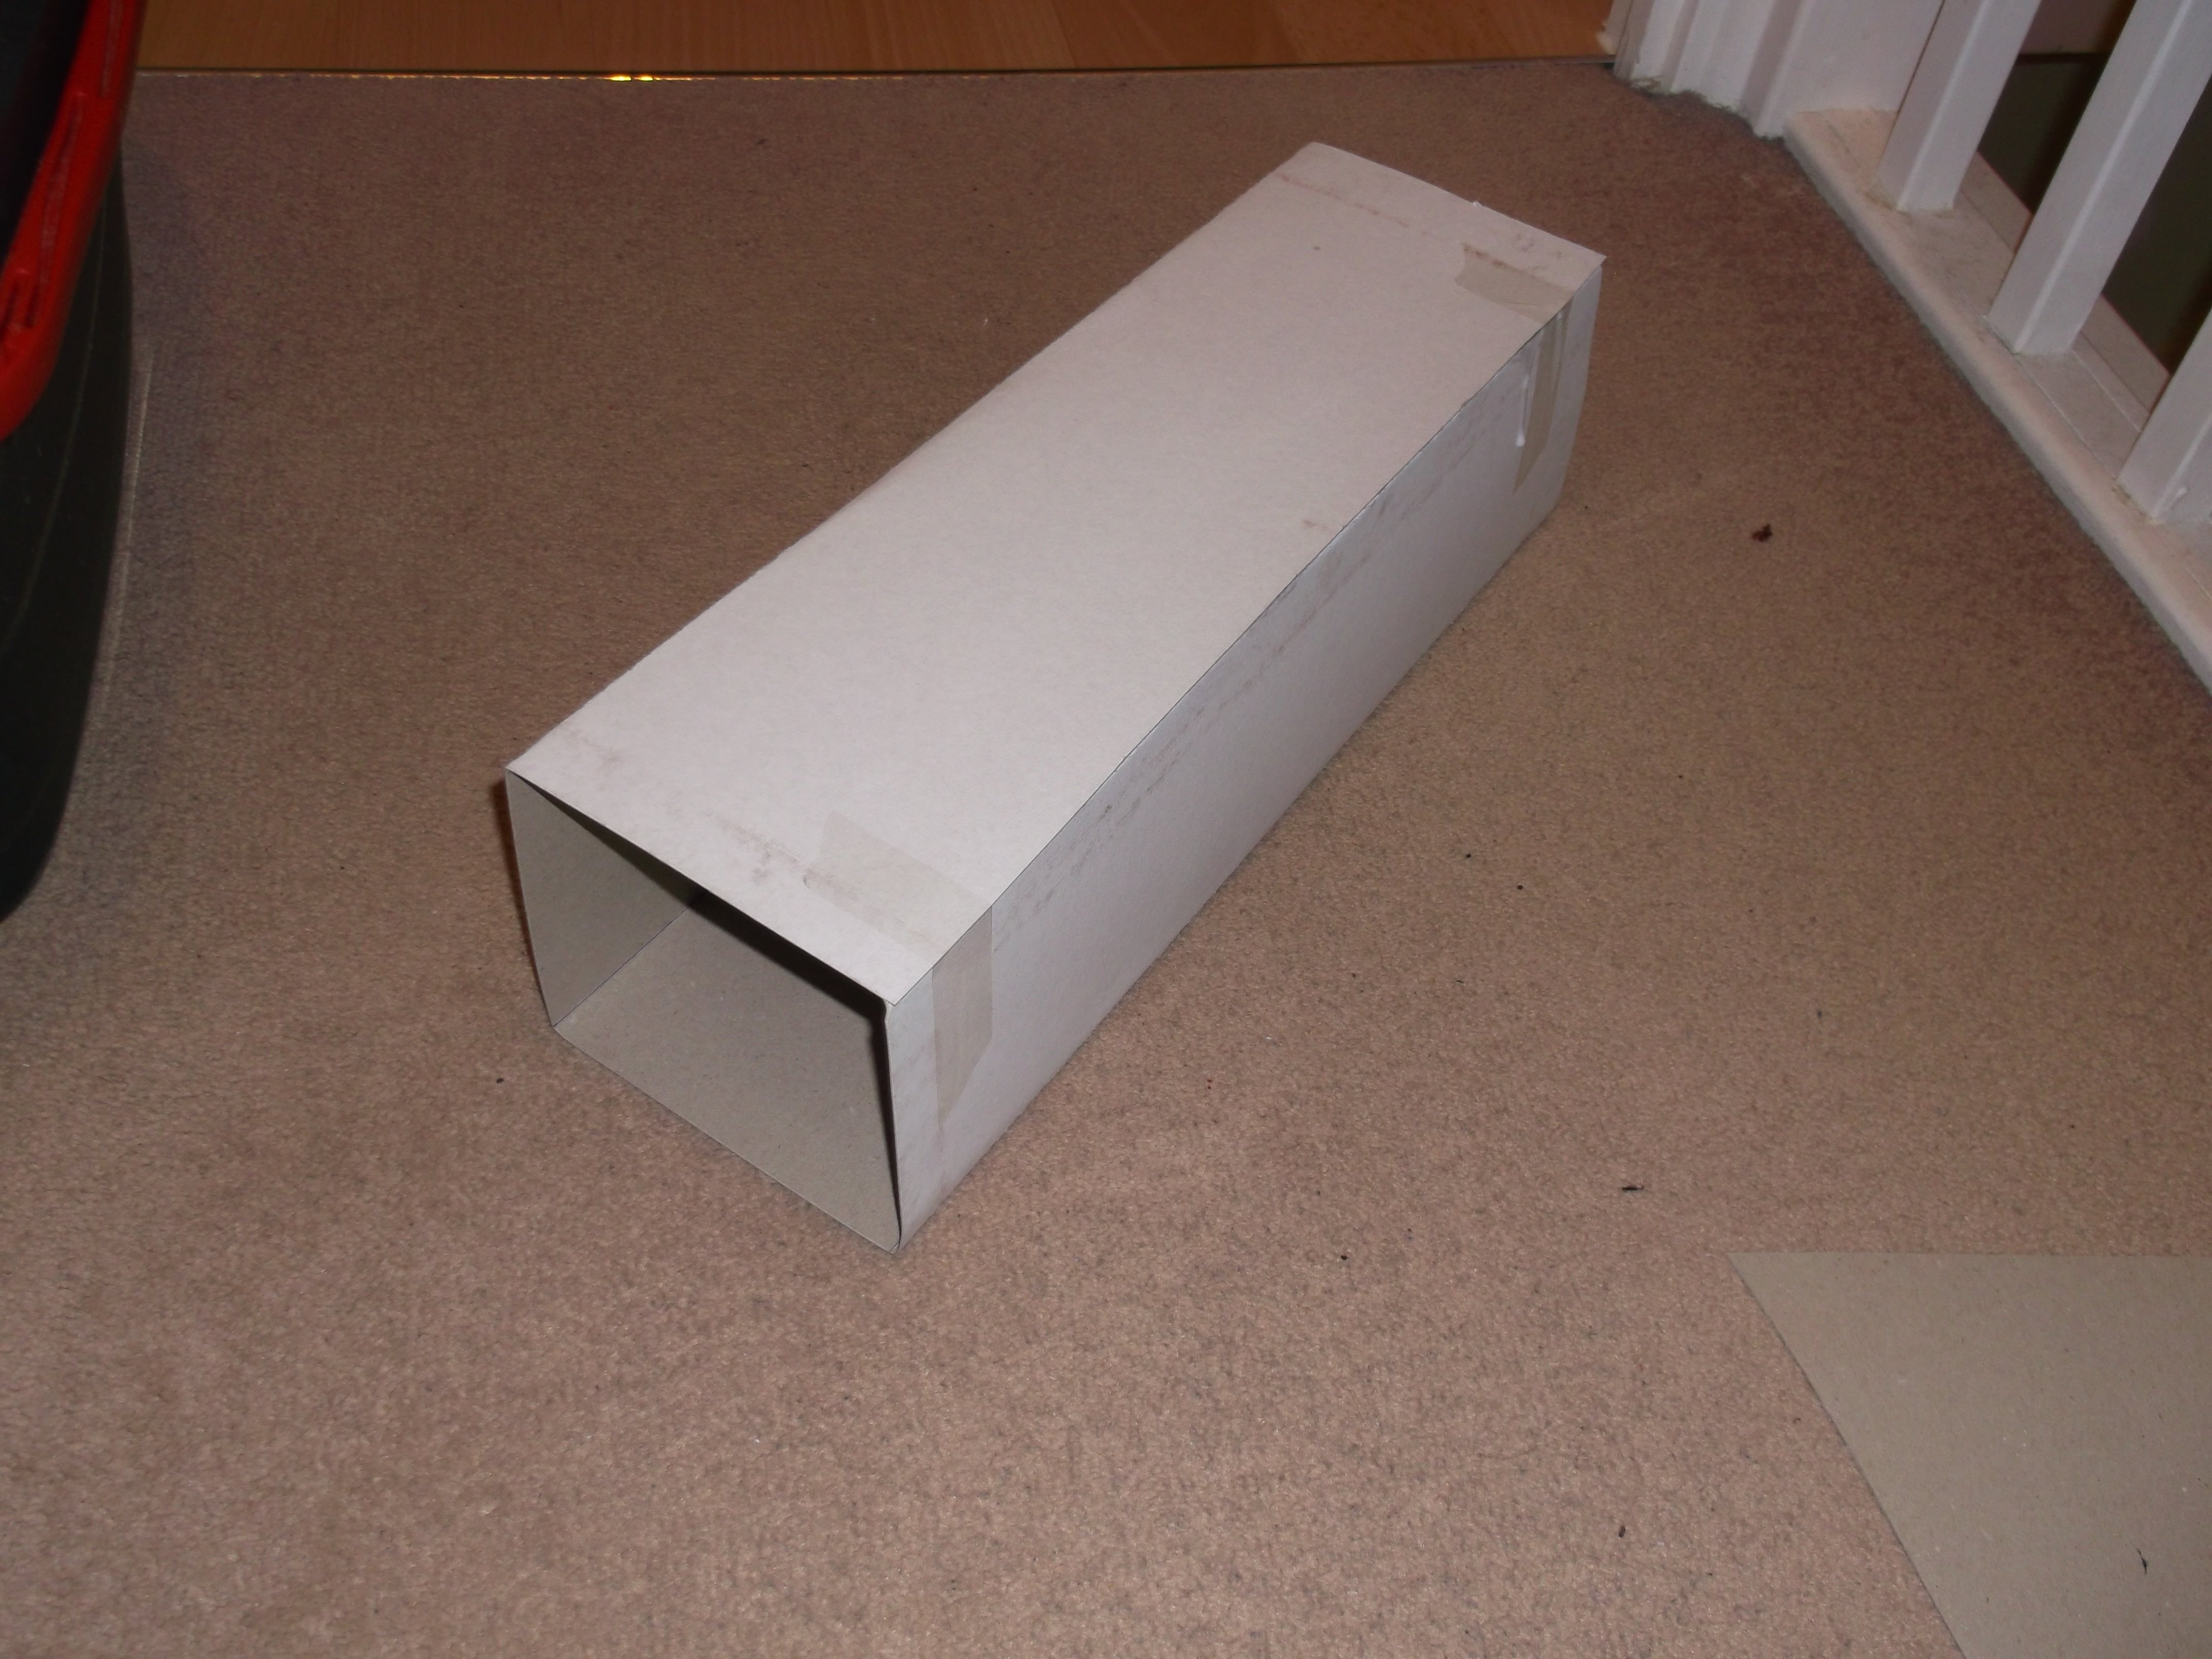
Last night i spent waaaaayyyy too long messing around with a large sheet of cardboard, that i legitly liberated from work (it's a sheet of card off a pallet of Pringles crisps no less!) and is just what i wanted to use to make a rough model of what i would like the finished wooden box to be like.
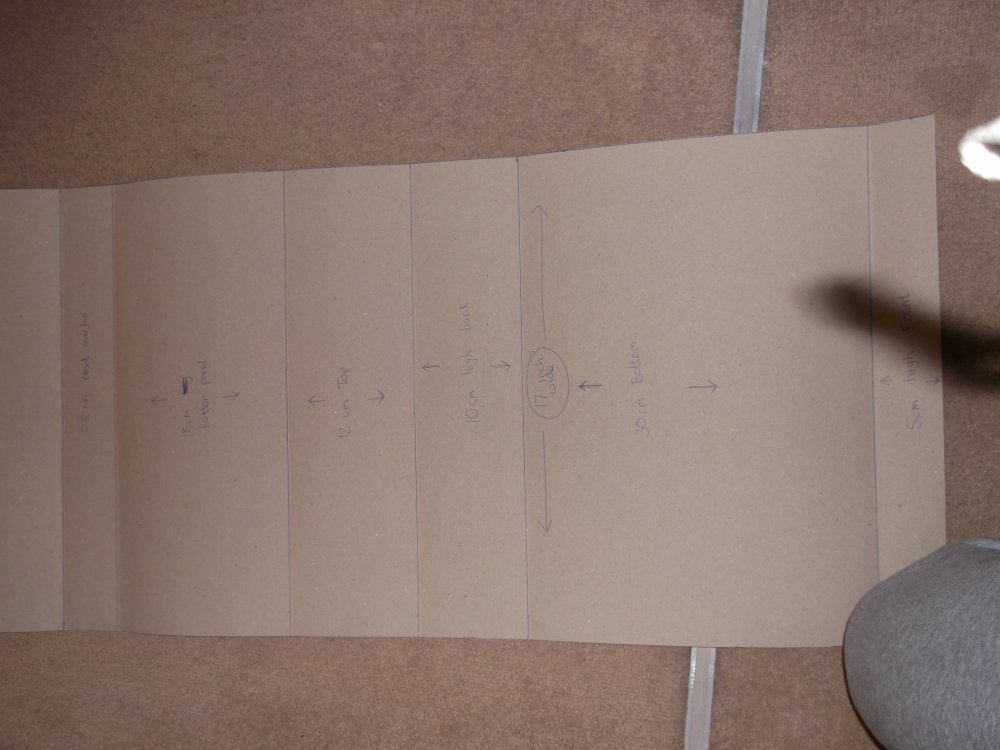
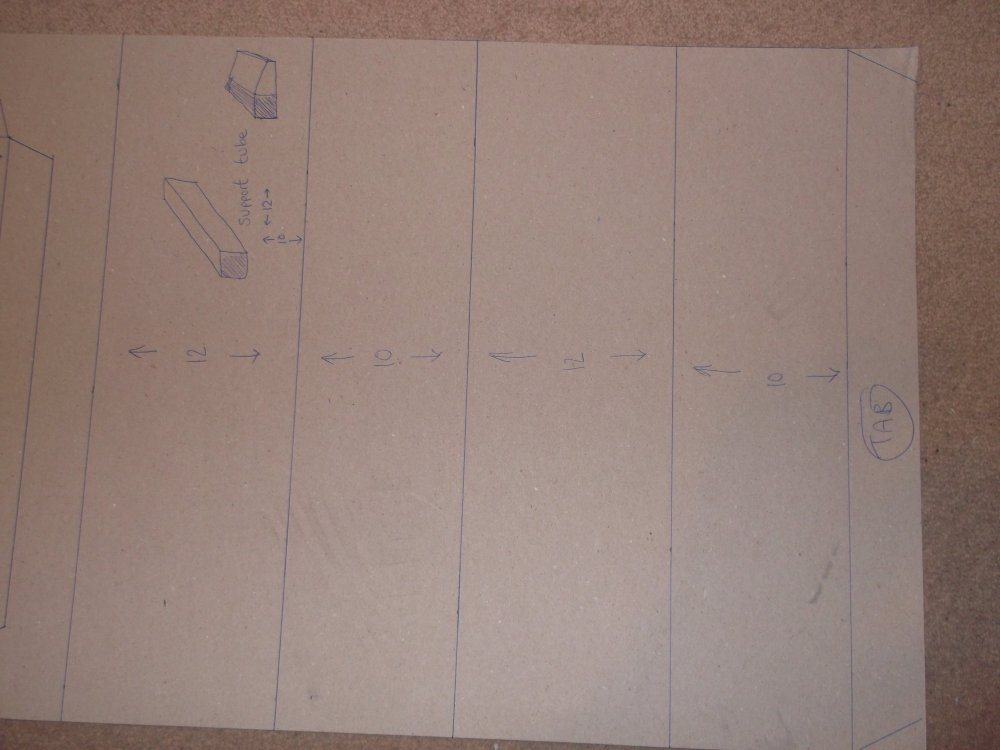
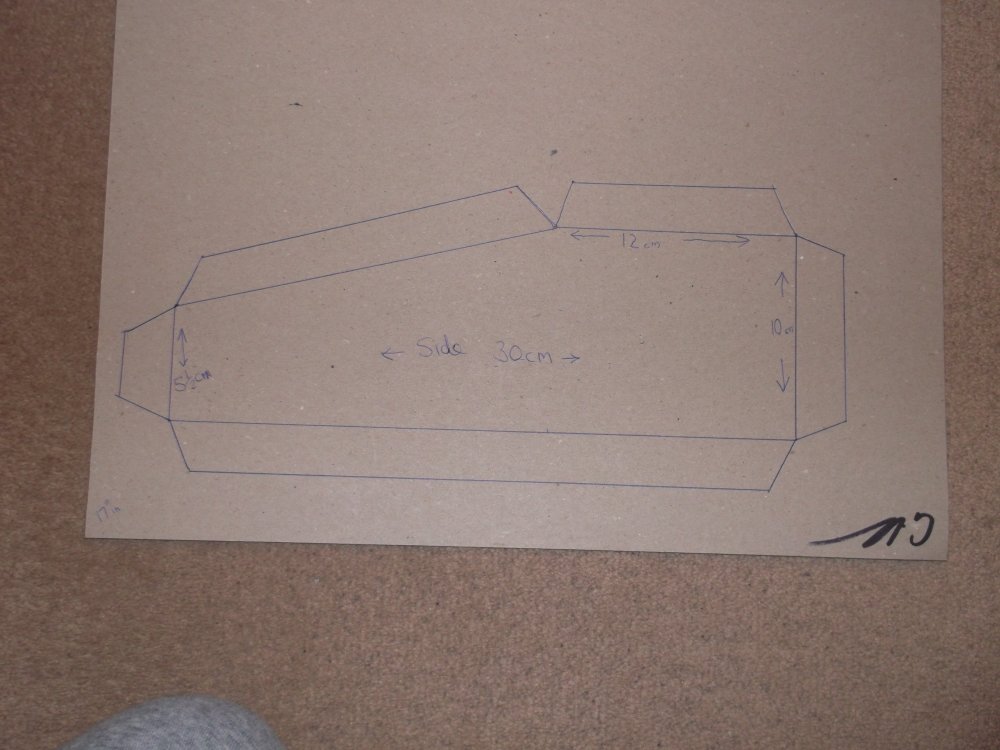
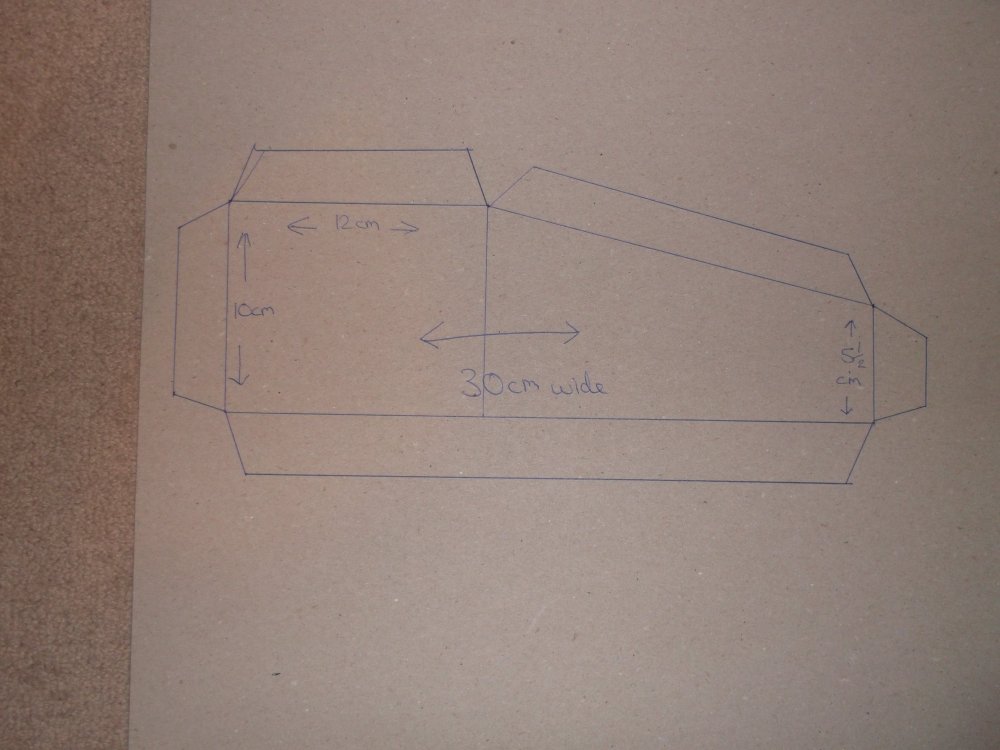
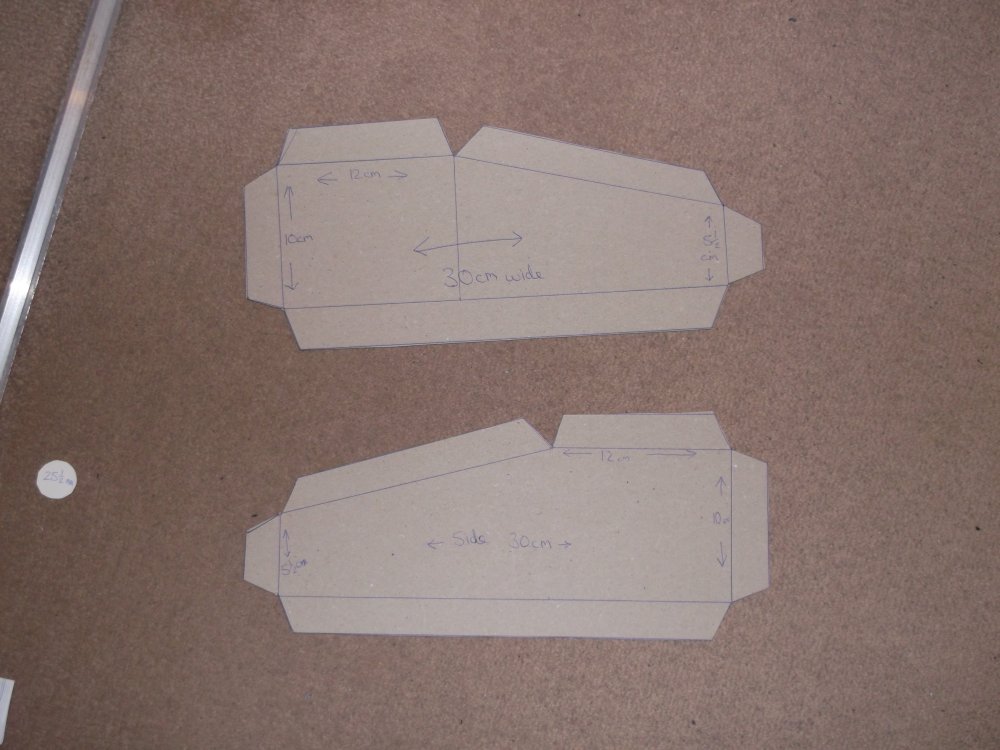
I found that i'd need the box to be 17in wide so i can comfortably place 8 round buttons on the bottom row.
I don't really want it to be very tall so went with 10cm high, 30cm deep, and raised the front of the box to 5.5cm before the slanted panel for the buttons begins - this is to give room for the backs of the buttons which poke unseen inside the box. Panel is 18cm and a 12cm flat top are the total dimensions.
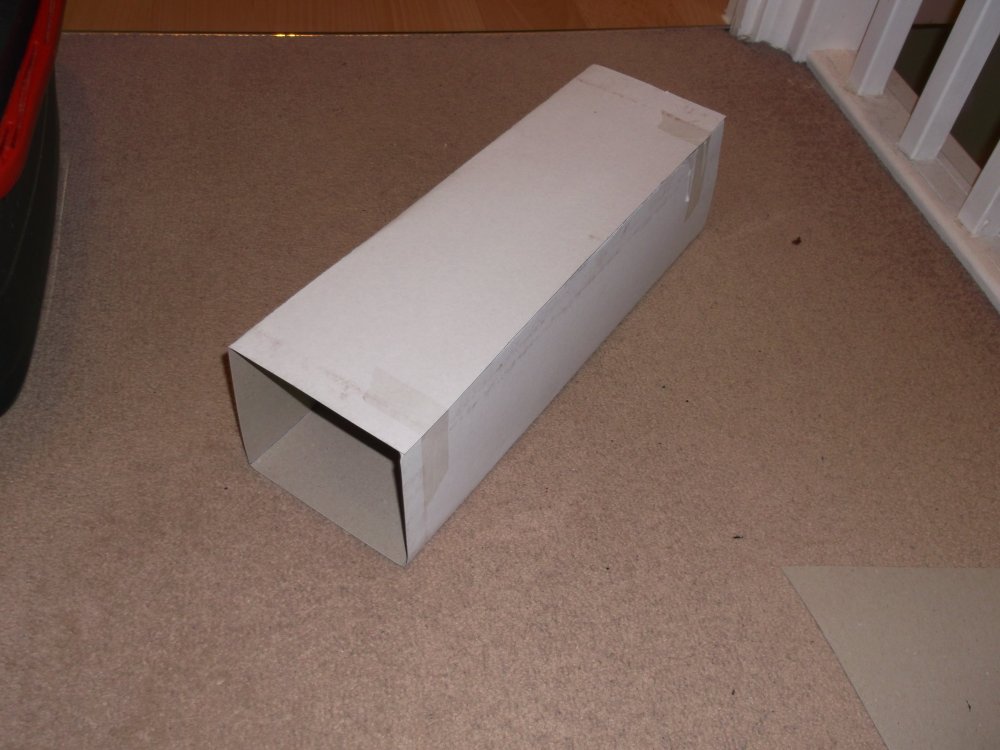
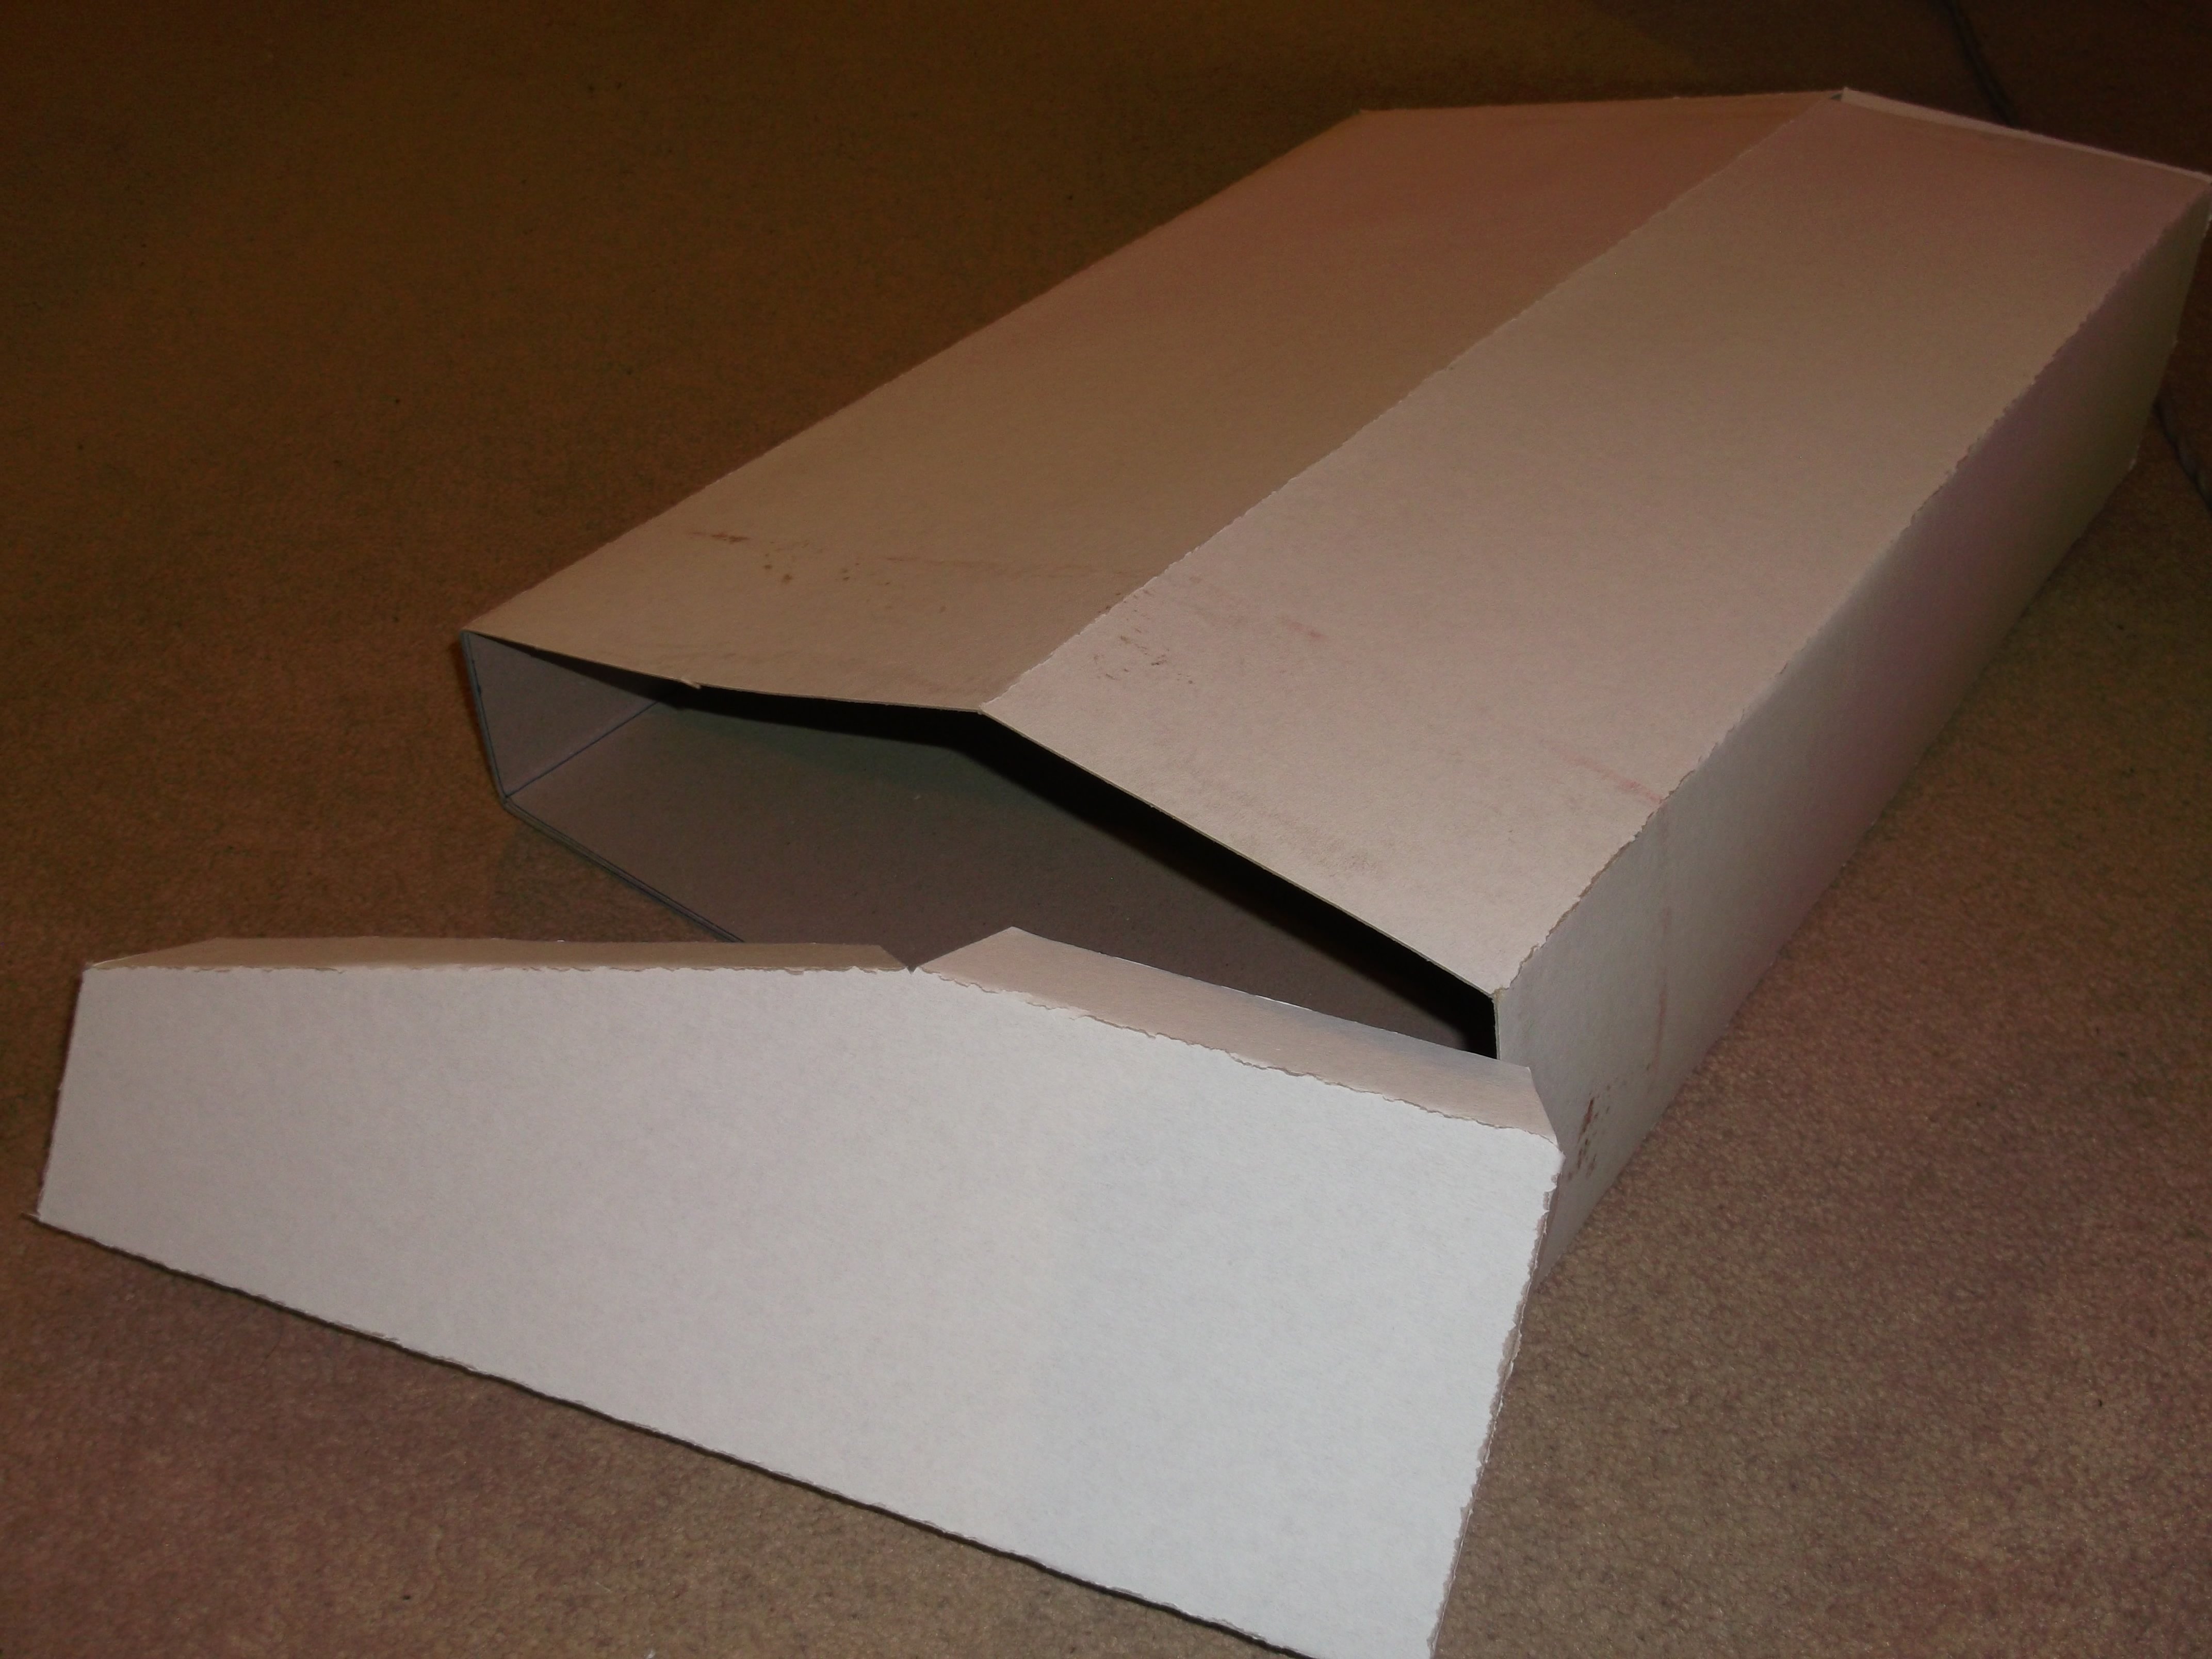
I made some sides and a support tube to give it some strength at the back. I was going to glue them together but taped them in the end as it was getting late and also sides are not quite right (size wise) and need some adjustment.
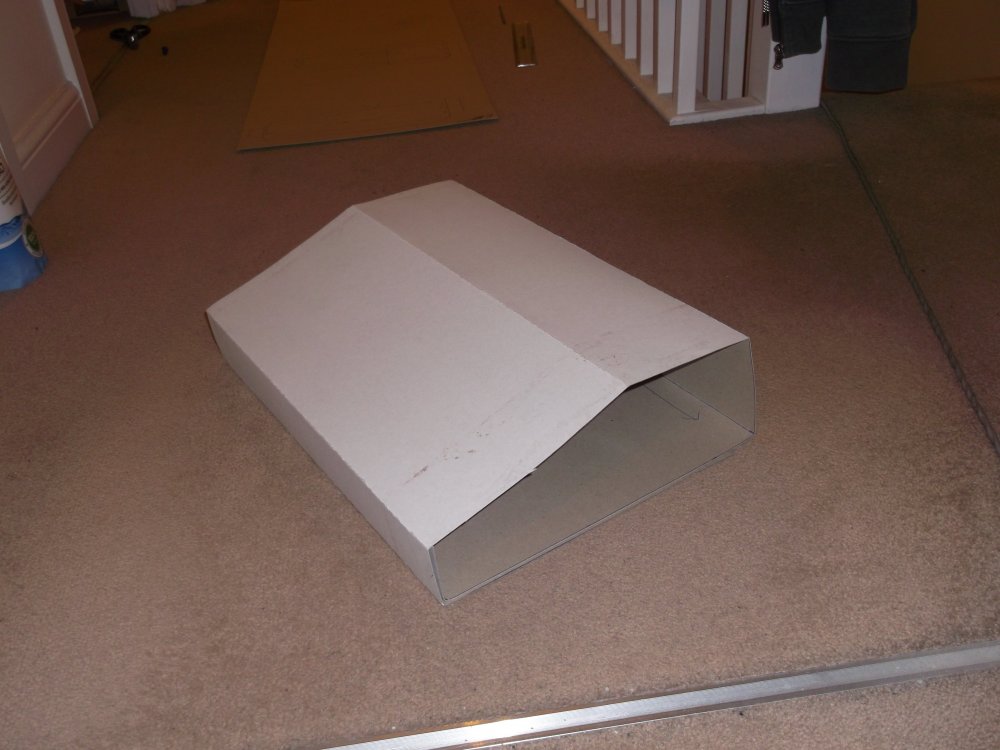
After putting 25mm holes in with a slightly blunt stanley knife, (my thumb sure got sore pushing the blade into the card - it's tough alright!) as well as scoring the edge flaps of the edge panels, it was time to put it together, and I ended up with what looks like a cardboard BBC model B computer!
Tried the buttons for size, and then realised to my horror that i'd put the holes for the triangle keys the wrong side to what my design was! Oh well, this is only a mock up for me and my brother to create a wooden case from anyway!
Took pictures at different stages as it took shape, i would like the final wooden box to somehow open in case i need to do maintenance to anything inside, so thinking a hinge so i can lift the control panel up (a bit like opening the front of a Barcrest MPU5 machine lol)
So, yeah - bit naff really ain't it! lol...
I have a question to those in the know...
1) Should I introduce the PacDrive and I-Pac2 to my computer before i wire anything to them?
That's all for now anyway -
Cheers,
Gary.


-
4
-
-
On 25/01/2022 at 01:40, Amusements said:
Don't forget that you need output 15 and 16 if you are adding hoppers, unless you add another Pacdrive ID#2. You can still more buttons to the IPac , they just wont all light up. For example, I added extra buttons to the back of my button box for some shortcuts for Full Screen, Random Game, Escape , and Volume +/-, which do not light up. I use 14 main buttons on my cab, and some of them get used twice on layouts with tons of buttons.
@Amusements I'm not going to be using hoppers at all for this... if i ever build a cabinet, that will be when i get hoppers, so all 16 buttons are going to be lit, and i decided to put an unlit 17th button on the side for £1 input.
Cheers,
Gary

-
22 minutes ago, Reg said:
...this is how it begins...
...first MFME on a PC...
...then MFME with your custom keyboard...
...then MFME in a cabinet with your hoppers and coinmech...
...then...
....then...
Arcade Simulator in the Metaverse on the Occulus Quest 2???

-
1
-
-
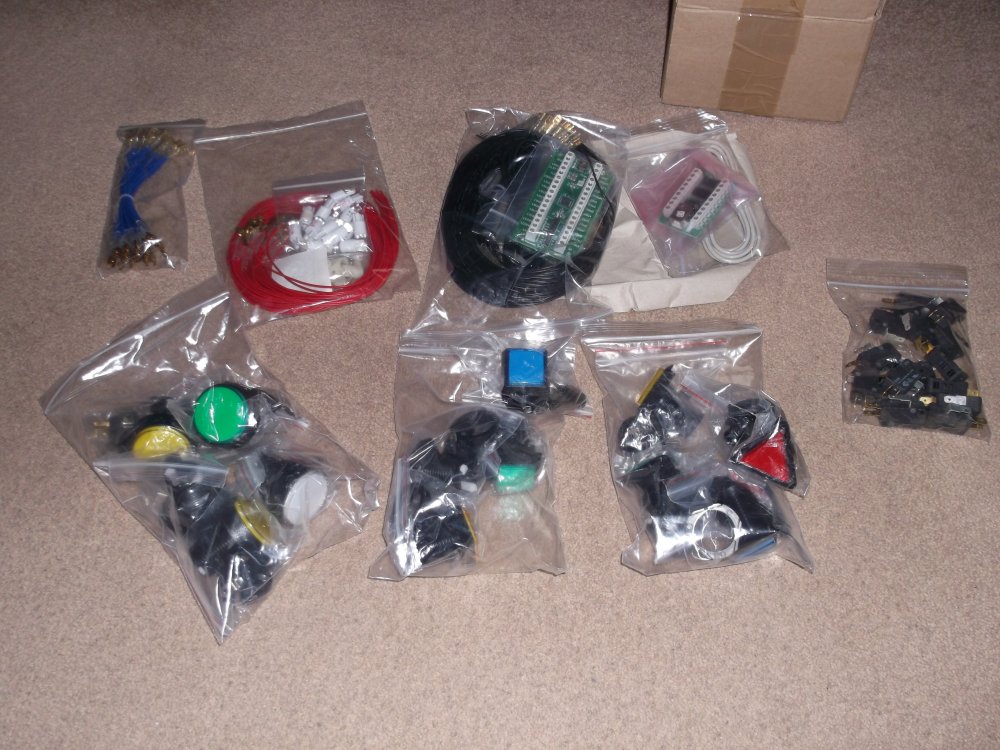
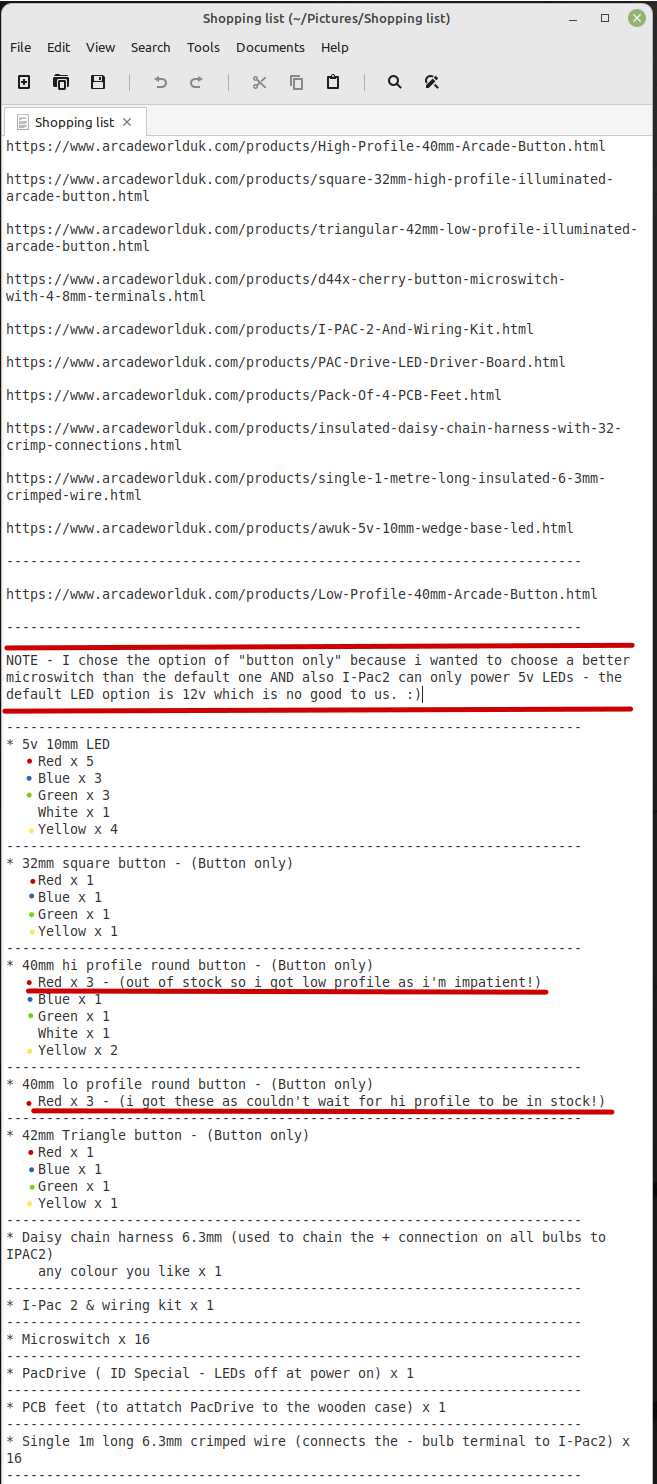
This was the shopping list... I ordered 3 red low profile buttons as high profile was out of stock and i'm inpatient... i'll order high profile when they are in stock again whenever that will be....


-
Just now, woodsy said:
Wicked!! Must admit I’m getting jealous seeing all these builds!!! I’m going to pm you in a bit and I will follow along if that’s ok
You can if you like matey...
I will be heavily using the MFME Keyboard tutorial that @Reg made, as i am crap at most things, but want to make this so badly that i just thought "F**k it, just do it!"
What will be, will be!
-
1
-
-
Hi Fruity fans!
I have been wanting to make a MFME Keyboard for ages, and finally ordered the parts, but still need :
 a USB hub
3 red round 40mm buttons (out of stock at arcade world at the mo)
the wooden case to put it all into
a USB hub
3 red round 40mm buttons (out of stock at arcade world at the mo)
the wooden case to put it all into
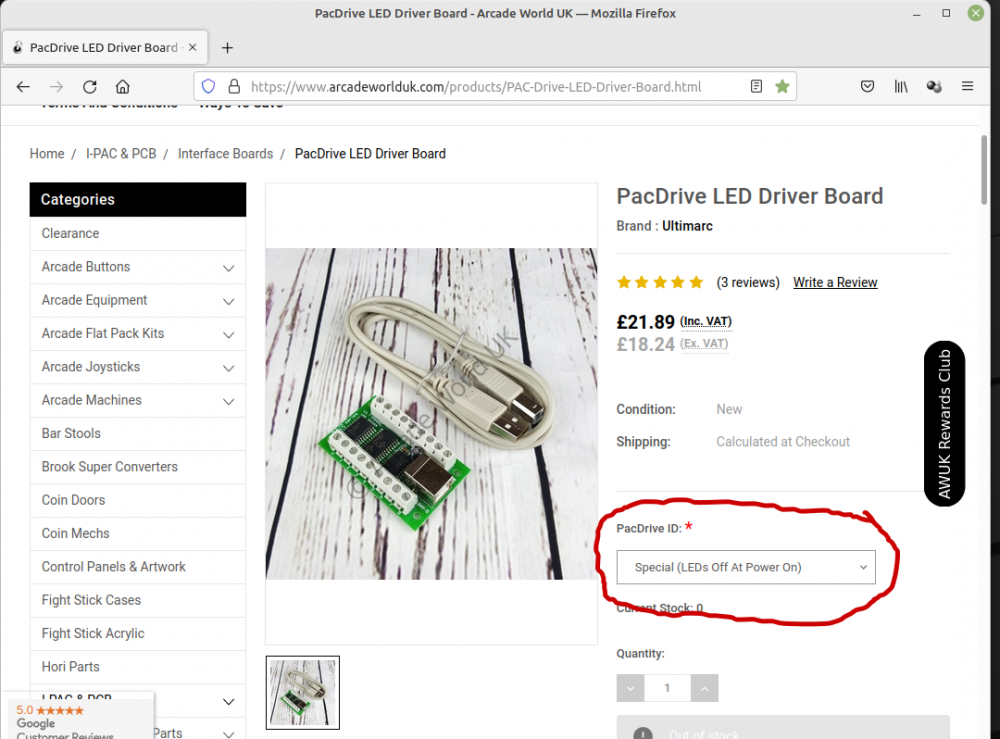
I decided i will stick with 16 buttons as that's the max one PacDrive can handle
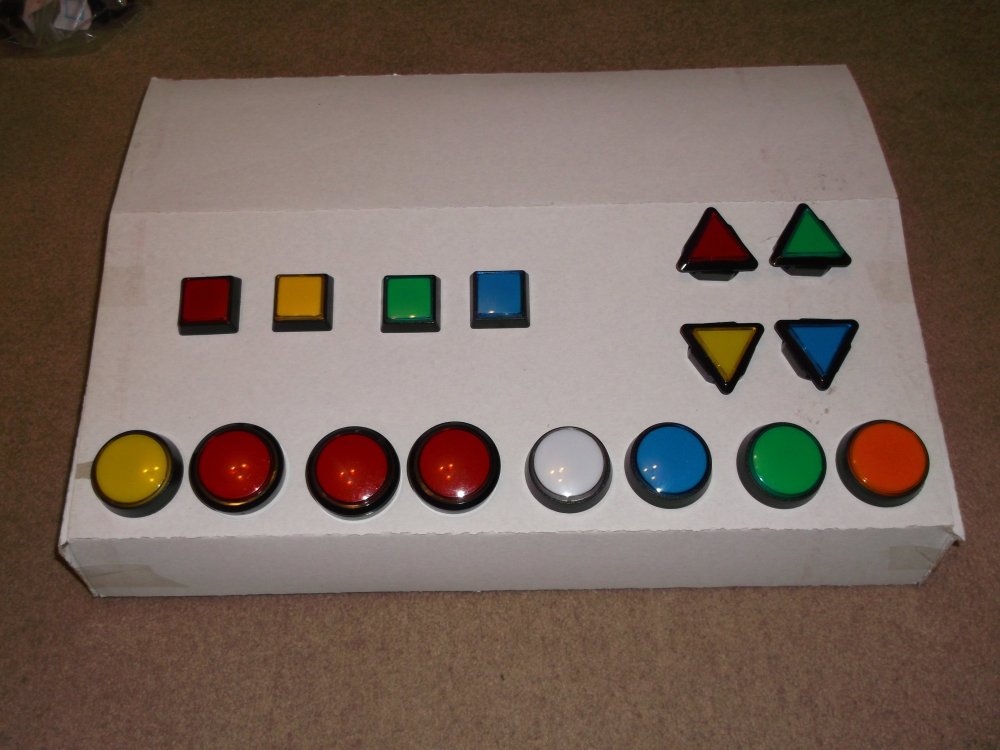
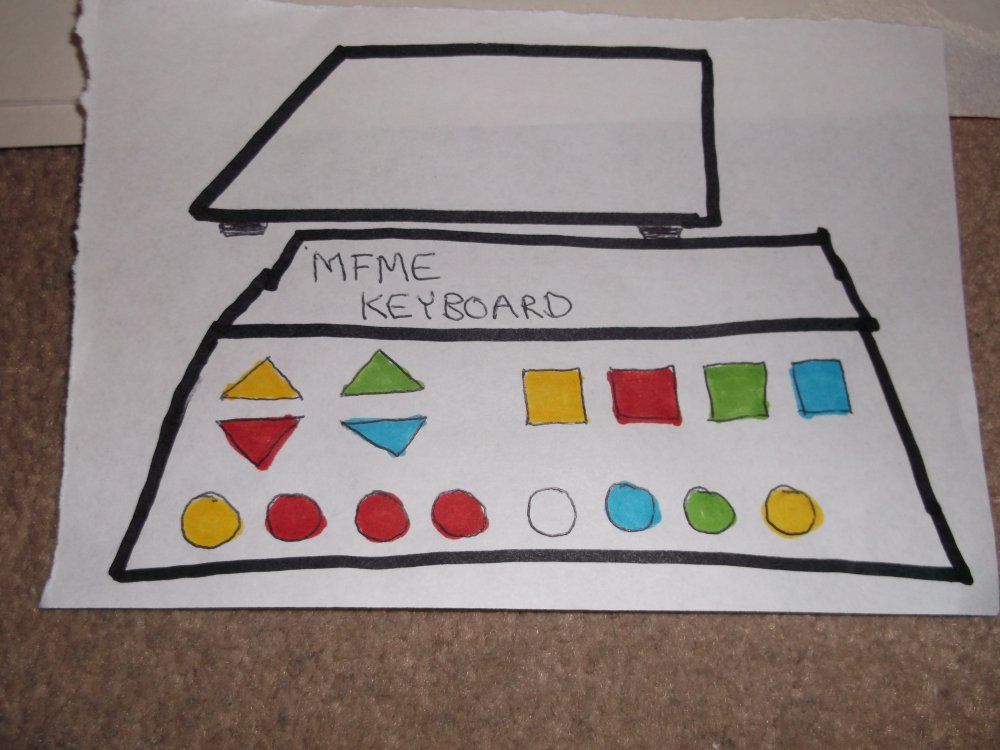
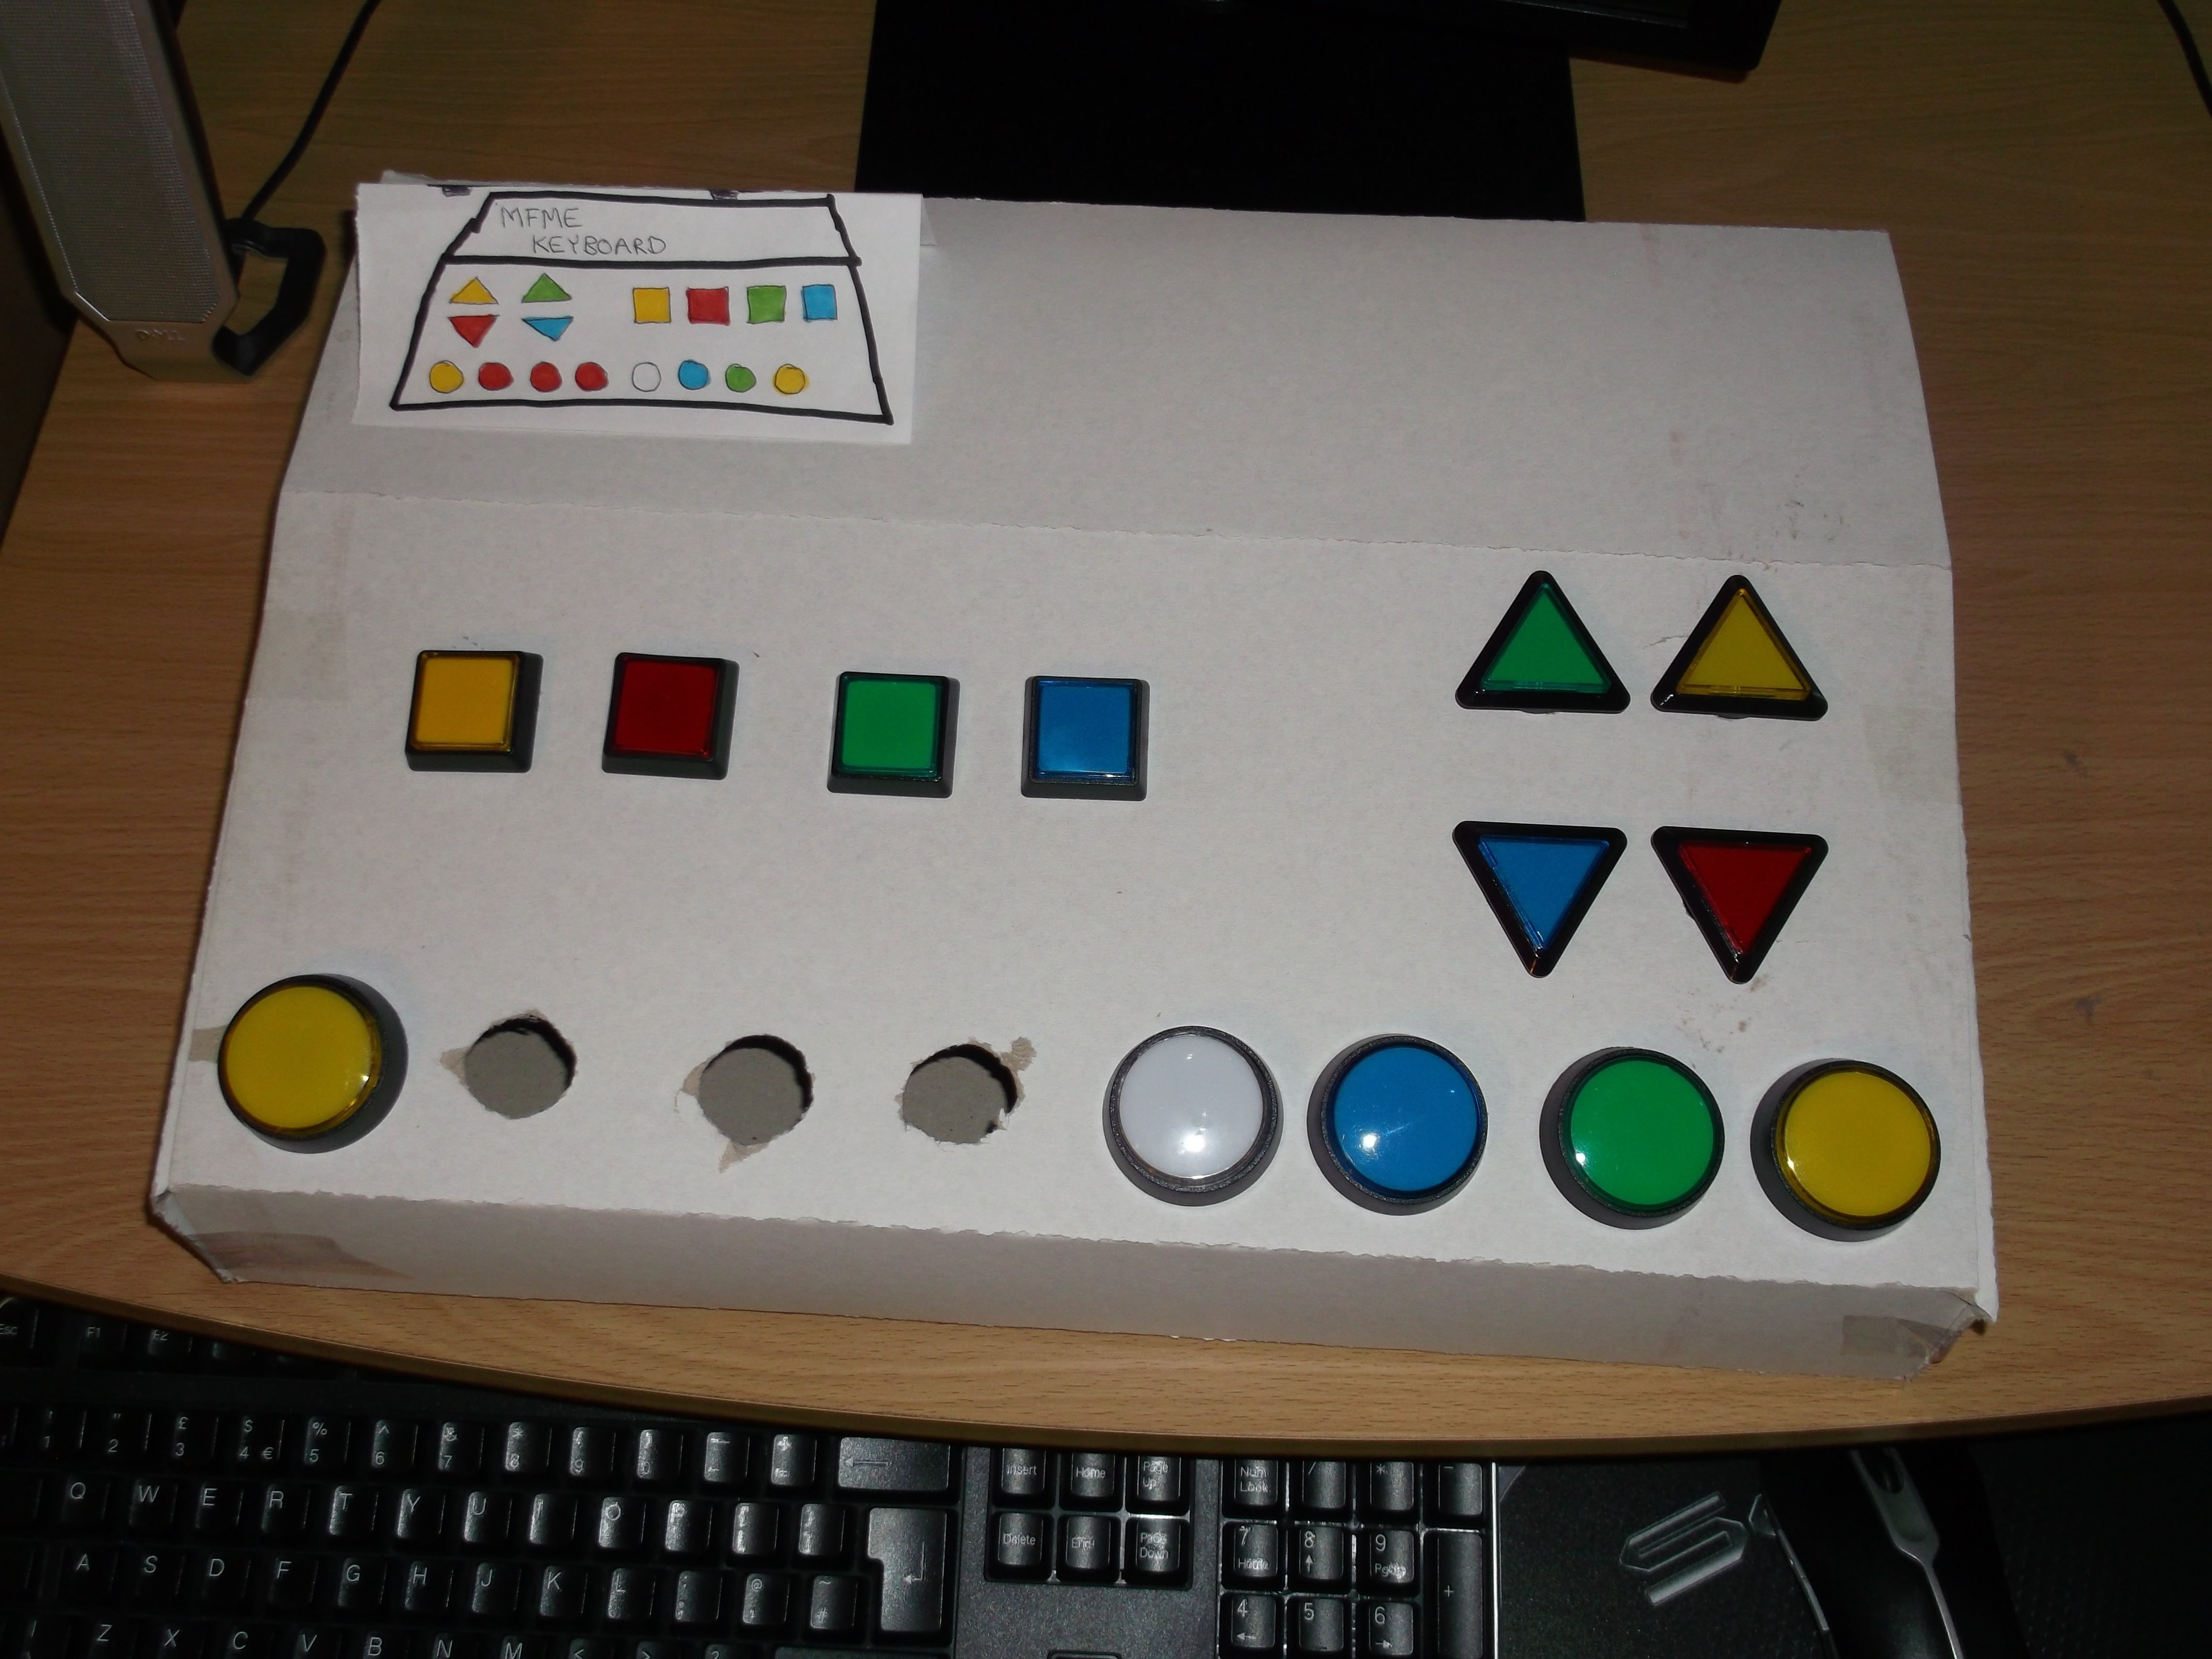
I drew a rough idea of how i want the keyboard to look, and how the buttons will be presented, i think they will cover the majority of machine layouts anyway.
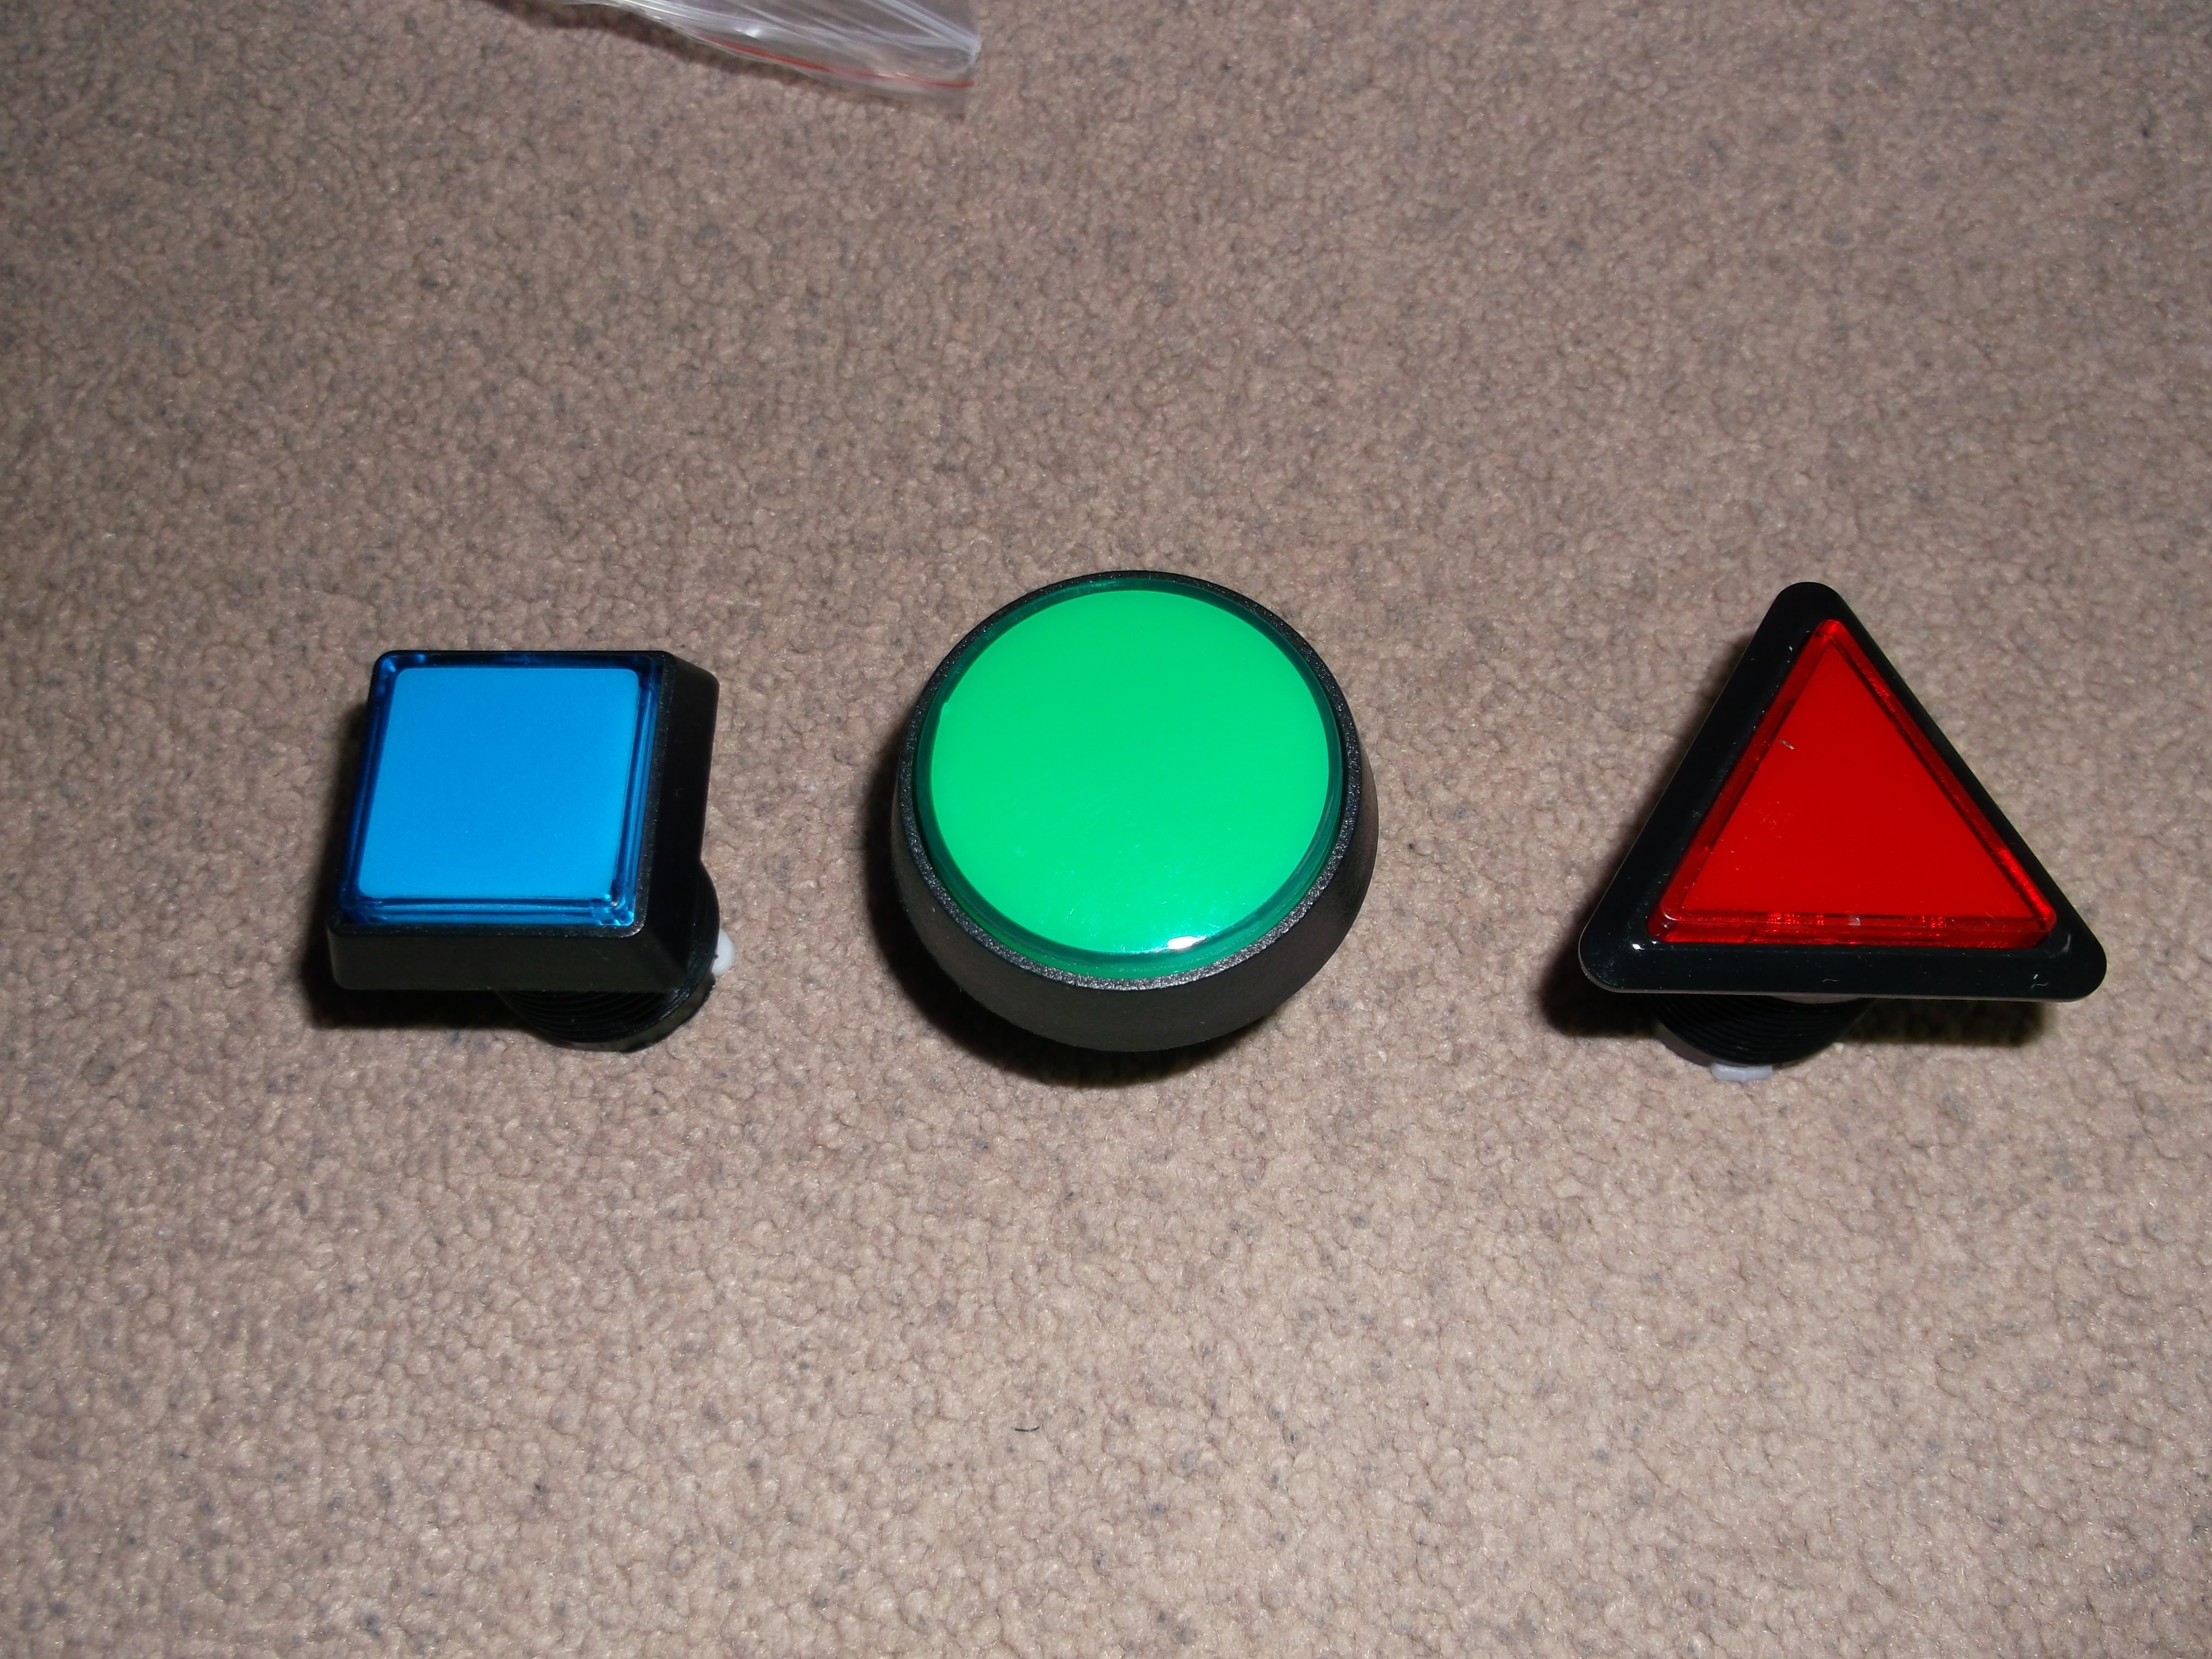
I went for 3 shapes of button,
8 round buttons on the bottom row,
4 triangle buttons for double hi-lo machines such as Gridrunner
4 square buttons for feature/cash/nudge/knockout stacks
My brother is good at D.I.Y so will get him to help me build a wooden case for it, he's talking about using 6mm ply with a vinyl wrap... tho i'm tempted to use planed timber, but we'll see.
This will be a while before it gets completed anyway but hopefully be back in the near future to show you all the finished product! - wish me luck - i will need it!
Below is some pictures of :
the parts,
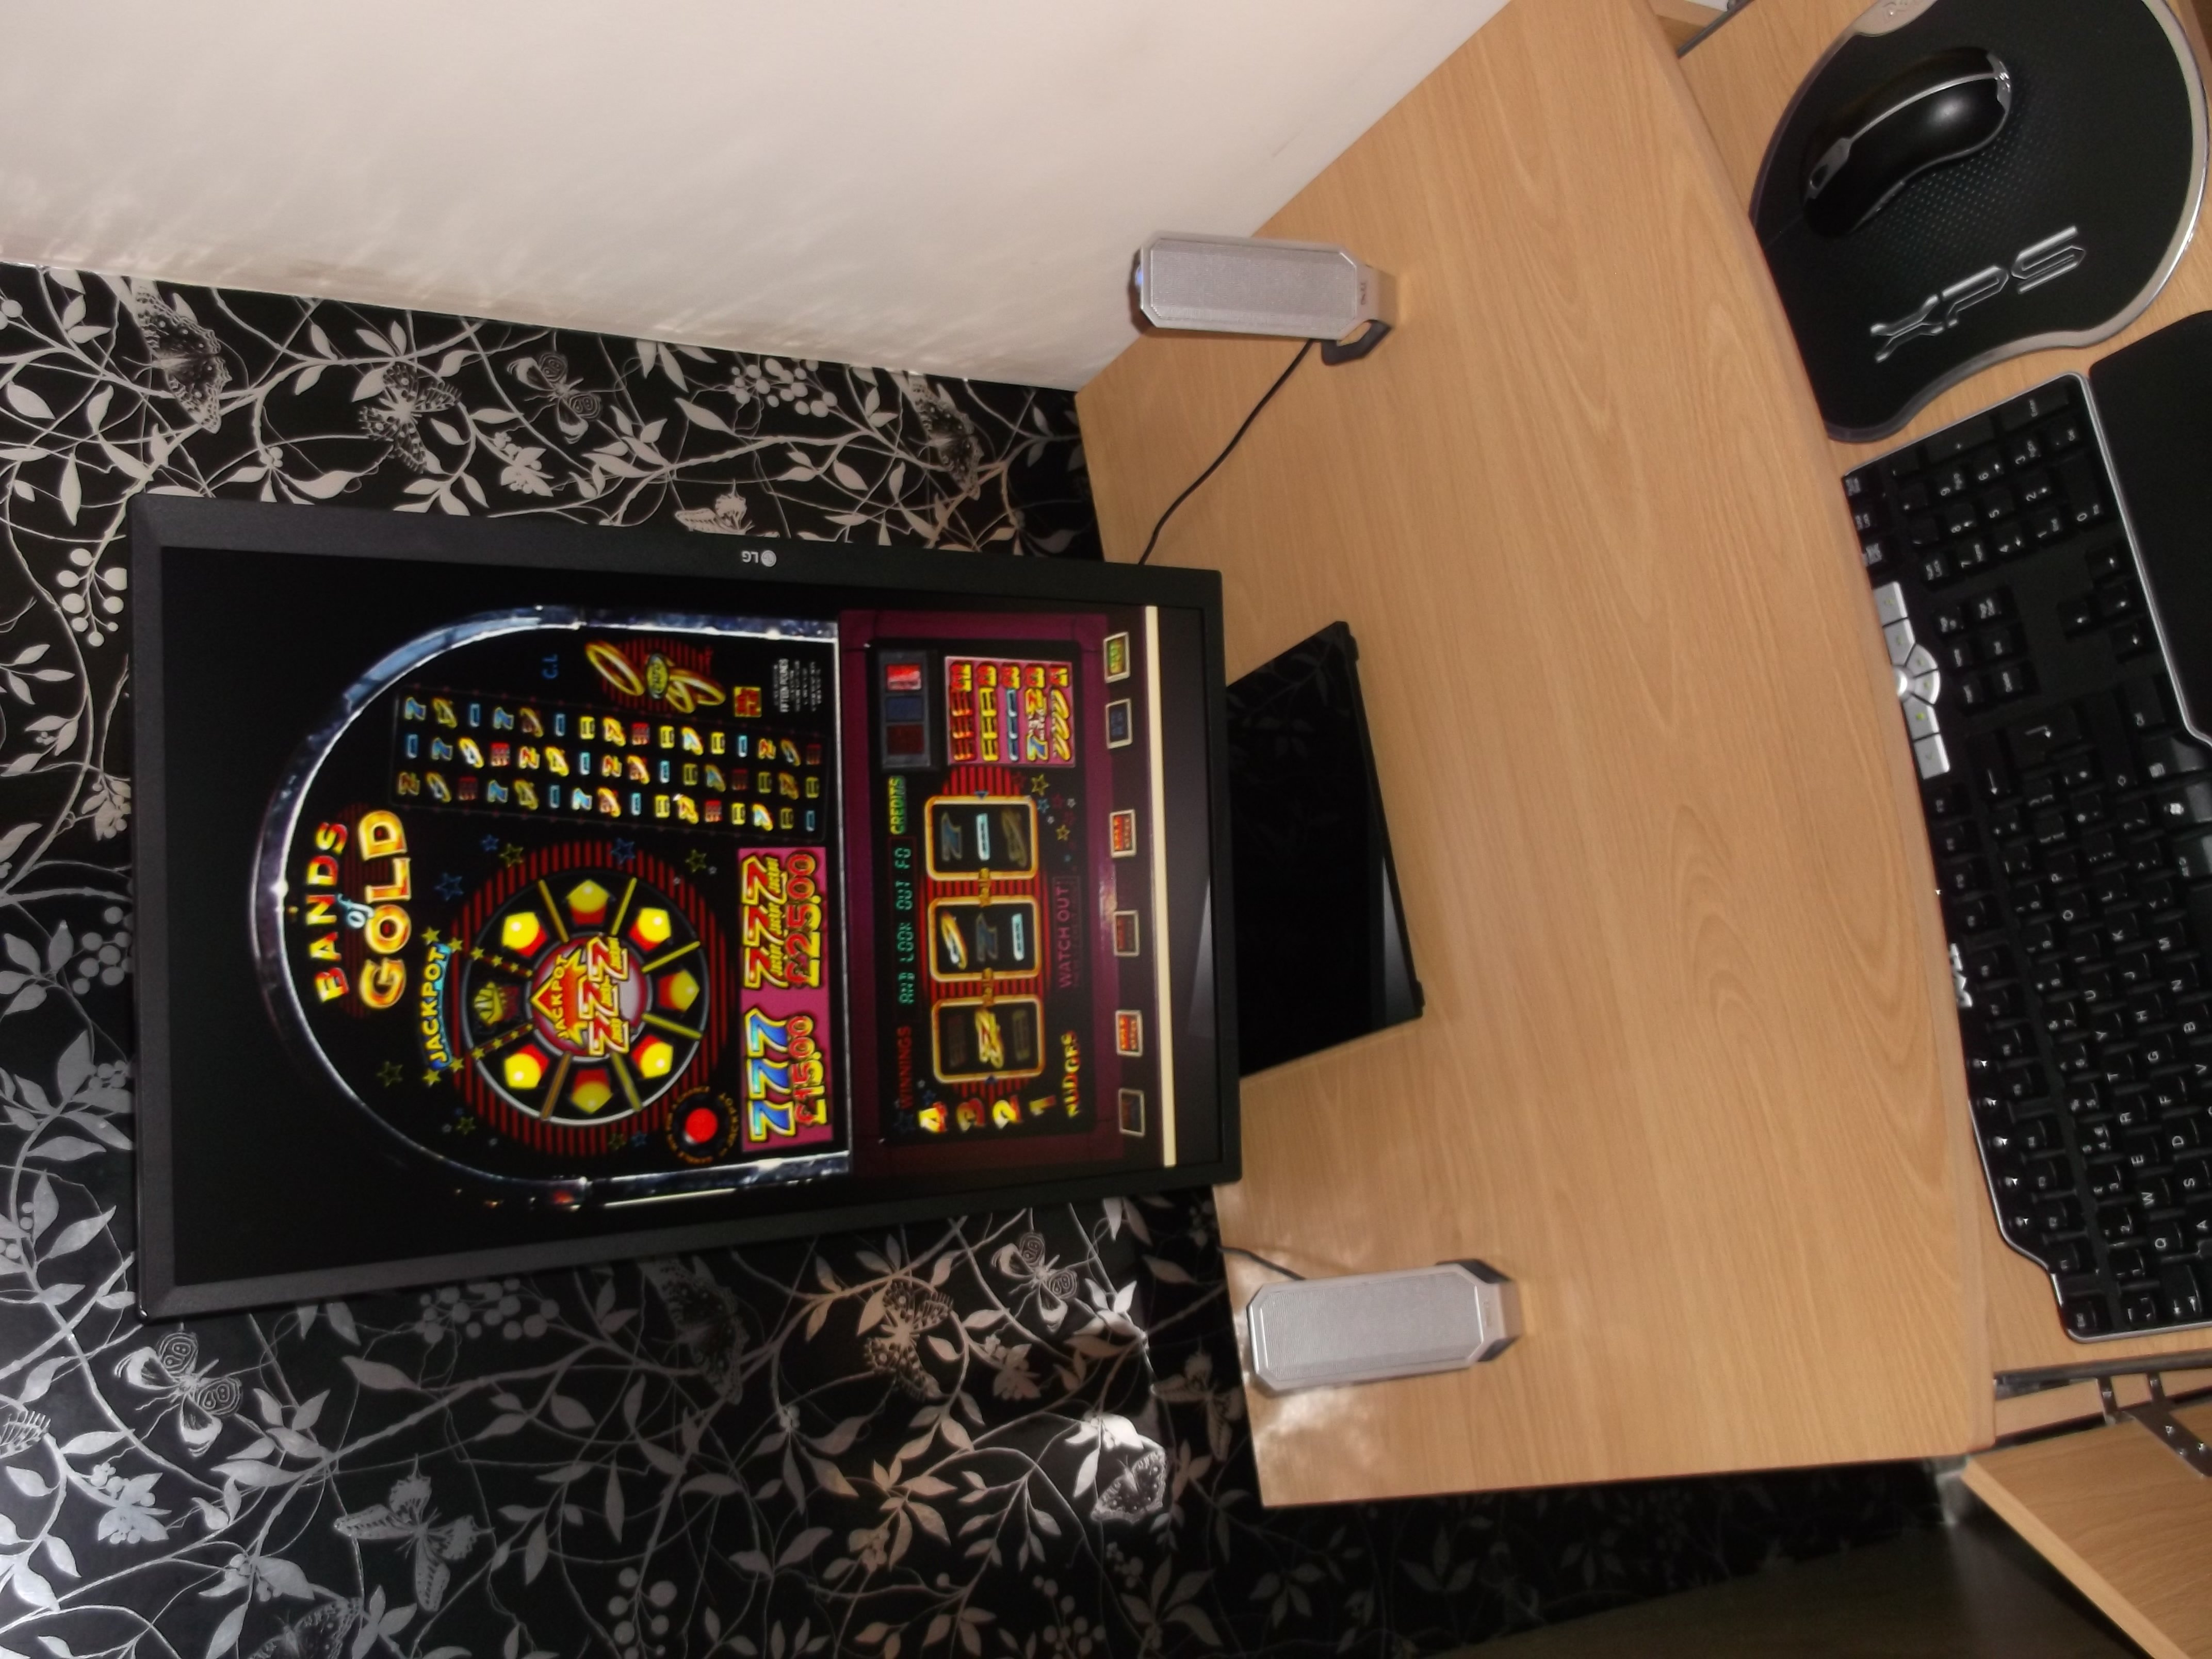
my computer setup where the keyboard will live,
a cardboard mock-up just to see how far apart holes will need to be and get a feel of what it could look like,
my keyboard design idea
I could'nt believe how small the PacDrive was... it's diddy! It looks way bigger in picture i've seen in other peoples posts!
... and that little triangle button looks so cute!

Hopefully all will go well and i won't blow up the PacDrive or I-Pac 2
Anyway... Wish me luck!
Cheers all
Gary.


-
3
-
-


.png.33a3e3ee10afb5aad002413bee535c08.png)
(2).png.be42bc68b522ed3674e57081b1022fd8.png)
.png.aafc451025d7066e533cd19d361200d8.png)


.png.5c2a76210c816727101172f62b3a580f.png)
(2).png.57c2e2ec62ba85371b2bbd19834fe69b.png)


.jpg.bc872bf11c3c444a69eae48e1431b597.jpg)
.jpg.bad4d3d275821b9f641e241d813d1491.jpg)
.jpg.c4af9923265959eb3c1e2a7f3f7e418a.jpg)


Humble beginnings - My MFME Keyboard - a work in progress...
in Cabinet Building
Posted
Legends with lollipops, no less!