

Amusements
-
Posts
1,841 -
Joined
-
Last visited
-
Days Won
18
Content Type
Profiles
Forums
Gallery
Downloads
Articles
Everything posted by Amusements
-
On my mini cabinet I have 2 similar mechs, (ASFIK that mech will only take one type of coin after programming) and a cheap 12v power supply, that one on Amazon is more than you need, and expensive. I used an old satellite box power supply. Maybe shop around. From the mech you will need a relay . I use 6 x 5/12v relays with low and high triggers which I got for a couple of quid each online from China. 2 for 2 mechs that use the 12v power supply also powering my mechs. These send a 9 and 0 key press through the Ipac to MFME. 2 for my hopper motors. Signal come from the Pacdrive upon payout, and this closes the circuit that then sends power to my hoppers. 2 for my hoppers coin output sensor (These send a [ & ] key press through the Ipac to MFME) and stop the power to the hopper motors. Get a Pacdrive and an Ipac with the correct settings. Don't spend your time on USB controllers, you will just get a headache, and may not be able to drive the hoppers. On the last build I did, I used the following mechs and hopper. https://www.lazada.co.th/-i226392941-s346113649.html 2x mechs https://www.lazada.co.th/products/6-hole-hopper-big-i128910856-s136425165.html 1x hopper
-
Version 1.0.0
87 downloads
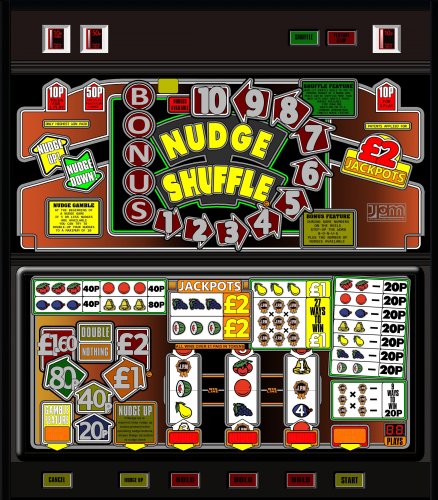
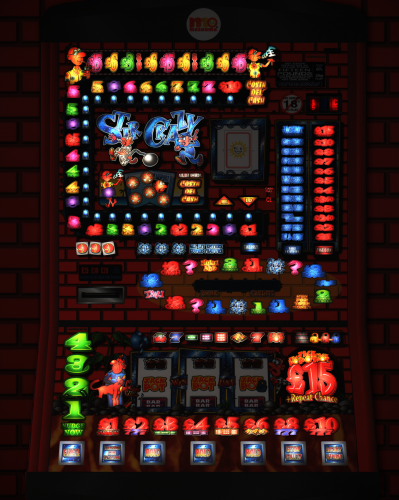
Hi Guys. Welcome to my second layout. Since I found out that this game was in fact a System 80 game in an SRU cabinet (thanks Ploggy), and that Dad (dadsfme.co.uk) had the roms I thought I would put my house moving/waiting around time to good use. Unfortunately there was practically no artwork for this when I started, so I redrew everything from scratch, using an old flyer Ploggy posted, and endlessly watching 3 low res videos on youtube. Anyway after about 60-70 hours of clicking away, and learning new techniques, I came up with something resembling the original game. Thanks go to Tommy c for providing some additional pics, Vectra666 for his input, Dad who has been testing the layout, and giving feedback, and of course Wizard who has made this all possible:) Have fun......Amusements- 5 comments
-
- 7
-

-

-

-
- nudge shuffle
- sys80
- (and 1 more)
-
 Looks awesome! Cant wait to give it a spin or two.
 -
 Looking forward to playing this, as I have never played the club version before. Thanks Reg:)
 -
Version 1.3.0
142 downloads
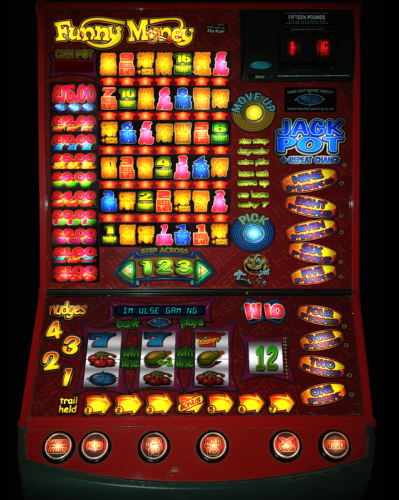
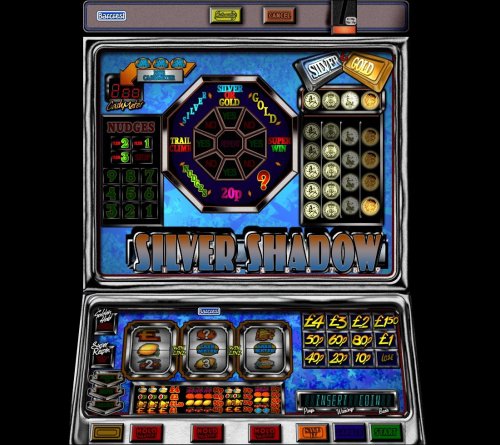
One of JPM's Best ever fruit machines. This is mostly hand drawn using an old photo for reference, so the resolution is as high as possible. -
Well after waiting 3 weeks for my Perspex to arrive.... It got cancelled. Plan B was to visit a recycling center and re purpose some old shop display bits.
-
A peek inside.
-
Quick demo for you. I am just waiting for a piece of Perspex to arrive, so I can build a light box to put on the front instead of the gold plastic on there at the moment.
-
 Looks nice. Thanks
 -
Fixed the opto board this morning, and made a slide that is the right angle to let gravity do its part, then sanded it to fit flush against my front panel, and it has worked flawlessly all day:) Despite being almost upside down, and using small coins. I can finally play 2p machines, and old clubbers that pay out from both hoppers. The final stage is the put a cover over the payout holes, and find some thin screws to make the relays permanent, and maybe put a tower light on top.
-
The hopper set up works in 2 parts. The way mine works is: (My hopper is 220v AC) Output 16 on my Pacdrive goes to the signal input on a 5v relay, along with a +/- 5v tapped from the usb powering the PacDrive. The mains lead that goes to the hopper has one wire cut, and is routed through the output of the relay. The hopper then turns on when it is triggered by MFME and stops when part 2 kicks in. Part 2 uses the I-Pac to generate a [ symbol. (This tells the Pacdrive a coin has been paid x1) The way mine is set up: A coin passes through an optical sensor on the hopper (powered by 5v again), and sends a signal to another relay, and this time the output connects Gnd and 1Right together on the I-Pac which is set up via ultimarcs software to generate a [ symbol. Something I learned about my cheap Chinese hopper. The optical sensor came in the unblocked position which was bad for my relay. You can unscrew it, and move it to a 2nd (blocked position).
-
Update So I ordered a 2nd hopper off a (Drop shipper/seller) on Lazada despite getting no answer to my question about coin option + 7 other sellers asked the same question). It arrived badly packed, and came with bent pins ect, and I could not fit it due to it being 110v. Ordered a 220/110v converter and it arrived 2 days ago, so I spent today (Sunday) fitting the hopper. Unfortunately I can't get the optical sensor to respond, despite fixing back the wires, and re soldering the LED with snapped leg, but fitted anyway, and will order some sort of optical sensor on Monday if I cant fix the opto board. At the moment the hopper spins round ok under PacDrive Triac command and pays coins out, but is too 'short pulsed' to be effective, so that is a good sign, as the hopper is effectively fitted upside down, and should work perfectly when it has an optical sensor fitted to the output.
-
By marking the surface out with pencil, using a very sharp pointy object to put an indentation in the middle of each button X, and using one of them flat metal bladed hole cutters in the drill. They have a point that sits in the indentation. I slowly drilled a hole out that was several mm smaller than the hole required, because the heat generated by the blade creates a burr, and melts the plastic around the edge (drill from the top side down). I then cut off the burr with a sharp blade, and used a Dremel with sandpaper drum attachment, to get the hole a perfect size for each button.
-
Indeed it is all separate. The main purpose of this set up is so that you can sit on your sofa, put the buttons on your lap, and play on a big screen. Last night I was playing Nudge Double up Deluxe on one side of the sofa, and my friend was putting money in, and collecting the winnings on the other side of the sofa, whilst watching it all on a big 4K TV. Space has been left inside the cabinet to add a small hopper (on order) for some of the older games that pay out 2 different coins, like 2p games and old clubbers.
-
Hi Guys First of all I would like to give a huge thanks to Wizard for making this project possible, with the awesome and selfless work he has done on MFME and all the layout creators. THANK-YOU!!!! After months of planning, buying, prototyping, testing and building I have finally finished my Mini slot Cabinet that plugs in to my Slot Button Console via Lan cable and in to my PC with a USB.
-
Finally! My new buttons arrived. (After 2 cancelations and 1 theft) Just waiting for some opto sensors and relays to do the coin/hopper combo I am making...Almost there now:)
-
Well my buttons got cancelled twice, and after re-ordering via ebay, only half of them turned up, so I have done an 8 button version for now until I re-order buttons from elsewhere. Works perfectly though:) It looks even better when you resize the layouts to hide the buttons. Next step is getting a hopper to work. I just ordered this one https://shopee.co.th/220V-6-holes-coin-token-hopper-for-coin-changer-machine-vending-machine-game-machine-i.45695614.760333891
-
Mine were Rainbow Invaders (the one where you got a bonus for getting the bottom row last), Donkey Kong (sit down), Tempest, Defender (even though I was crap at it), Frogger (sit down), Pleiads, and then I discovered JPM!
-
I am definitely in the C64 camp. We used to play Daley Thompsons Decathlon to death https://en.wikipedia.org/wiki/Daley_Thompson's_Decathlon I also had this 2 player game with moving lines on about 4 or 5 levels, and you had to collect things without falling down the gaps. I wish I could remember what it was called? But it was the best 2 player game ever! My mum wanted a C64, so she sent my stepdad out to go and buy one..The idiot came back with a Vic 20..... He never lived that down.
-
Thanks for the reply uptown47, and thanks for the original thread Reg. I have now ordered the Pacdrive to go with some buttons from Lazada. This project will come in at 60 Quid, thanks to horrible postage charges, but will be well worth it:)
-
Hi Guys. Interesting thread. I recently hacked a USB numerical keypad, and made a set of buttons in a 26.5cm box that you can put on your knee, so I could work out the best layout configuration ect. Everything turned out pretty good, and the whole project cost under a tenner to make. So my next project is to do a version with buttons that light up using the Pac Drive. However I am not sure which one to order, because on Reg's PDF it says the Pac Drive is (ID#1 SP) and when I try to order, I can only click ID#1 or SP. Do I have to contact ultimarc and make a special order? Or am I being confused?
-
Nice job! I have just recently finished building a "button only" version, that sits on your knee, and my next step is to build a version with flashing buttons, so I found this thread interesting. BTW..I assume that by now, you have edited the layouts? IE resize them so the buttons don't show on screen?
-
 Nice job
 -
 Thanks
 -
 Thanks.